")
In this tutorial, I'll walk you through how to test the fuel injector resistance on your 2000–2001 V6 Dodge Ram pickup using a multimeter —a test that'll tell you if one has failed internally and stopped delivering fuel.
This is by far the fastest and simplest way to check if a fuel injector has an internal short or open-circuit that's keeping it from firing —and causing a misfire in the cylinder it feeds.
Contents of this tutorial:
APPLIES TO: This tutorial applies to the following vehicles:
- 3.9L V6 Dodge Ram 1500 Pickup: 2000, 2001.
- 3.9L V6 Dodge Ram 2500 Pickup: 2000, 2001.
WIRING DIAGRAMS:
- Fuel Injector Wiring Diagram (1998-2000 3.9L V6 Dodge Ram Pickup).
- Fuel Injector Wiring Diagram (2001 3.9L V6 Dodge Ram Pickup).
Symptoms Of A Bad Fuel Injector
Each cylinder in your V6 Dodge Ram needs three essentials to run and make power:
- Air (compression).
- Fuel.
- Spark.
If even one of those is missing, that cylinder's out of the game. When a fuel injector stops delivering fuel for any reason, here's what you'll notice:
- Rough idle: The engine shakes when you're stopped.
- Misfiring: You'll feel hesitation or jerking when you step on the gas.
- Misfire codes (DTCs): You'll see one or more of the following:
- P0300: Random Cylinder Misfire Detected.
- P0301: Misfire Cylinder #1.
- P0302: Misfire Cylinder #2.
- P0303: Misfire Cylinder #3.
- P0304: Misfire Cylinder #4.
- P0305: Misfire Cylinder #5.
- P0306: Misfire Cylinder #6.
- Loss of power: The truck feels sluggish or slow when you accelerate.
- Bad gas mileage: You'll find yourself filling up more often than usual.
So what causes a fuel injector to quit? Most of the time, it's just old age. Here are a few common ways they fail:
- Internal failure: The injector's internal winding goes bad and it completely stops working.
- Clogging: It still sprays fuel, but not enough or it doesn't atomize it correctly and the cylinder misfires.
- Electrical or computer issue: A problem with the wiring or the fuel injection computer causes the injector to stay open and dump fuel nonstop.
In this guide, we're focusing on injectors that are electrically fried internally and won't spray. But, I'm also gonna explain a sure-fire diagnostic strategy to pin-point a clogged fuel injector.
Where To Buy The Fuel Injector And Save


Disclosure: As an Amazon Associate, I earn from qualifying purchases. If my tutorials help you, using these links is an easy way to support the site at no extra cost to you. Thank you!
Not sure if the above fuel injector fits your particular Dodge Ram pickup? Don't worry, once you get to the site, they'll make sure it fits by asking you the particulars of your vehicle. If it doesn't fit, they'll find you the right one.
Fuel Injector Resistance Specifications
| Year | Engine | Resist. |
|---|---|---|
| 2000-2001 | 3.9L | 10.8-13.2 Ohms |
NOTE: All resistances at: 68°F/20°C
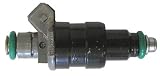
TEST 1: Fuel Injector Resistance Test
")
")
In the steps below, I'll be walking you through testing all six fuel injectors. Why all six? Because they're super easy to access with your multimeter leads —and testing them all gives you a solid base-line to spot a bad one by comparison.
That said, you don't have to test every single injector if you'd rather not. But if you're only checking one, I still recommend testing at least two more. Having a couple of known-good readings will make it easier to tell if something's off.
NOTE: Don't have a multimeter or need to upgrade yours? This is the one I use and recommend: Tekpower TP8268 AC/DC Auto/Manual Range Digital Multimeter (at: amazon.com).
IMPORTANT: You'll want to test injector resistance when the engine is cold —room temperature (or whatever ambient temp is around you) is perfect. If the engine's been running, give it time to cool off completely before starting.
Alright, let's get it done:
- 1
Unplug the fuel injector from its harness connector.
- 2
Set your multimeter to its Ohms (Ω) setting.
- 3
Touch the meter leads to the injector's two electrical terminals.
What you're looking for is a reading that falls within spec: Fuel Injector Resistance Specifications. - 4
Write down the resistance value you get.
Make sure to label it by cylinder number —use the the diagram in image 2 of 2 above to identifying them. - 5
Repeat the test on the other 5 injectors.
Record each result and match it with the corresponding cylinder.
Here's how to read your results:
CASE 1: All six injectors show readings within the correct range. That tells you there are no electrical shorts or open-circuits inside any of the injectors.
However, good resistance doesn't always mean the injector isn't clogged. For more on that, go to: Fuel Injector Diagnostic Strategy.
CASE 2: One or more injectors show a reading way outside the expected range. Test that injector again to rule out a bad test connection.
If the reading still doesn't match the spec, then that injector has failed. Time to replace it.
Fuel Injector Diagnostic Strategy
In this section, I'll walk you through the quickest method I use to pinpoint which fuel injector might be causing trouble. It's all about testing the most common failure points that lead to a cylinder misfire —including the injector itself.
This step-by-step approach will help you figure out if your Dodge Ram pickup's rough idle or misfire is being caused by a bad injector or something else entirely. And the best part? You don't need any expensive diagnostic tools to get it done.
1.) CHECK THE FUEL INJECTOR SPRAY:
I start by pulling the injector and hooking it up to a DIY injector cleaner tool to watch the spray pattern directly.
This test gives me an instant answer —if the injector's clogged or faulty, I'll see it right away. I've put together a full step-by-step guide you can follow here:
2.) USE THE PROCESS OF ELIMINATION:
Here's the "process of elimination" method I use to track down which fuel injector might be the problem:
- Step 1: Find out which cylinder isn't firing.
- This is the most critical step. If you've got a scan tool or basic code reader, check for misfire codes —they'll usually tell you exactly which cylinder is down.
- If you don't have any codes or a scanner, you can do a manual cylinder balance test. That's my go-to move when I'm chasing a misfire without scan tool help.
- Step 2: Confirm the cylinder's getting spark.
- Use a spark tester on the spark plug wire going to the misfiring cylinder. Crank the engine and watch for spark. If it's there, the ignition system's working. If not —there's your problem.
- Also check for oil in the plug boot or on the spark plug itself —that can stop spark in its tracks.
- While you're at it, pull the plug and inspect the porcelain for cracks or carbon tracking.
- Here's a great real-world example: Carbon Tracks Are A Common Cause Of Ignition Misfires (from easyautodiagnostics.com).
- Need help testing the ignition system? This tutorial will help you test the spark plug wires and distributor cap:
- Step 3: If spark is good, test compression.
- Compression is often overlooked, but low compression can absolutely knock out a cylinder. Here's how to check it:
- Step 4: Use a Noid light to check for injector pulse.
- If compression and spark both look good, make sure the injector is actually getting its signal from the PCM.
- This quick guide will walk you through using a Noid light:
- How To Use A Noid Light And Where To Buy It (via easyautodiagnostics.com).
- Step 5: If all that checks out, swap the injector.
- If you've confirmed the cylinder has:
- Good spark.
- Solid compression.
- Injector resistance within spec and a proper pulse signal.
- NOTE: Don't forget to replace the O-rings when swapping injectors. See: Tech Tip: Always Replace Injector O-Rings.
- If you've confirmed the cylinder has:
- Step 6: Check the injector spray pattern.
- This one involves removing the injector and using a test tool to observe the spray pattern. You can learn more about how that works here:
As you've probably noticed, this is a process of elimination. You test one system —if it checks out, you move on to the next.
Working through these steps one by one is the smartest way to rule out ignition or mechanical issues before pointing the finger at a bad injector. It also keeps you from wasting money on parts that won't fix the problem.
And trust me —this method has saved me more than once from replacing perfectly good injectors. It helped me zero in on the actual cause of the misfire instead of just guessing.
Tech Tip: Always Replace Injector O-Rings
Any time you remove a fuel injector —whether you're swapping it for testing or putting in a new one— there's one rule you can't ignore: Don't reuse the old O-rings.
Here's why that matters: those tiny O-rings create the seal between the injector and the fuel rail. Once you pull the injector, the O-rings can get stretched, pinched, or slightly damaged —even if they look fine at first glance.
It might be tempting to reuse them, but it's not worth the gamble. A torn or worn O-ring can lead to a fuel leak —and fuel near heat or sparks under the hood? That's a serious fire risk.
Here's the right way to handle it:
- Use brand-new O-rings that are an exact match for your injector and engine setup.
- Apply a light coat of clean engine oil to the new O-rings before installing the injector. This helps them slide in smoothly and keeps them from tearing or getting pinched.
It only takes a few extra minutes, but it can save you from a serious problem —like a fuel leak that could lead to engine damage or even a fire.
More 3.9L V6 Dodge Ram Pickup Tutorials
You can find a complete list of diagnostic tutorials for the full-size Dodge Ram pickups in this index:
Here's a sample of the tutorials you'll find in the index:
- How To Test The TPS (1997-2001 3.9L V6 Dodge Ram Pickup).
- How To Test The Fuel Pump (1992-2001 3.9L V6 Dodge Ram Pickup).
- How To Test The Intake Air Temp (IAT) Sensor (1998-2001 3.9L V6 Dodge Ram Pickup).
- How To Test The Camshaft Position Sensor (1998-2001 3.9L V6 Dodge Ram Pickup).

If this info saved the day, buy me a beer!
