The intake air temperature (IAT) sensor is a thermistor —a type of resistor whose electrical resistance changes with temperature.
It's job is to detect and report the temperature of the air flowing through the intake manifold and it's a super easy sensor to check.
In this tutorial, I'll walk you through the IAT sensor test (using a multimeter) so you can figure out if it's working as it should or if it's toast.
NOTE: The intake air temp (IAT) sensor is also known as the air charge temp (ACT) sensor.
Contents of this tutorial:
- Symptoms Of A Bad Intake Air Temperature (IAT) Sensor.
- What Does The Intake Air Temperature (IAT) Sensor Do?
- Common Intake Air Temperature (IAT) Sensor Problems.
- Initial Checks Before Starting The IAT Sensor Tests.
- Where To Buy The IAT Sensor And Connector.
- Checking Temperature To Resistance Value Relationship.
- More 5.2L, 5.9L Dodge Ram Pickup Tutorials.
APPLIES TO: This tutorial applies to the following vehicles:
- Dodge Ram 150 Pickup 5.2L V8: 1992, 1993.
- Dodge Ram 250 Pickup 5.2L V8: 1992, 1993.
- Dodge Ram 150 Pickup 5.9L V8: 1992, 1993.
- Dodge Ram 250 Pickup 5.9L V8: 1992, 1993.
- Dodge Ram 350 Pickup 5.9L V8: 1992, 1993.
- Dodge Ram 1500 Pickup 5.2L V8: 1994, 1995, 1996, 1997.
- Dodge Ram 2500 Pickup 5.2L V8: 1994, 1995, 1996.
- Dodge Ram 1500 Pickup 5.9L V8: 1994, 1995, 1996.
- Dodge Ram 2500 Pickup 5.9L V8: 1994, 1995, 1996.
- Dodge Ram 3500 Pickup 5.9L V8: 1994, 1995, 1996.
Symptoms Of A Bad Intake Air Temperature (IAT) Sensor
Your V8 Dodge Ram pickup is equipped with a speed-density fuel injection system. In this type of system, the fuel injection computer relies on three key inputs to estimate the amount of air entering the engine and deliver the right amount of fuel accordingly:
- Engine RPM input provided by the crankshaft position (CKP) sensor.
- Intake manifold vacuum pressure provided by the manifold absolute pressure (MAP) sensor.
- Incoming air temperature from the intake air temperature (IAT) sensor.
Because the IAT sensor provides critical data for fuel delivery, when the it fails, you'll have an IAT sensor trouble code registered in the PCM's memory and the check engine light (CEL) illuminated. You'll see:
- OBD-I (1993-1995):
- Code 24: Charge Air Temp Sensor Voltage High Or Low.
- OBD-II (1996-1997):
- P0112: Intake Air Temperature (IAT) Sensor Voltage Low.
- P0113: Intake Air Temperature (IAT) Sensor Voltage High.
Besides an IAT sensor trouble code, it's failure can lead to a variety of issues, including:
- Hard start: In cold or hot weather, the engine may take longer to start due to incorrect air/fuel mixture.
- Decreased engine power: You'll notice reduced acceleration or sluggish performance.
- Rough idle: The engine may run unevenly or shake while idling.
- Engine stalls: The engine may suddenly shut off, especially at idle or low speeds.
- Engine no-start: In some cases, the engine may not start at all.
- Bad gas mileage: The PCM injects more fuel than necessary, leading to bad gas mileage.
What Does The Intake Air Temperature (IAT) Sensor Do?
The intake air temperature (IAT) sensor detects the temperature of the air entering the engine and relays that information to the fuel injection computer.
As a thermistor, the IAT sensor's resistance varies with temperature. It receives a 5-Volt reference signal from the fuel injection computer, and depending on the sensor's resistance, a voltage drop occurs.
The computer monitors this voltage drop and, using pre-set calibration data, calculates the current air temperature.
Getting accurate readings from the IAT sensor is crucial for correct fuel delivery, optimal ignition timing, and smooth engine operation.
Common Intake Air Temperature (IAT) Sensor Problems
Several common issues can lead to the failure of an IAT sensor.
- Old age: Like many car parts, the sensor can wear out over time and stop working.
- Internal open-circuit: The sensor suffers a break in its internal electrical circuit, preventing it from functioning properly.
- Internal short-circuit: An internal fault causes the sensor to short out, leading to incorrect readings or failure.
- Wire insulation damage: The protective coating on the sensor wires is damaged or dry-rotted, allowing the wires to touch and short together.
- Connector damage: The locking clip on the sensor's connector is broken (this usually happens when unplugging the sensor). This can cause an intermittent electrical connection with the PCM.
When any of these issues occur, the sensor sends inaccurate data to the powertrain control module (PCM), which can lead to noticeable engine performance issues and trigger diagnostic trouble codes (DTCs).
Initial Checks Before Starting The IAT Sensor Tests
Before you start testing the IAT sensor, take a moment to do these quick visual checks:
- Inspect the sensor's wiring for visible damage, such as frayed or cut wires.
- Look over the connector for any signs of damage, especially a broken locking tab.
- Check the sensor itself for any damage, especially since it's top part is made of plastic and can break off from its metal base.
Fraying occurs when the insulation around the wires wears off, exposing the metal strands inside. This is a frequent problem with IAT sensor wiring.
Exposed wires can eventually short out, leading to faulty temperature readings and activating the check engine light.
Here's an example that shows what this problem can look like:
- IAT Sensor Wire Insulation Problem And Wires Shorted Together (from: easyautodiagnostics.com).
There are two ways to address this kind of issue:
- If the fraying is extensive or located close to the connector, the best option is to replace the entire connector assembly.
- If the damage is minor and further away from the connector, wrapping the affected area with electrical tape can serve as a temporary fix.
NOTE: Electrical tape should only be considered a short-term solution. For long-lasting reliability, it's best to replace any damaged parts of the connector or wiring.
Where To Buy The IAT Sensor And Connector
Disclosure: As an Amazon Associate, I earn from qualifying purchases. If my tutorials help you, using these links is an easy way to support the site at no extra cost to you. Thank you!
Checking Temperature To Resistance Value Relationship
As previously mentioned, the IAT sensor's resistance shifts as the air temperature (in the intake manifold) changes. Each resistance reading directly corresponds to a specific air temperature.
A properly working IAT sensor will show a temperature reading that's within 10 degrees (plus or minus) of the actual ambient temperature in your area.
If the sensor is faulty, you'll typically get one of the following results when testing it with a multimeter:
- Open-circuit issue: The multimeter will show "OL" (infinite resistance), indicating no continuity.
- Short-circuit issue: The multimeter will display "0 Ohms", showing that the circuit is completely shorted.
IMPORTANT: For this resistance-to-temperature test to be accurate, the sensor must be completely cold. If the engine has been running and the sensor is still warm or hot, wait for it to fully cool down before you begin.
OK, let's begin:
- 1
Check the current ambient temperature in your area.
Use your smartphone's weather app or a wall-mounted thermometer to get the most accurate reading. - 2
Find the IAT sensor and unplug it from its wiring harness.
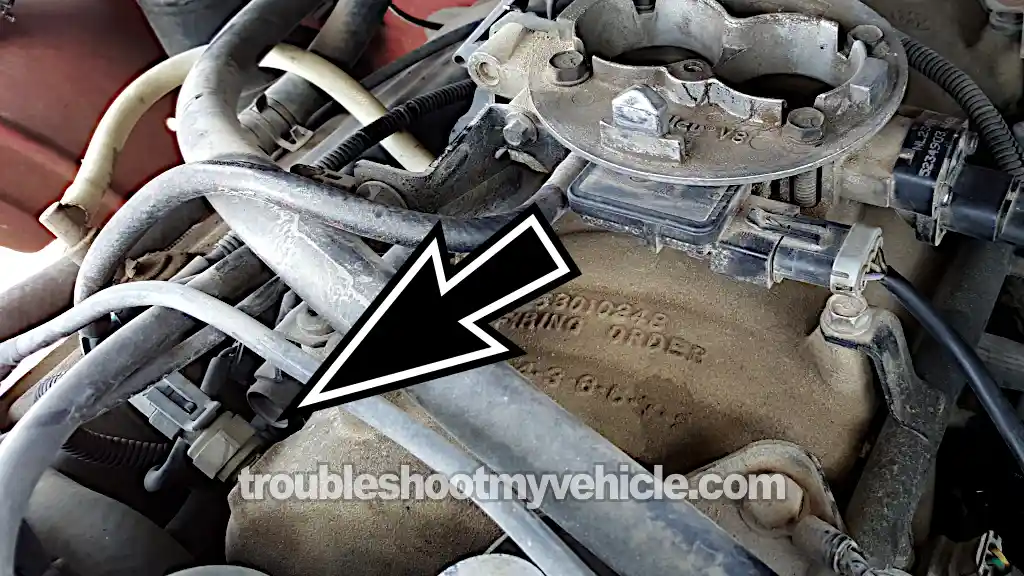
LOCATION: The IAT sensor is located towards the front of the intake manifold, on the passenger side of the engine. See photo 4 in the image viewer above. - 3
OPTIONAL: Carefully remove the sensor from the its mounting location on the intake manifold.
NOTE: The IAT sensor, can be tested while in its place on the intake manifold. If it's more convenient to test it removed, please do so. - 4
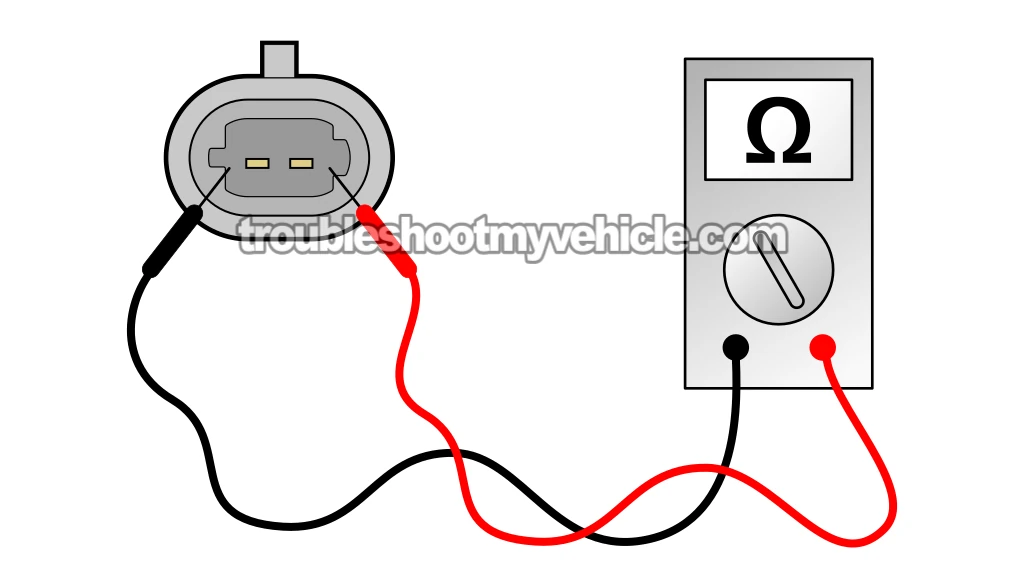
Set your multimeter to its Ohms (Ω) setting.
- 5
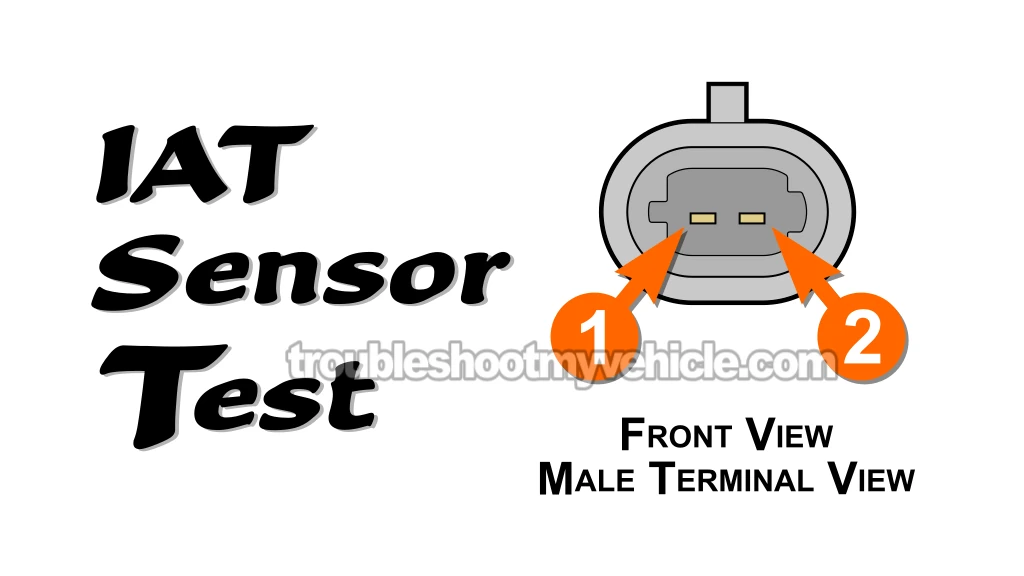
Measure the sensor's resistance by placing the multimeter leads on the sensor's male terminals.
- 6
Record the resistance value shown on the multimeter.
- 7
Compare the recorded resistance to the values listed on the Temperature-To-Resistance Chart (see the charts in the image viewer above).
The sensor's resistance should be within the acceptable range for your current temperature (± 10°F).
Let's interpret your results:
CASE 1: The resistance does NOT fall within the expected range for the current ambient temperature. This indicates that the IAT sensor is faulty and should be replaced.
CASE 2: The resistance is within the proper range for the current temperature. In this case, the IAT sensor is working correctly.
More 5.2L, 5.9L Dodge Ram Pickup Tutorials
You can find a complete list of tutorials for the 5.2L/5.9L V8 Dodge Ram Pickup in this index:
Here's a sample of the tutorials you'll find in the index:
- How To Test The Fuel Pump (1992-2003 5.2L, 5.9L Dodge Ram Pickup).
- How To Test The TPS (1992-1996 5.2L, 5.9L V8 Dodge Ram Pickup).
- How To Test The MAP Sensor (1992-1996 5.2L, 5.9L V8 Dodge Ram Pickup).
- Troubleshooting A Blown Head Gasket (1989-2003 5.2L, 5.9L V8 Dodge Ram Pickup).

If this info saved the day, buy me a beer!


