")
In this tutorial, I'm going to show you how you can test the crankshaft position (CKP sensor on your 2001-2009 3.0L V6 Ford Escape (2001-2006 3.0L V6 Mazda Tribute).
Although you do have to lift the vehicle off the Ground to access the CKP sensor, it's not that difficult a test. Not only that, it can be checked with a multimeter.
Now, if you're leaning more towards just replacing the sensor outright, no problem. I'm going to give you a couple of pointers that'll help you avoid some common hassles.
Contents of this tutorial:
APPLIES TO: This tutorial applies to the following vehicles:
- 3.0L Ford Escape: 2001, 2002, 2003, 2004, 2005, 2006, 2007, 2008, 2009.
- 3.0L Mercury Mariner: 2005, 2006, 2007, 2008, 2009.
- 3.0L Mazda Tribute: 2001, 2002, 2003, 2004, 2005, 2006.
Symptoms Of A Bad CKP Sensor
When the crankshaft position (CKP) sensor fails on the 2001–2009 3.0L V6 Ford Escape, you'll see one or more of the following issues:
- Engine cranks but does not start —if the engine runs, even for a few seconds, the CKP sensor is doing its job. A no-start is the big clue it's failed.
- No fuel injector pulse —the PCM won't activate the fuel injectors without a CKP signal.
- No spark from any ignition coil —none of the coils will fire when the CKP signal is missing.
- No ignition coil trigger —the coils won't even get their activation signal without input from the CKP sensor (this ties in directly with the "no spark" symptom).
- Stored trouble code —the PCM may set a CKP-related diagnostic trouble code (DTC):
- P0320: Ignition Engine Speed Input Circuit Malfunction.
- P1336: CKP And/OR CMP Input Signal To PCM Concerns.
- Intermittent stalling (sometimes) —if the CKP sensor is failing off and on, the engine may suddenly stall while driving and then restart once the sensor starts working again.
Should I Replace The CKP Sensor Without Testing It?
A lot of folks will go straight to replacing the crankshaft position (CKP) sensor without testing it first. And honestly, there are a few reasons why this makes sense:
- The sensor is pretty easy to get to and not difficult to replace.
- The CKP sensor isn't expensive.
- They don't have the tools —like a multimeter— to test it properly.
- Even if replacing it doesn't solve the problem, it's part of their diagnostic process. They saved paying shop labor or a diagnostic fee, and now they know it's time to dig deeper.
If this is the route you want to take, no problem. Most of the time, when a CKP sensor code turns on the check engine light, it does turn out to be a bad sensor. So replacing it outright can make sense.
But here are two things I recommend you confirm first:
- Check spark on the three accessible ignition coils (cylinders 4, 5, and 6 —the ones facing the radiator). If the CKP sensor is bad, those coils won't be firing spark.
- Inspect the connector wires. Look closely at the spot where the wires enter the connector. If the insulation has fallen off and the wires are shorting together, you'll need to replace the connector too. See this section for more info: CKP Sensor Connector Wires (A Common Trouble Spot).
Confirming these two things gives you a much better chance that replacing the sensor will solve your engine no-start problem —or, if the sensor is failing off and on, that it'll clear up the intermittent issue.
Alright, whenever you're ready to swap it out, these two are from brands I've been using for years (Motorcraft is the factory original), and don't hesitate to recommend:
- Motorcraft DY1007 Engine Crankshaft Position Sensor (Amazon affiliate link).
- Delphi SS12196 Engine Crankshaft Position Sensor (Amazon affiliate link).
Now, with that said, I'm going to make the case for testing the sensor itself. After all, this tutorial is about how to test the CKP sensor with a multimeter. And here's why:
- Testing makes sure the sensor really is the problem.
- The test isn't hard —a regular multimeter is all you need.
- This tutorial will walk you through the test step by step.
So if you're ready to move forward with testing it first, keep reading —I'll show you how.
Checking The CKP Signal With A Multimeter
")
NOTE: When your Escape's CKP sensor fails, you'll get an engine no-spark no-start condition. So, if you're getting spark, even if in just ignition coil, the sensor is good and this test will not help you.
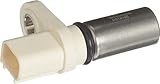
The crankshaft position (CKP) sensor on the 2001–2009 3.0L V6 Ford Escape (or Mazda Tribute) is a two-wire reluctor type sensor (it's located besides the crankshaft pulley).
That means it has two wires going to it, and because it's a reluctor type, it generates its own AC voltage signal.
The good news is we can check that signal easily with a multimeter, and that's exactly what this section is going to cover.
To tap into the CKP sensor's two wires, you'll need a wire-piercing probe for each one. If you don't have this tool, here's the one I use and recommend: Goupchn 4mm Banana to Banana Plug Test Leads Kit (Amazon affiliate link).
One last thing before we get started: make sure your Ford Escape's battery is fully charged. A weak battery will drop the cranking RPM, and that can affect the accuracy of the test. So if the battery is low, get it charged up before running the test.
CAUTION: To access to the crankshaft position sensor (to test it), you'll need to lift the right-front side of your Ford Escape. Once you've got it up with a jack, make sure to set it securely on jack stands. Don't ever rely on the jack by itself to keep your vehicle raised.
OK, let's get'er done:
- 1
Locate the fuel pump inertia switch and disconnect it from its two-wire connector.
NOTE: This is an important safety precaution that will keep the engine from starting accidentally while you perform the test. - 2
Disconnect the CKP sensor from its connector and peel back some of the wire loom or the black electrical tape covering the two CKP sensor wires.
NOTE: Check the condition of the tool wires, especially around the section where they enter the connector, to make sure that the insulation isn't damaged or peeling off and exposing the copper strands inside. See: CKP Sensor Connector Wires (A Common Trouble Spot) for more info. - 3
Hook one of your multimeter leads to one of the CKP sensor wires.
It doesn't matter which lead (red or black) you use, since polarity isn't important here.
NOTE: You'll need to use a wire-piercing probe to connect the test lead to the wire. - 4
Attach the other multimeter lead to the other CKP sensor wire.
- 5
Plug the connector back into the CKP sensor.
IMPORTANT: Keep your test leads and probes clear of the crank pulley and serpentine belt, because the engine will be cranking in the next step. - 6
Switch your multimeter to Volts AC mode.
- 7
With the engine not cranking, your multimeter should read 0 Volts AC.
- 8
Have a helper crank the engine while you watch the multimeter.
- 9
You should see the voltage fluctuate between about 0.5 and 1 Volt AC while the engine is cranking.
To be clear, the multimeter won't show a steady AC voltage. The reading will fluctuate between 0.5 and 1 Volt AC the whole time the engine is cranking —and only while it's cranking.
NOTE: Once you're done with the test and remove the wire-piercing probes, make sure to wrap the wires with black electrical tape. This seals off the tiny holes in the insulation and keeps moisture and corrosion out of the copper strands.
Alright, let's figure out what your test result means:
CASE 1: The multimeter showed the expected AC voltage while the engine was cranking. This tells you the CKP sensor is producing a proper signal and is in good working shape.
CASE 2: The multimeter DID NOT show the expected AC voltage while the engine was cranking. This points to a failed CKP sensor and explains the 'cranks but will not start' problem.
Whenever you're ready to replace the CKP sensor on your Ford Escape, these two are from brands I've been using for years (Motorcraft is the factory original), and don't hesitate to recommend:
- Motorcraft DY1007 Engine Crankshaft Position Sensor (Amazon affiliate link).
- Delphi SS12196 Engine Crankshaft Position Sensor (Amazon affiliate link).
According to Ford repair manual, the CKP sensor should generate more than 0.4 Volts AC. If it's not reaching that level, the next step is to measure the sensor's internal resistance, which should fall between 290 and 800 Ohms.
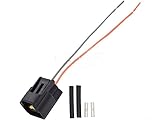
CKP Sensor Connector Wires (A Common Trouble Spot)
Because of where the crankshaft position (CKP) sensor sits, it usually ends up covered in engine oil. Leaks from the valve covers or other gaskets tend to coat the connector and harness right where the two wires go into the connector.
Over time, this oil doesn't just sit on those wires —it soaks in and starts breaking down their insulation. The result is that the plastic swells, softens, and eventually cracks or peels away completely. This is a very common issue on these engines.
Here's what you'll often find when you peel back the loom or tape:
- Swollen wires —the insulation looks puffed up or bubbled where it enters the connector.
- Cracked insulation —splits or breaks that expose the copper strands inside.
- Peeling insulation —the covering flakes off or is missing altogether, leaving bare wire.
If the insulation is compromised, those two CKP sensor wires can short together or to Ground. That will kill the sensor signal and make it look like a bad CKP sensor, when the real issue is the wiring itself.
So before you even hook up a multimeter, take a close look at the harness. If you see swollen insulation, cracks, or bare copper, you've found the problem.
Replacement connector part number: Walker Products 270-1077 Pigtail Connector and you can buy it here:
Disclosure: As an Amazon Associate, I earn from qualifying purchases. If my tutorials help you, using these links is an easy way to support the site at no extra cost to you. Thank you!
Where To Buy The CKP Sensor And Save
If you're ready to replace the CKP sensor on your Ford vehicle, I want to recommend the following sensors from known automotive brands I've been using forever and don't hesitate to recommend:

Disclosure: As an Amazon Associate, I earn from qualifying purchases. If my tutorials help you, using these links is an easy way to support the site at no extra cost to you. Thank you!
NOTE: Not sure if the CKP sensor fits your particular Ford Escape, Mercury Mariner, or Mazda Tribute? Don't worry, once you get to the site they'll make sure it fits by asking you the specifics of your particular Ford vehicle. If it doesn't fit, they'll find you the right CKP sensor.
More 3.0L V6 Ford Escape Diagnostic Tutorials
You can find a complete list of 3.0L V6 Ford Escape, Mercury Mariner, and Mazda Tribute diagnostic tutorials in this index:
Here's a sample of the diagnostic tutorials you'll find in the index:
- How To Test The MAF Sensor (2001-2007 Ford 3.0L V6 Ford Escape).
- How To Test Engine Compression (2001-2012 3.0L V6 Ford Escape).
- How To Test For A Blown Head Gasket (2001-2012 3.0L V6 Ford Escape).
- How To Test The Fuel Pump (2001-2004 3.0L Ford Escape).

If this info saved the day, buy me a beer!
