TEST 2: Exhaust Gases Escaping Through The Radiator

The second most common test, to see if the head gasket has blown or not, is to remove the radiator cap and then crank and/or start the car.
What this test will confirm is if the head gasket is letting engine compression into the cooling system (radiator) or not.
IMPORTANT: If the engine in your Stratus (or Neon, Caravan, Breeze, Avenger) has been running for a while and it's hot, let it cool down for about an hour, since a radiator cap should never be removed with the engine hot. Please take all necessary safety precautions.
If your 2.0L or 2.4L Dodge car or mini-van doesn't start, well this will not be an issue since the coolant will be cold.
Alright, this is what you need to do:
- 1
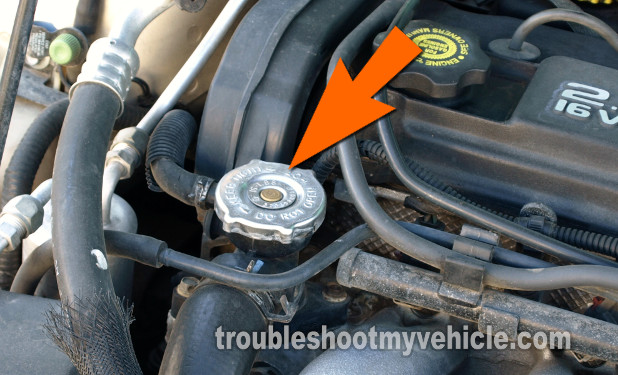
Remove the radiator's cap. If the radiator does not have any coolant, add some water (for this test, you can add just water and not anti-freeze).
- 2
Have a helper crank the engine while you observe the open radiator from a safe distance.
- 3
You'll see one of two things:
1.) The water or coolant inside the radiator will shoot up and out of the now open radiator.
2.) The coolant will not be disturbed. In other words, cranking the engine will have no effect on the level of the Water or coolant in the radiator.
OK, now that the testing part is done, let's take a look at what your results mean:
CASE 1: The coolant bubbled out or shot out from the radiator. This is not good and indicates beyond a shadow of a doubt that the head gasket is blown on your PT Cruiser (or Neon, Stratus, Cirrus, Sebring, etc.).
No further testing is required. Now, in case you're wondering why this is happening: Well, the head gasket's job is to seal both the coolant and engine oil and also the engine compression/combustion process happening inside each engine cylinder. When the head gasket gets blown, one of the most common after-effects is the engine compression/combustion gases escaping into the cooling system, since it's not sealing effectively anymore.
So, by removing the radiator cap and cranking and/or starting your car or mini-van, you can physically see if this is happening or not.
CASE 2: The coolant DID NOT bubble out NOR shoot out from the radiator. This is the correct and expected test result.
Most folks think that when the head gasket gets blown, it causes the engine oil to mix with the coolant and vice-versa. Also that engine compression/combustion gases shoot up and out the radiator but not always.
So far you've done 2 out of 4 tests, well I suggest one more. This one you'll find in the next page, TEST 3: Checking Engine Compression.
TEST 3: Checking Engine Compression

It does happen that a head gasket can get blown without causing the coolant to mix with the engine oil and without causing combustion gases from entering the cooling system. I have seen this enough to know that one more test has to be done.
In these cases, the head gasket will get burned between two cylinders, causing a gap that will let the compression/combustion of one cylinder to leak into the other and vice-versa (see the photo at the beginning of this tutorial). If this happens, in a 2.0L or 2.4L Chrysler equipped car or mini-van, the engine is not going to start.
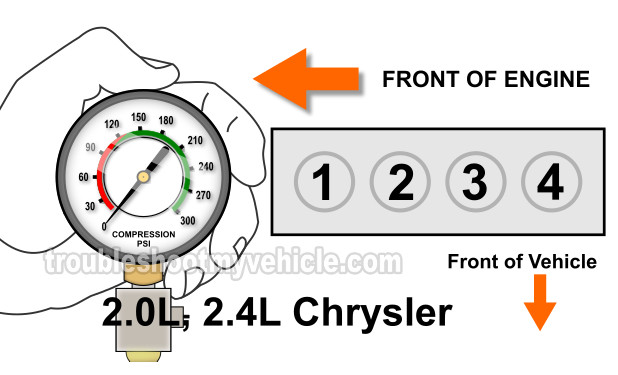
To be a bit more specific: If the head gasket has burned at a location between 2 cylinders, you are going to have 2 good compression readings and 2 compression readings that will be 0 PSI.
Here's a simple example of this:
- Cylinder #1 = 175 PSI
- Cylinder #2 = 165 PSI
- Cylinder #3 = 0 PSI
- Cylinder #4 = 0 PSI
As you can see from the above compression readings, cylinders #3 and #4 have 0 PSI readings. And this is a clear indication that the head gasket has burned at the point between them both.
Now, in your specific case (and if it applies), you may not see those exact same cylinders with 0 PSI readings. It may be #1 and #2 or it may be #2 and #3, the main idea is that whatever cylinders are affected, they will always be side by side.
Let's get testing:
- 1
Disconnect the ignition coil pack and the fuel injectors. This will disable the ignition system and fuel system. This first step is important.
- 2
Disconnect the spark plug wires from the spark plugs.
- 3
Remove all four spark plugs.
- 4
Thread in the compression tester on the first spark plug hole you're gonna start with.
- 5
Have a helper crank the engine while you observe the compression tester's needle.
- 6
Once the needle on the gauge stops climbing, have your helper stop cranking the engine.
- 6
Write down the reading and what cylinder it applies to.
- 7
Repeat the above steps in the remaining 3 cylinders.
Let's interpret your particular test results:
CASE 1: All cylinder compression readings where normal. This tells you that the head gasket is OK.
If your vehicle starts and runs and you still suspect a blown head gasket, go to: TEST 4: Using A Chemical Block Tester (Combustion Leak Tester).
CASE 2: Two side by side cylinders had 0 PSI compression. This engine compression reading confirms that the head gasket is burned thru' at the point between those two cylinders.
