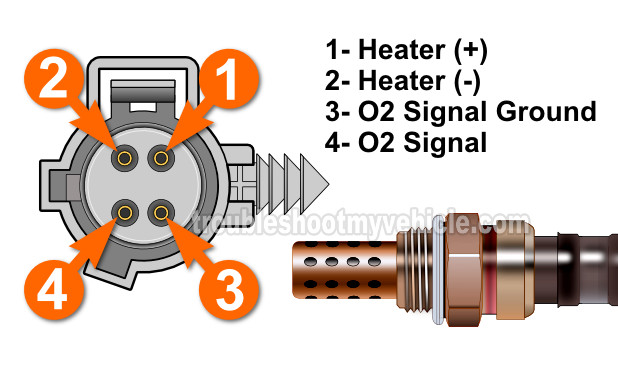
TEST 2: Testing The Heater Element's Resistance

Now that you have checked and confirmed that the rear O2 sensor is getting both power and Ground, we now need to make sure that the heater element's resistance is within specification (4 to 7 Ohms).
If the rear oxygen sensor's heater element is fried, its resistance value won't be within specification. This of course will confirm the veracity of the P0141: 1/2 O2 Sensor Heater Failure trouble code lighting up the check engine light.
NOTE: It's important that the rear oxygen sensor has to be completely cold before proceeding with this test since the manual calls for the O2 sensor to be at room temperature for the resistance test.
OK, this is what you need to do:
- 1
Locate the O2 sensor terminals number 3 and number 4 of the O2 sensor connector itself (not the engine wiring harness O2 connector).
The connector of the O2 sensor itself has round female terminals. - 2
Place your multimeter in Ohms mode.
- 3
Probe terminals number 3 and number 4 of the O2 sensor itself.
- 4
If all is OK, you should see about 4 to 7 Ω on your multimeter.
If the heater element is fried, your multimeter will show an open (usually indicated by the letters OL) or a number over 10 K Ω.
Let's take a look at your test results:
CASE 1: Your multimeter confirms that the O2 heater's resistance is within factory specification. This is the correct and expected test result and tells you that the rear oxygen sensor's heater is OK.
CASE 2: Your multimeter showed an open circuit (OL) or any resistance spec that's not 4 to 7 Ohms. This confirms that the rear O2 sensor's heater element is fried. Replacing the rear O2 sensor with a new one will solve the P0141 trouble code lighting up the check engine light (CEL).
To be a bit more specific, you can replace the rear O2 sensor if you have:
- Confirmed that the rear O2 sensor's heater element is getting both power and Ground (TEST 1).
- -AND-
- That the heater element's resistance is out of specification.

If this info saved the day, buy me a beer!


