TEST 2: Exhaust Gases Shooting Out Of The Radiator

This test involves removing the radiator cap (from the radiator) and then cranking the engine.
If the coolant inside the open radiator gets shot out, then you can conclude that one or both head gaskets are blown.
The normal and correct test result is for the coolant to remain undisturbed (inside the open radiator) as the engine is cranked.
CAUTION: Do not remove the radiator cap with a hot engine! If the engine has been running for any length of time, let it cool down completely before removing the cap from the radiator.
Let's get started:
- 1
Remove the radiator cap from the radiator.
- 2
Check the coolant level. If the radiator is not full, then top it off with water.
- 3
Have your helper to crank the engine, while you stand at a safe distance from the open radiator.
- 4
You'll see one of two results:
1.) The water or coolant inside the radiator will shoot up and out of the now open radiator.
2.) The coolant will not be disturbed. In other words, cranking the engine will have no effect on the level of the water or coolant in the radiator.
Let's examine your test result:
CASE 1: The coolant bubbled out or shot out from the radiator as the engine was cranked. This result confirms that one or both head gaskets are blown on your 3.3L V6 equipped Chrysler (Dodge, Plymouth) mini-van.
CASE 2: The coolant DID NOT bubble out NOR shoot out from the radiator as the engine was cranked. This is the correct test result.
If the engine doesn't start or starts but runs with a misfire, in your 3.3L V6 Chrysler (Dodge or Plymouth) min-van, go to: TEST 3: Cylinder Compression Test.
If the engine, in your 3.3L V6 Chrysler (Dodge or Plymouth) min-van, runs but overheats, go to: TEST 4: Using A Chemical Block Tester (Combustion Leak Tester).
TEST 3: Cylinder Compression Test

If you take a look at the photo at the beginning of this tutorial, you'll notice that the head gasket is burned in a spot right between two side-by-side cylinders.
This head gasket failure was causing 0 PSI compression in those two side-by-side cylinders.
The best way to diagnose this type of head gasket failure is with a compression test.
NOTE: You can find a more detailed explanation of the engine compression test and how to interpret its results here: How To Test Engine Compression (1991-2007 3.3L V6 Chrysler, Dodge, Plymouth Mini-Van).
OK, these are the test steps:
- 1
Disconnect the ignition coil from its electrical connector. This is will disable the ignition system and is an important safety precaution.
- 2
Disconnect the fuel pump relay from its electrical connector.
- 3
Disconnect all spark plug wires (from their spark plugs).
- 4
Remove all of the spark plugs.
- 5
Thread in the compression tester by hand, on the first spark plug hole you're gonna' start with.
Do not use any tools to tighten the compression tester. Hand tightening the compression tester is more than enough to get the proper results. - 6
Have a helper crank the engine as you observe the compression tester.
- 7
When the tester's needle stops climbing, have your assistant stop cranking the engine.
- 8
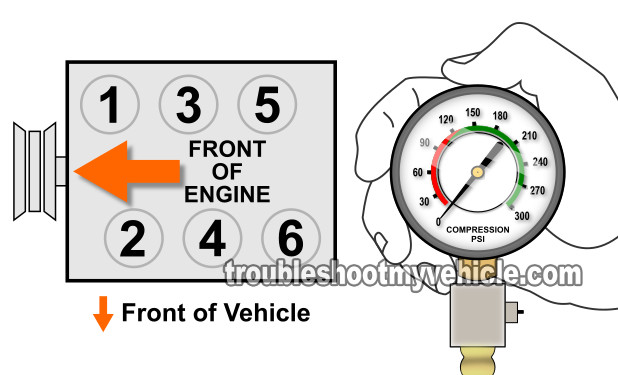
Write down the reading and what cylinder it belongs to on a piece of paper (you can use the illustration above to help you identify the cylinder).
- 9
Remove the compression tester and repeat the above steps in the remaining cylinders.
OK, let's take a look at what your results mean:
CASE 1: All cylinder compression readings where normal. This is the correct test result and it confirms that both head gaskets are OK (not burned at a spot between two side-by-side cylinders).
If you still suspect a blown head gasket, go to: TEST 4: Using A Chemical Block Tester (Combustion Leak Tester).
CASE 2: Two side by side cylinders had 0 PSI compression. This engine compression reading confirms that the head gasket is burned thru' at the point between those two cylinders. You will need to replace the head gasket.
