This tutorial is a ‘How To Replace The Distributor For The Absolute Beginner’.
It will also help you install the distributor in case you can't get the engine to start because you have removed it and scrambled the firing order.
I've also included how to install the distributor if you've lost the timing.
Contents of this tutorial:
IGNITION SYSTEM DIAGNOSTICS:
- How To Test The Ignition System (1996-2000 3.0L Caravan, Grand Caravan, Voyager, Grand Voyager).
- How To Troubleshoot A Cylinder Misfire (1990-2000 3.0L V6 Dodge And Plymouth Minivan).
ENGINE NO-START DIAGNOSTICS:
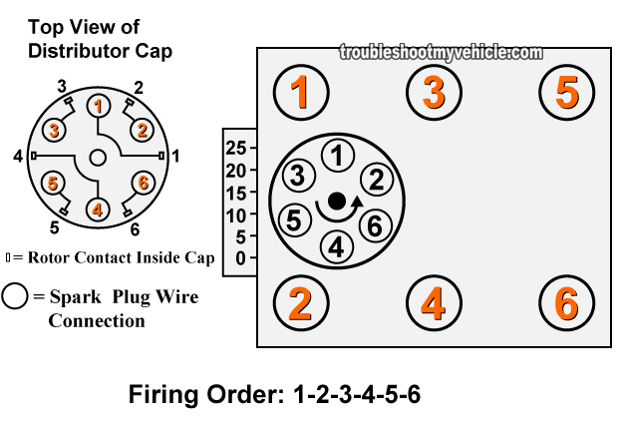
How To Find Cylinder #1 Top Dead Center (On Its Compression Stroke)

Finding the top dead center (TDC) of cylinder #1 on its compression stroke, on your 3.0L equipped Chrysler car or mini-van, isn't hard.
The two things to keep in mind, if you have never set the #1 piston to top dead center (TDC) on its compression stroke is:
One: That the crankshaft pulley has an indentation on it (specifically on its vibration dampener and simply known as a mark).
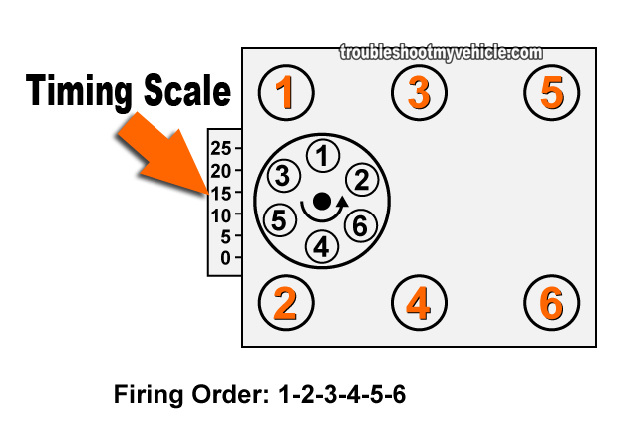
Two: This mark (on the crank pulley) will align with a number 0 on the timing scale, once the #1 piston has arrived at top dead center (TDC) on either its exhaust or compression stroke (the timing scale is bolted to the front of the engine and located above the crankshaft pulley).
OK, these are the steps:
- Remove all of the 6 spark plugs (this will make it easier to rotate the engine). If you don't remove all the spark plugs, you do have to remove the #1 cylinder spark plug.
- Have a helper rotate the crankshaft pulley using the appropriate tool(s).
- Stick your thumb OVER the #1 cylinder spark plug hole.
- As the #1 piston reaches top dead center (TDC) on its compression stroke you will feel pressure on your thumb (this pressure is very noticeable) and the mark on the crank pulley will edge closer to the 0 degree mark on the timing scale.
- Top dead center (TDC) is at the top of this stroke where the piston stops traveling upward and any further movement will cause it to travel downward.
- At TDC, the mark on the crank pulley will line up the 0° mark on the timing scale.
- NOTE: If you don't feel any pressure (even though the mark on the crank pulley is aligned with the 0° mark on the timing scale), then the #1 piston is on its exhaust stroke.
- If the #1 piston is on its exhaust stroke, no worries, just have your helper rotate the crankshaft pulley one full revolution and the piston will now be on its compression stroke.
- You'll be able to verify that the piston is on its compression stroke because you'll feel the pressure being pushed out on your thumb as your helper rotates the crank pulley.
- Also, the mark on the crank pulley will start to edge up and line up the 0° mark on the timing cover's timing scale once again.
So, once you have felt the pressure being pushed out (from the #1 spark plug hole) and the timing mark on the crank pulley has aligned with the 0 on the timing scale, the #1 cylinder is now at top dead center (TDC) of its compression stroke.
How To Replace The Distributor (Timing Not Disturbed)
Sooner or later, you'll need to replace the distributor and the most important thing you'll need to do, before you yank the old one out, is to make certain marks, on the old distributor and on the engine, align.
If you have already removed the old distributor and have not made any reference marks (and thus have lost the timing/sync of the distributor), don't panic. The following section will help: Replacing The Distributor (Timing Disturbed).
NOTE: If the engine is hot, let it cool down to avoid getting burned.
This is what you'll need to do:
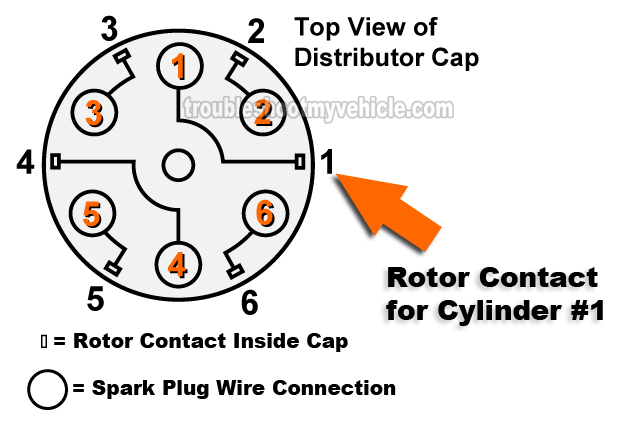
- On the outside of the distributor cap, mark the location of the rotor contact for cylinder #1 with a bright color marker (preferably an oil based marker).
- What is the rotor contact? This is the metal terminal under the cap which channels the spark from the distributor rotor to the spark plug wire -see photo 3 of 4 in the image viewer above.
- IMPORTANT: The rotor contact on the inside of the cap and the tower where the #1 spark plug cable connects to, on the outside of the distributor cap, do not line up directly (like in any other conventional distributor type ignition system) and are offset in relation to each other.
- Mark the location of the rotor contact for cylinder #1 on the distributor itself. Here's how:
- Place the distributor cap on the distributor.
- Make a corresponding mark (of the mark you just made of the rotor contact on outside of the distributor cap) on the housing of the distributor, where the cap meets the distributor housing.
- When done, remove the distributor cap.
- Place cylinder #1 on its compression stroke's top dead center (TDC) position by turning the crank pulley till its mark aligns with the 0° mark on the timing scale bolted to the front of the engine.
- The distributor rotor should now almost completely line up with the mark you made with the oil-based marker on the distributor's metal housing (where the distributor cap meets the distributor).
- Remember, this is the mark that corresponds to the #1 cylinder rotor contact inside the distributor cap.
- The rotor will not perfectly align with the mark you made (with the marker) and this is normal. A perfect alignment is not possible because of the ignition timing specification the distributor has been set to.
- If the rotor points in the opposite direction (which would mean cylinder #1 is in its exhaust stroke's TDC position), all you need to do is turn the crank pulley one complete revolution (by hand).
- For more specific (and alternate) instructions on how to do this, go here: How To Find Cylinder #1 Top Dead Center (On Its Compression Stroke).
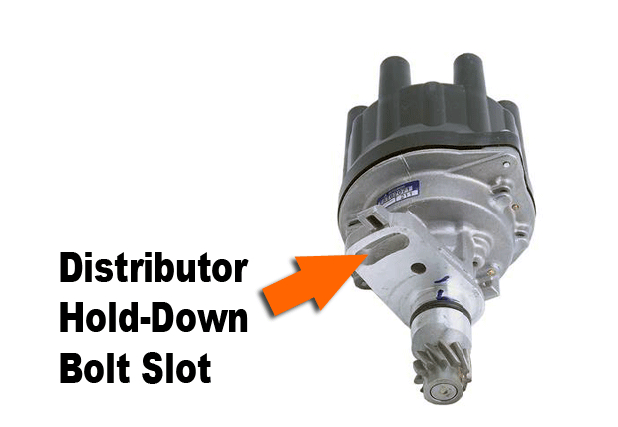
- Make a note of the location of the distributor's hold down bolt slot in relation to its bolt hole in the engine. You'll be aligning the bolt slot to the bolt hole (in the engine) when you're installing the distributor (see image 4 of 4 in the image viewer).
- Remove the distributor.
- IMPORTANT: From this point forward, you can not crank the engine, either manually or with the starter motor, or you'll have to find cylinder #1's compression stroke TDC again.
- Transfer all of your marks to the new distributor and install it on the engine.
- Once the distributor is fully seated in its place, all of the marks you just made must match:
- The distributor rotor must align with the mark on the distributor housing (this is the mark that corresponds to the rotor contact inside the distributor cap).
- The distributor hold down bolt slot should line up with its bolt hole in the engine
- Once you're satisfied all your marks match/line up and the distributor shaft is fully seated in the engine, bolt the distributor down to specification.
You are now ready to start the engine and set the ignition timing to specification with a timing light.


