

The crankshaft position (CKP) sensor plays a big role in your 3.9L V6 Dodge Ram pickup's ignition system. The cool thing is that testing it, to see if it's good or bad, can easily be done with just a multimeter.
In this tutorial, I'm gonna show you my way of checking it with 3 simple multimeter tests. With your test results, you'll quickly find out if it's functioning correctly or if it's toast.
Contents of this tutorial:
- Important Tips And Suggestions.
- How The CKP Sensor Works.
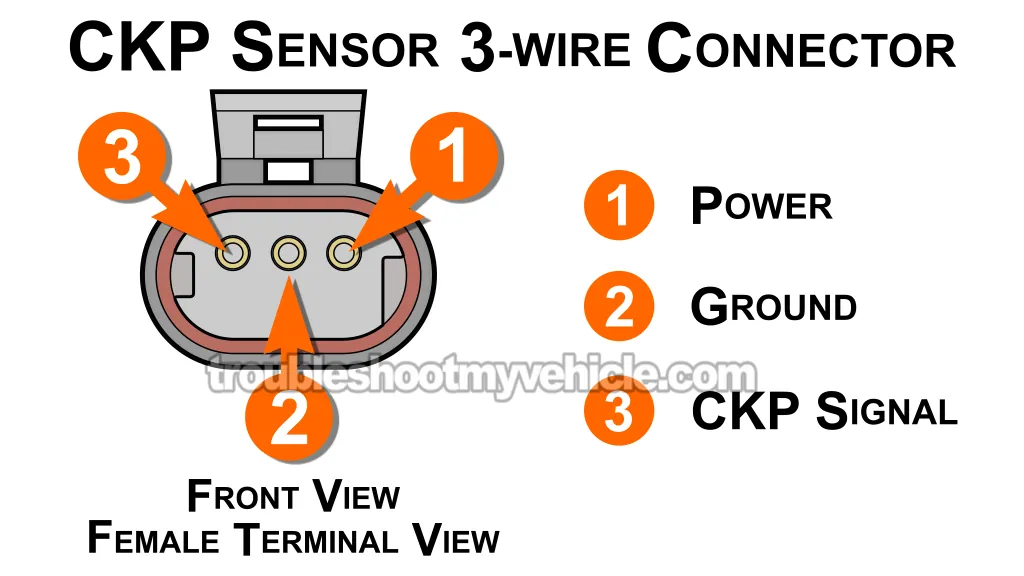
- CKP Sensor Connector Pinout.
- Where To Buy The CKP Sensor And Save.
- TEST 1: Checking The CKP Signal With A Multimeter.
- TEST 2: Making Sure The CKP Sensor Has Power.
- TEST 3: Making Sure The CKP Sensor Has Ground.
- More 3.9L V6 Dodge Ram Pickup Tutorials.
ES  You can find this tutorial in Spanish here: Cómo Probar El Sensor De Posición Del Cigüeñal —CKP (1992-1997 3.9L V6 Dodge Ram Pickup) (at: autotecnico-online.com).
APPLIES TO: This tutorial applies to the following vehicles:
- 3.9L V6 Dodge Ram 150 Pickup: 1992, 1993.
- 3.9L V6 Dodge Ram 250 Pickup: 1992, 1993.
- 3.9L V6 Dodge Ram 1500 Pickup: 1994, 1995, 1996, 1997.
- 3.9L V6 Dodge Ram 2500 Pickup: 1994, 1995, 1996, 1997.
WIRING DIAGRAMS:
- Ignition System Wiring Diagram (1992-1993 3.9L V6 Dodge Ram Pickup).
- Ignition System Wiring Diagram (1994-1995 3.9L V6 Dodge Ram Pickup).
- Ignition System Wiring Diagram (1996-1997 3.9L V6 Dodge Ram Pickup).
IGNITION SYSTEM TESTS:
- How To Test The Ignition Coil (1992-2001 3.9L V6 Dodge Ram Pickup).
- How To Test The Camshaft Position Sensor (1992-1995 3.9L V6 Dodge Ram Pickup).
- How To Test The Camshaft Position Sensor (1996-1997 3.9L V6 Dodge Ram Pickup).
Important Tips And Suggestions
TIP 1 →On-car test: This CKP sensor test is done with it still bolted to the transmission bell housing. Don't remove it to test it.
TIP 2 →Crank the engine by hand (not with the key): To get an accurate multimeter test result, you'll need to rotate the engine manually —not with the starter motor.
This part matters —if you use the starter to crank the engine, the multimeter reading won't be of any use to you.
When I say crank it by hand, I mean grab a 1/2-inch ratchet and the correct socket, then turn the crankshaft pulley yourself.
TIP 3 →Start by checking for spark: This one's a big deal: if you've already confirmed the ignition coil is sparking, the CKP sensor is working just fine.
Spark means the sensor is doing its job, so if that's the case, this CKP test won't tell you anything new.
This tutorial will help you check for spark:
How The CKP Sensor Works
The crankshaft position sensor (CKP) sits on the transmission bell housing. From there, it monitors (senses) the notches on the flywheel as the engine cranks or runs.
- CKP signal: The flywheel has 6 sets of notches arranged in a pattern: 3 sets of single notches and 3 sets of double notches, spaced evenly around its edge. As each set passes under the CKP sensor, it triggers a voltage pulse:
- A single notch creates 1 pulse.
- A double notch (two notches close together) creates 2 fast pulses.
- Purpose: These pulses tell the computer the exact position of the crankshaft and how fast the engine's spinning (RPM). It works together with the cam sensor (CMP) to control spark timing and fuel injection.
- No CKP signal, no-start: If the computer doesn't see those CKP pulses, it shuts down the ASD (Auto Shutdown) relay and the fuel pump relay. That cuts power to the injectors and ignition coil —and the engine isn't gonna start.
- ON/OFF voltage: As the engine rotates, the sensor flips between ON and OFF. You'll see 5 Volts DC when it's ON, and 0 Volts when it's OFF.
- When a single notch passes under the sensor, you'll get 1 voltage flip (1 pulse).
- When a double notch passes by, you'll see 2 quick voltage flips (2 pulses).
- Testing: The cool part? You can catch that 5-to-0 Volt flip using a regular multimeter —and that's exactly how we're gonna test it.
CKP Sensor Connector Pinout
| Pin | Wire Color | Description |
|---|---|---|
| 1 | Orange (ORG) | 8 Volts DC →1992-1995 only |
| Violet with white stripe (VIO/WHT) | 5 Volts DC →1996-1997 only | |
| 2 | Black with light blue stripe (BLK/LT BLU) | Sensor Ground |
| 3 | Grey with black stripe (GRY/BLK) | CKP Signal |
Where To Buy The CKP Sensor And Save


If you're not sure if the above CKP sensors fit your particular vehicle, don't worry. Once you get to the site, they'll make sure that it fits and if it doesn't, they'll ask the particulars of your specific Dodge Ram pickup to find you the right one.
TEST 1: Checking The CKP Signal With A Multimeter
The first thing we need to do is check if the CKP sensor is putting out a 5-Volt ON/OFF signal through its signal wire.
The CKP signal wire is the gray with black stripe (GRY/BLK) wire of the CKP sensor's wiring harness connector.
Since the sensor has to stay plugged in during the test, you'll need to tap into the GRY/BLK wire with a special tool.
You've got two ways to do that: back-probe the connector or use a wire-piercing tool. If you're not sure what one looks like or need to buy one, take a look here: Goupchn 4mm Banana to Banana Plug Test Leads Kit, 15PCS Five Colors (Amazon affiliate link).
IMPORTANT: Like I said earlier, there's no reason to remove the CKP sensor for this test —and you should not remove it from the engine. If you do, you'll throw off its air gap calibration when you reinstall it and it'll get destroyed when you crank the engine.
NOTE: Need to buy a multimeter or an upgrade? This is the one I have and use: Tekpower TP8268 AC/DC Auto/Manual Range Digital Multimeter (Amazon affiliate link).
Alright, let's get into it:
- 1
Disconnect the ignition coil from its connector. This is a must-do safety step —don't skip it before moving forward.
- 2
Switch your multimeter to Volts DC mode.
- 3
Attach the black test lead from your multimeter to the negative (-) terminal on the battery.
- 4
Turn the key to the ON position (but don't start the engine). This "wakes up" the CKP sensor so it's ready to be tested.
- 5
Locate the CKP sensor connector.
Once you've found it, peel back a bit of the plastic loom or tape around the sensor's three wires. You only need enough room to access them for testing.
NOTE: Make sure you've got the right connector. The CMP and CKP sensor connectors look similar. The connector you're after connects to the sensor on the transmission bell housing, not the one inside the distributor. - 6
Touch the red test lead to the GRY/BLK wire at the CKP sensor harness connector.
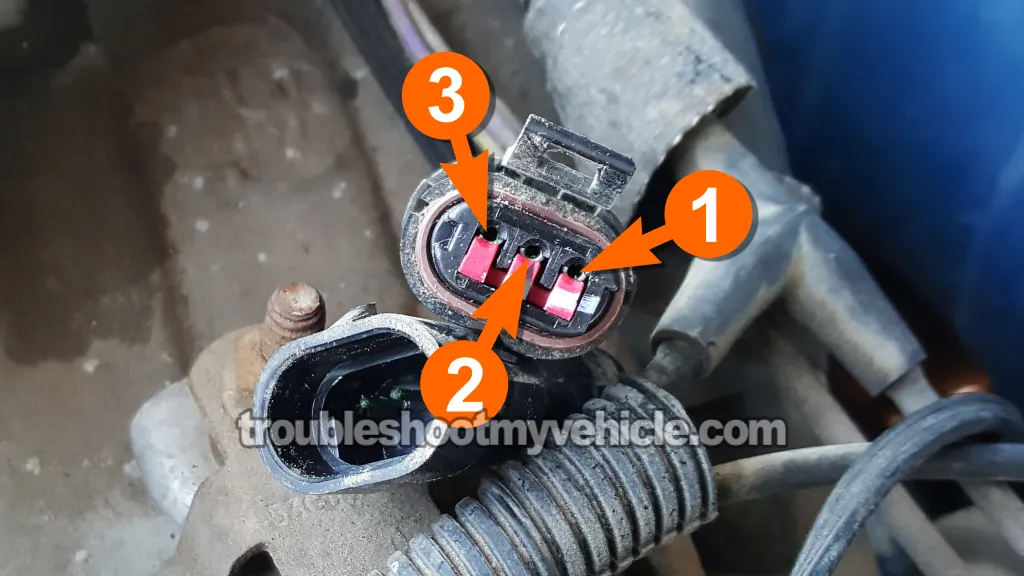
This wire connects to terminal number 3 on the sensor —see the diagram above for reference.
NOTE: Keep the CKP sensor plugged in the whole time —unplugging it will mess up the test. - 7
Have someone slowly rotate the crankshaft pulley by hand (clockwise) while you watch the multimeter.
NOTE: Don't use the starter motor, otherwise you won't see the voltages changes (as the engine is turning over too fast). This test only works when the engine's turned by hand. - 8
Watch for the multimeter to flip between 0 and 5 Volts as you slowly turn the crankshaft pulley.
OFF = 0 Volts. ON = 5 Volts. Crank the engine smoothly and steadily so you don't miss any voltage changes.
NOTE: You should catch a total of 6 sets of voltage flips for each full rotation of the crankshaft: 3 single flips and 3 double flips.
→ A single flip happens when a single notch on the flywheel passes under the sensor and you'll see the voltage jump once (from 0 to 5 or vice versa).
→ A double flip happens when a pair of notches (double notch set) passes by —you'll see the voltage flip twice in quick succession.
These flips are the sensor's ON/OFF pulses, and they're what the PCM uses to track crankshaft position.
Now, let's go over what your test results mean:
CASE 1: The multimeter flipped between 5 Volts and 0 Volts as you turned the crank. That means the CKP sensor is working like it should.
If the sensor's doing its job, the no-start issue is coming from somewhere else. Next place to check is the camshaft position (CMP) sensor. Start here:
- How To Test The Camshaft Position Sensor (1992-1995 3.9L V6 Dodge Ram Pickup).
- How To Test The Camshaft Position Sensor (1996-1997 3.9L V6 Dodge Ram Pickup).
- How To Test The Camshaft Position Sensor (1998-2001 3.9L V6 Dodge Ram Pickup).
CASE 2: The multimeter didn't show any ON/OFF 5-Volt signal while cranking the engine by hand. That tells you the CKP sensor isn't sending a signal to the PCM —so no spark and no fuel injection.
In about 95% of cases, this means the CKP sensor is toast. Replacing it usually gets things running again. But —not always.
Before calling it for sure, double-check that the sensor's actually getting power from the PCM. That's your next step: TEST 2: Making Sure The CKP Sensor Has Power.
TEST 2: Making Sure The CKP Sensor Has Power
Since the crankshaft position (CKP) sensor is a Hall-Effect type sensor, it needs both power and Ground to function properly.
In this step of the CKP sensor check, you're gonna use your multimeter to confirm that the sensor's getting the power it needs.
Here's what you're looking for: depending on the year of your V6 Dodge Ram, the PCM sends either 8 or 5 Volts DC to the sensor when the key's in the ON position (and also when the engine's turning over or running).
If you're working on a 1992–1995 model, the power comes through the orange (ORG) wire —that one delivers 8 Volts.
If it's a 1996–1997 pickup, then the purple with white stripe (PPL/WHT) wire is the one you want —it sends out 5 Volts from the PCM.
Here's what you're gonna do next:
- 1
Disconnect the CKP sensor from the engine wiring harness connector.
- 2
Set your multimeter to read Volts DC.
- 3
Hook the black lead from your multimeter to the battery's negative (-) post.
- 4
Turn the key to the ON position —no need to crank the engine for this step.
- 5
Touch the red multimeter lead to female terminal 1 on the CKP sensor harness connector.
Make sure that terminal lines up with either the ORG or VIO/WHT wire.
NOTE: This test happens at the engine harness connector —the side with the female terminals. - 6
Your multimeter should show between 7.5 to 8 Volts -or- 4.5 and 5 Volts DC if the PCM is sending power like it's supposed to.
Now let's go over what those readings tell you:
CASE 1: You're getting the indicated voltage. That means the CKP sensor is getting its power from the PCM —so far, so good.
But don't call it yet —you've still got to confirm the sensor has a solid Ground. That's up next: TEST 3: Making Sure The CKP Sensor Has Ground.
CASE 2: You're not getting any voltage. First, double-check your test connections and try again.
If there's still no voltage, you've found the issue: the CKP sensor isn't getting power, and replacing it isn't the solution to the problem.
Tracking down what's causing that missing voltage is beyond what we're covering here —but fixing that power supply will get your V6 Dodge Ram pickup back on the road.
TEST 3: Making Sure The CKP Sensor Has Ground
So far, your CKP sensor tests have revealed the following:
- TEST 1: The sensor isn't sending out a 5-Volt ON/OFF signal.
- TEST 2: The power supply wire is delivering 8 or 5 Volts DC to the sensor like it should.
Now it's time for the last piece of the puzzle —we're gonna check if the sensor has a good Ground connection. You'll do this with a quick voltage test using your multimeter.
The sensor's Ground comes through the black with light blue stripe (BLK/LT BLU) wire, which runs straight to the PCM.
IMPORTANT: Handle this part with care. That BLK/LT BLU wire connects directly to the PCM —if it touches battery voltage, you'll fry the computer. The test method I'm about to show you is 100% safe for checking that wire's Ground.
Here's what you'll need to do:
- 1
Disconnect the CKP sensor from its wiring harness.
- 2
Set your multimeter to read DC Volts.
- 3
Hook up the red lead from your multimeter to the battery's positive (+) terminal.
- 4
Turn the ignition key to ON. No need to start the engine.
- 5
Gently probe terminal number 2 of the CKP sensor connector with the black multimeter test lead.
Make sure this terminal connects to the BLK/LT BLU wire —that's the one carrying Ground from the PCM. - 6
If everything's working right, you'll see somewhere between 10 and 12 Volts DC on your multimeter.
Now let's go over what it all means:
CASE 1: You saw 10 to 12 Volts DC. That means the BLK/LT BLU wire is doing its job and supplying Ground to the CKP sensor.
If all three of your tests check out:
- TEST 1: No ON/OFF signal from the sensor.
- TEST 2: Power wire is delivering 5 or 8 Volts.
- This test: Ground is present and solid.
Then the sensor itself is shot —time to replace it.
CASE 2: You didn't get a 10–12 Volt reading. Go back and double-check your test setup, then try again.
If there's still no voltage showing, the BLK/LT BLU wire isn't supplying Ground. That means the CKP sensor isn't the problem —the missing Ground is. Your next step is to resolve the issue causing this missing Ground.
More 3.9L V6 Dodge Ram Pickup Tutorials
You can find a complete list of wiring diagrams and diagnostic tutorials for the V6 Dodge Ram pickup here:
Here's a sample of the tutorials you'll find in the index:
- How To Test The Fuel Pump (1992-2001 3.9L V6 Dodge Ram Pickup).
- How To Test The Intake Air Temp (IAT) Sensor (1992-1997 3.9L V6 Dodge Ram Pickup).
- How To Test The TPS (1992-1996 3.9L V6 Dodge Ram Pickup).
- How To Test For A Blown Head Gasket (1989-2001 3.9L V6 Dodge Ram Pickup).

If this info saved the day, buy me a beer!
