The intake air temp (IAT) sensor's job is to keep track of the air temp flowing through the intake manifold and send that data to the powertrain control module (PCM).
I can tell you from personal experience that it's one of the easiest sensors to test with a multimeter -you don't need a scan tool.
In this tutorial, I'm gonna walk you through how to check the internal resistance of the IAT sensor using a multimeter. Your test results will let you know right away if it's working like it should —or if it's fried and needs to be replaced.
NOTE: The intake air temp (IAT) sensor is also called the air charge temp (ACT) sensor.
Contents of this tutorial:
- Symptoms Of A Bad Intake Air Temperature (IAT) Sensor.
- What Does the Intake Air Temperature (IAT) Sensor Do?
- Common Intake Air Temperature (IAT) Sensor Problems.
- Initial Checks Before Starting the IAT Sensor Tests.
- Where To Buy The IAT Sensor And Connector.
- Checking Temperature To Resistance Value Relationship.
- More 3.9L V6 Dodge Ram Pickup Tutorials.
APPLIES TO: This tutorial applies to the following vehicles:
- Dodge Ram 150 Pickup 3.9L V6: 1992, 1993.
- Dodge Ram 250 Pickup 3.9L V6: 1992, 1993.
- Dodge Ram 150 Pickup 3.9L V6: 1992, 1993.
- Dodge Ram 250 Pickup 3.9L V6: 1992, 1993.
- Dodge Ram 350 Pickup 3.9L V6: 1992, 1993.
- Dodge Ram 1500 Pickup 3.9L V6: 1994, 1995, 1996, 1997.
- Dodge Ram 2500 Pickup 3.9L V6: 1994, 1995, 1996.
- Dodge Ram 1500 Pickup 3.9L V6: 1994, 1995, 1996.
- Dodge Ram 2500 Pickup 3.9L V6: 1994, 1995, 1996.
- Dodge Ram 3500 Pickup 3.9L V6: 1994, 1995, 1996.
OTHER IAT SENSOR TESTS:
- Throttle Body Temp Sensor Tests (1989-1991 5.2L, 5.9L V8 Dodge Ram Van).
- How To Test The Intake Air Temp (IAT) Sensor (1998-2003 5.2L, 5.9L V8 Dodge Ram Van).
Symptoms Of A Bad Intake Air Temperature (IAT) Sensor
Your V6 Dodge Ram pickup uses a speed-density fuel injection system. In this setup, the fuel injection computer (PCM) figures out how much air the engine is breathing using three key signals:
- Engine RPM —this comes from the crankshaft position (CKP) sensor.
- Vacuum pressure in the intake manifold —picked up by the manifold absolute pressure (MAP) sensor.
- Air temp coming in through the intake —detected by the intake air temperature (IAT) sensor.
With these three data inputs, the PCM figures out how much fuel the engine needs based on how much air is coming in.
When the IAT sensor fails, the PCM logs a trouble code and lights up the check engine light (CEL). You'll see one of these codes show up:
- OBD-I (1993–1995):
- Code 24: Charge Air Temp Sensor Voltage High or Low.
- OBD-II (1996–1997):
- P0112: Intake Air Temperature (IAT) Sensor Voltage Low.
- P0113: Intake Air Temperature (IAT) Sensor Voltage High.
Besides triggering the check engine light and a diagnostic trouble code —it can cause a few other headaches, like:
- Hard start: The engine takes longer to fire up, especially when it's really hot or cold out.
- Low power: When you step on the gas, acceleration feels weak or sluggish.
- Rough idle: The engine shakes or runs uneven while idling —like when you're stopped at a red light.
- Engine stalling: Out of nowhere, the engine just cuts out.
- Engine no-start: Sometimes, the engine won't start at all when the IAT sensor's bad.
- Bad gas mileage: The PCM can't fine-tune the air/fuel mix and ends up injecting too much fuel. You're gonna find yourself at the gas station more often.
What Does the Intake Air Temperature (IAT) Sensor Do?
The IAT sensor keeps tabs on the temp of the air heading into the engine and feeds that info straight to the fuel injection computer.
It's a thermistor, which means its resistance changes depending on how hot or cold the air is. The computer sends it a 5-Volt reference signal, and that voltage drops based on how much resistance the sensor puts up at any given moment.
The computer watches the voltage drop, matches it to its built-in calibration chart, and figures out the actual air temp from there.
Getting solid readings from the IAT sensor is key for the PCM to dial in the right air/fuel mix, max out fuel economy, and keep the engine running at its best.
Common Intake Air Temperature (IAT) Sensor Problems
The IAT sensor can stop working for a few common reasons.
- Normal wear and tear: Like any other part, it just wears out and fails with age.
- Internal open-circuit: A break in the sensor's internal circuit kills the signal —and the sensor stops responding.
- Internal short-circuit: A short inside the sensor can also kill the signal and shut the sensor down.
- Cracked or peeling wire insulation: When the wires' insulation starts peeling off (a very common problem), they'll touch and short-out. The sensor may be OK, but the PCM longer gets a valid IAT signal.
- Broken connector: The most common issue is the locking tab on the connector breaking off when unplugging it. That leads to a intermittent false connection wreaking havoc on the signal.
Any of these problems will cause the PCM to flag the IAT sensor as bad, set a trouble code, and light up the check engine light. Not to mention, the bad sensor will cause engine performance problems.
Initial Checks Before Starting the IAT Sensor Tests
Before you grab your multimeter to test the IAT sensor's resistance, please do a quick visual check for these issues first:
- Look over the sensor wires for obvious damage —cuts, exposed metal, or anything that looks off.
- Check the connector for a missing locking tab or any other type of damage.
- Examine the sensor closely. The plastic top can snap off from the metal base if it's been manhandled.
Frayed wires are a common issue near the IAT sensor plug. The insulation wears away (usually from dry-rot), and the bare wires underneath get exposed.
Once that happens, they short out, kill the IAT signal, and the PCM gets some weird temp readings.
Here's a real example showing what this kind of damage looks like:
- IAT Sensor Wire Insulation Problem And Wires Shorted Together (source: easyautodiagnostics.com).
You've got two ways to handle it:
- If the fraying is severe or right by the connector, swap out the whole connector with a new one.
- If it's minor and farther down the wire, wrapping it up with electrical tape can buy you a little time.
NOTE: Electrical tape is just a patch. For a proper fix, replace the damaged section of wire or the connector entirely.
Where To Buy The IAT Sensor And Connector
Disclosure: As an Amazon Associate, I earn from qualifying purchases. If my tutorials help you, using these links is an easy way to support the site at no extra cost to you. Thank you!
Checking Temperature To Resistance Value Relationship
Like I mentioned earlier, the IAT sensor's resistance changes as the air in the intake manifold heats up or cools down. Each resistance value lines up with a specific air temperature.
If the sensor's in good shape, the reading should be within about 10 degrees (plus or minus) of the current outdoor temp in your area.
If the sensor's bad, here's what you'll see when you test it using a multimeter:
- Open-circuit: The multimeter shows "OL" (infinite resistance), meaning there's no connection through the sensor.
- Short-circuit: The multimeter reads "0 Ohms" —that means the circuit is fully shorted out.
IMPORTANT: This resistance test only gives you an accurate/reliable result if you start your test with a cold sensor. If the engine's been running, let everything cool down completely before you start testing.
Alright, here's how to do it:
- 1
Find out the current outside temperature.
Use your phone's weather app or check a nearby wall thermometer. You need a solid temp reading for the test to mean anything. - 2
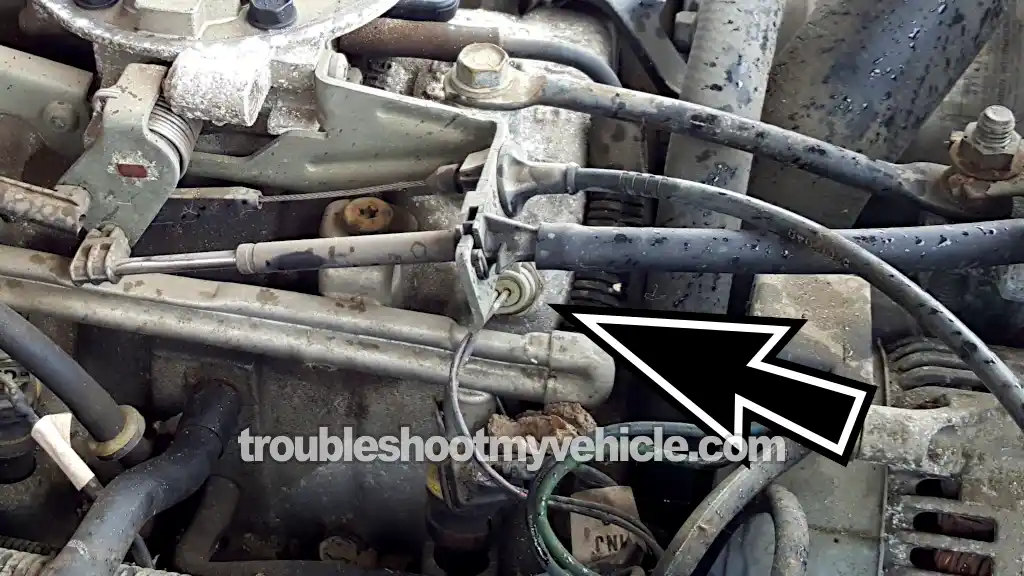
Find the IAT sensor and unplug the harness connector.
LOCATION: The sensor's up front on the intake manifold, passenger side of the engine, above fuel injector #2, and behind the alternator. Photo 4 in the image viewer shows it. - 3
OPTIONAL: Carefully remove the sensor from the intake manifold.
NOTE: You don't have to remove it to test it. But if you've got more room that way, go ahead and take it out. - 4
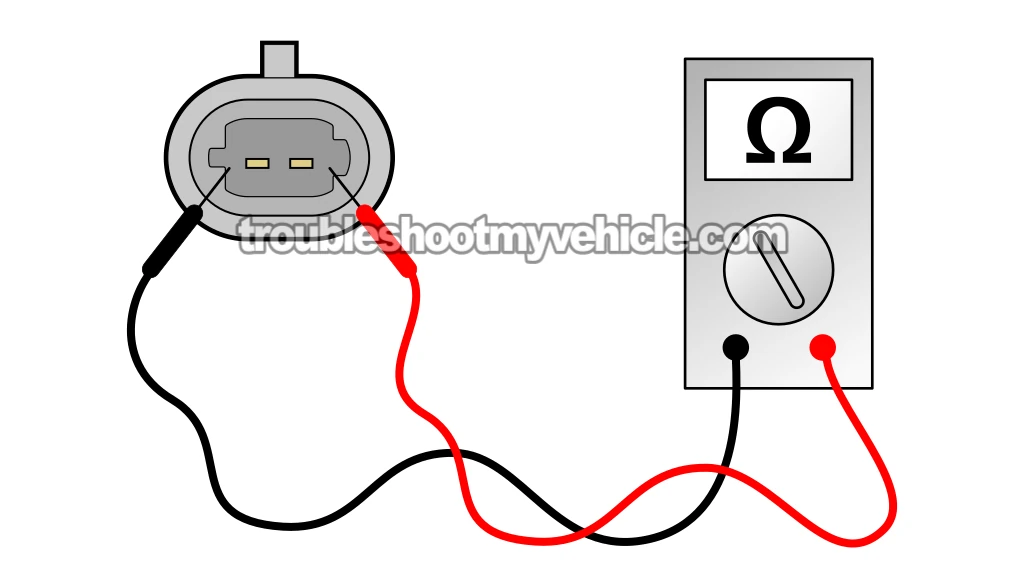
Set your multimeter to Ohms (Ω) mode.
- 5
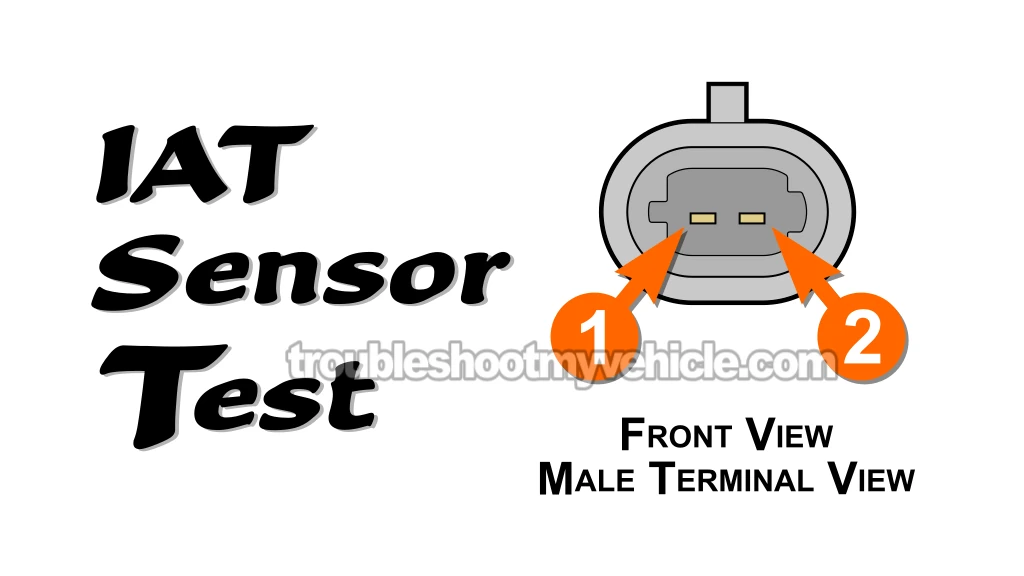
Touch the multimeter leads to the sensor's two male terminals to check resistance.
- 6
Write down whatever reading you see on the multimeter screen.
- 7
Compare the number you got with the values in the Temperature-To-Resistance Chart (you'll find the chart in the image viewer above).
The resistance should line up with the outside air temp, give or take 10°F.
Now, let's break down what your result means:
CASE 1: The resistance doesn't match the expected range for your temp around you. That means the IAT sensor's not doing its job. Time to replace it.
CASE 2: The resistance falls right where it should. Your IAT sensor's working fine —nothing wrong with the IAT sensor itself.
More 3.9L V6 Dodge Ram Pickup Tutorials
You can find a complete list of tutorials for the 3.9L V6 Dodge Ram pickup in this index:
Here's a sample of the tutorials you'll find in the index:
- How To Test The Fuel Pump (1992-2001 3.9L V6 Dodge Ram Pickup).
- How To Test The MAP Sensor (1992-1996 3.9L Dodge Ram Pickup/Van).
- How To Test The Engine Compression (1989-2001 3.9L V6 Dodge Ram Pickup).
- How To Test For A Blown Head Gasket (1989-2001 3.9L V6 Dodge Ram Pickup).

If this info saved the day, buy me a beer!


