IGNITION COIL TEST 2: Testing For Spark Directly On The Ignition Coil Tower

One of the most common types of failures that'll keep your car from starting is the ignition coil wire going bad.
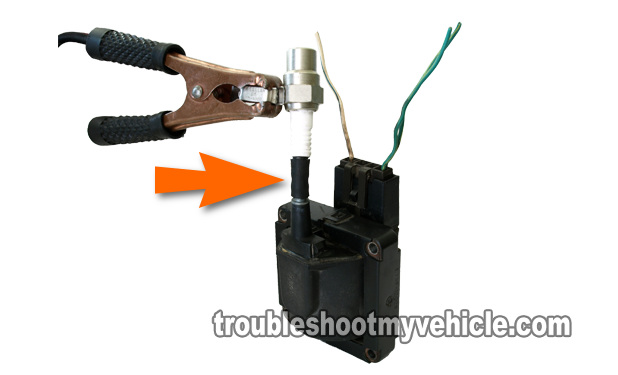
To eliminate this possibility, in this test step, you're gonna' test for spark directly on the ignition coil.
The result of this spark test will let you know if the high tension cable (that transmits the spark from the ignition coil do the distributor cap) is bad and not letting spark thru' to the distributor cap.
Or the spark test will let you know that you need to continue to the next test.
Alright, this is what you'll need to do:
- 1
OK, disconnect the high tension wire from the ignition coil.
- 2
Now, connect the HEI spark tester to the ignition coil's tower using a small piece of vacuum hose. This is important, see how I've done it in the photo above.
- 3
Now Ground the spark tester using a battery jump start cable directly on the battery negative (-) terminal.
- 4
When ready have your helper crank the engine as you eyeball the HEI spark tester, you'll see one of two results: spark or no spark.
OK, let's take a look at what your test results mean:
CASE 1: You got spark. This spark test result tells you that the high tension wire is FRIED and is the cause of your no-start condition. Replace all of the spark plug wires as a set.
CASE 2: You got NO spark:. This spark test result eliminates the high tension wire and means you're getting closer to the actual cause of the ignition coil's no-spark condition.
The next step is to verify that the ignition control module (ICM) is activating the ignition coil. For this test, go to: IGNITION COIL TEST 3.
IGNITION COIL TEST 3: Checking For 12 Volts

So far, you have verified that you do have a bonafide no spark situation coming directly from the ignition coil, the next couple of tests are to test the ignition coil itself.
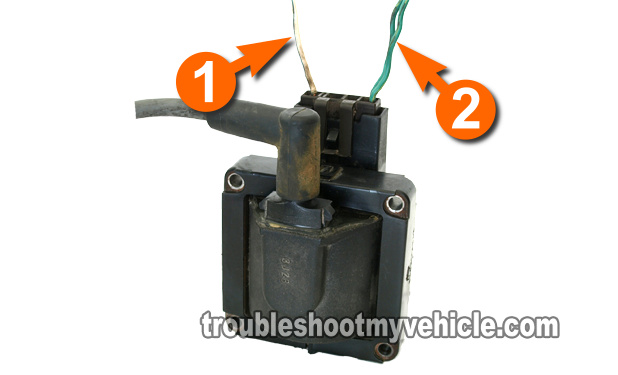
OK, before we start (and to help you make sense of this test and the next one) you're aware that the ignition coil needs power in the form of 12 Volts and that it needs a Switching signal to create spark. Well, in this test step, you'll check for these 12 Volts either using a multimeter or a 12 V DC test light.
Alright, this is what you'll need to do:
- 1
With your multimeter still in Volts DC mode from the previous test and the key ON (but engine OFF).
- 2
Probe the wire labeled with the number 1 in the image above, with the red multimeter test lead.
- 3
Now Ground the black multimeter test lead on the battery's negative (-) post.
- 4
Your multimeter should show you either: 1.) 12 Volts DC or 2.) 0 Volts.
OK, let's take a look at what your results mean:
CASE 1: The multimeter registered 12 Volts. This is the correct result and tells you that the next step is to check that the ignition coil is getting a switching signal from the ignition control module (ICM). Go to: IGNITION COIL TEST 4.
CASE 2: The multimeter DID NOT register 12 Volts. Double check your multimeter connections and repeat the test. If your multimeter results still do not indicate 12 Volts, then the ignition control module (ICM) is not fried and not the cause of the no-spark no-start problem, since without power, it won't work.
Although it's beyond the scope of this article to find the cause of these missing 12 Volts, resolving this issue will solve the no-spark no-start issue.
