TEST 2: Using A Jumper Wire To Bypass The Blower Resistor
If you've reached this point, you have checked the continuity of the blower resistor assembly's resistors and they're within specification.
In this test section, I'm gonna' ask you to use a jumper wire and bypass the blower motor resistors that create speeds LO, M1, and M2.
This is a pretty easy test and one that will let you know if the blower switch is good or not (indirectly that is).
NOTE: For these tests to work, you need to make sure that the blower motor on your Ford is working. So, if you haven't already, you need to test the blower motor first. The following tutorial will help you with this test: How To Test The Blower Motor (Ford 4.6L, 5.4L).
IMPORTANT: Use a small diameter wire as a jumper wire or you run the risk of damaging the blower motor resistor connector's female metal terminals. If you use a too thick jumper wire, you may permanently open these terminals up and create an intermittent ‘open’ problem.
Alright, these are the test steps:
- 1
Disconnect the blower motor resistor from its harness connector and turn the key to the on position (but no need to start the engine).
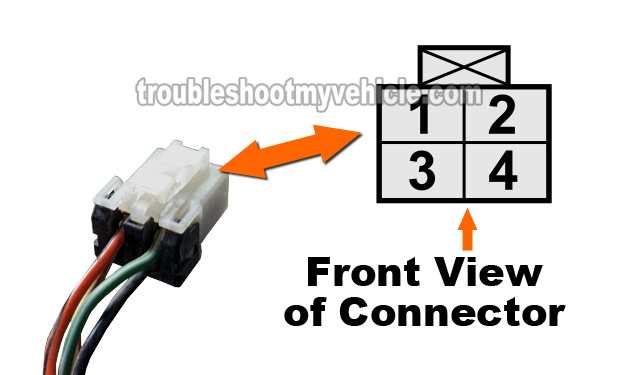
NOTE: All of the tests in this section are done on the blower motor resistor's harness connector and not on the resistor itself. The illustrations in the image viewer show the front view of the female metal terminals of the blower resistor connector. - 2
Jumper terminals 2 and 3 together and turn the vent position knob to VENT. This is the circuit that controls blower speed LO (see image 2 of 5).
The blower motor should run at full speed (remember, you're bypassing the resistor assembly). - 3
Jumper terminals 1 and 3 together and turn the blower switch to the M1 position (the vent position knob must be in the VENT position). Terminals 1 and 3 complete the circuit that controls blower speed M1 (see image 3 of 5).
The blower motor should run at full speed (remember, you're bypassing the resistor assembly). - 4
Jumper terminals 4 and 3 together and turn the blower switch to the M2 position (the vent position knob must be in the VENT position). Terminals 4 and 3 complete the circuit that controls blower speed M2 (see image 4 of 5).
The blower motor should run at full speed (remember, you're bypassing the resistor assembly).
Let's take a look at what your test results mean:
CASE 1: The blower motor DID NOT run when two or all of the indicated terminals were jumpered. This tells you that that specific circuit is bad or that the blower switch is bad.
Although it's beyond the scope of this tutorial, I suggest that you test the blower switch itself by doing a continuity test of the different blower speeds. The following tutorial may be of help:
If the blower switch is OK, then there's a good chance that circuit #4 (BLK wire) does not have a good Ground. This circuit (wire) connects directly to chassis Ground is probably not making a good contact due to corrosion.
CASE 2: The blower motor ran when all of the indicated terminals were jumpered together. This tells you several important things:
- That the circuits between the resistor connector, the blower motor switch and the blower motor are OK.
- That the blower motor is OK.
No further testing is required of the blower resistor, the blower switch or the blower motor.
More Ford 4.6L, 5.4L Diagnostic Tutorials
If you enjoyed and/or found this ‘How To' article helpful, I have written several more Ford 4.6L, 5.4L specific test articles. You can find them all in this index: Ford 4.6L, 5.4L Index Of Articles
Here's a small sample of the articles you'll find there:
- How To Test The Fuel Pump -No Start Test (Ford 4.6L, 5.4L).
- How To Test The Crankshaft Position Sensor (Ford 4.6L, 5.4L).
- How To Test Ford Coil-On-Plug Ignition Coils 4.6L and 5.4L V8 Engines (at: easyautodiagnostics.com).
- How To Test The Throttle Position Sensor Ford, Mercury, Lincoln 4.6L and 5.4L Engines (at: easyautodiagnostics.com).
- How To Test The FORD MAF 4.2L, 4.6L, 5.4L Round Air Filter Canister Assembly MAF Sensor (at: easyautodiagnostics.com).
- How To Test Ford MAF Sensors Using a Multimeter (at: easyautodiagnostics.com).

If this info saved the day, buy me a beer!


