It is possible to test the oxygen sensor on your GM 2.4L Quad 4 vehicle before buying it, and in this article I'll show you how to do it.
Being able to say “YES, the O2 sensor is bad or NO, it's OK” will save you some time and money, because the PCM (Powertrain Control Module = Fuel Injection Computer) sometimes accuses the oxygen sensor as having failed when it hasn't (and this happens a lot).
Contents of this tutorial:
Important Suggestions And Tips
TIP 1: You will need to use a scan tool, with Live Date capability, to use the info I'm presenting in this article.
Now, having said that, you don't need the GM factory scan tool or an expensive professional technician level scan tool. You can use a generic scan tool, as long as it has Live Data capability (Don't have a scan tool? Need a scan tool? Check out my recommendation: Actron CP9580 Scan Tool).
TIP 2: This is an on-car test of the oxygen sensor on your GM Quad 4 2.4L vehicle, so you will not be removing it to test it.
Symptoms Of A Bad Oxygen Sensor
The effects of a bad oxygen sensor can be very subtle since they usually do not cause serious drive-ability problems. Here are the most common symptoms:
- The check engine light (CEL) will be illuminated on your instrument cluster.
- The Diagnostic Trouble codes lighting up the CEL usually are:
- P0131 Upstream Heated Oxygen Sensor (O2S11) Circuit Out Of Range Low Voltage (Bank 1).
- P0133 Upstream Heated Oxygen Sensor (O2S11) Circuit Slow Response (Bank 1).
- Really bad gas mileage.
- Won't pass state mandated emission testing.
Oxygen Sensor Basics
In a nutshell, the oxygen sensor helps the PCM (Powertrain Control Module = Fuel Injection Computer) regulate how much fuel is injected into the engine.
For example, if the PCM doesn't inject enough fuel, the O2 sensor reports this as a Lean condition and the PCM injects more. If it injects too much, the O2 sensor reports this as a Rich condition, and the PCM injects less. Although I'm simplifying this quite a bit, it really is as simple as this.
Here are some more specifics:
- If the PCM, in your car (or mini-van) is injecting too much fuel, the oxygen sensor reacts by producing a voltage above 0.500 Volts. This voltage can go as high as 0.900 to 1.0 Volt.
Too much fuel means that the air fuel mixture is rich and once the PCM sees this, via the O2 Sensor, it starts to inject less. - As the PCM starts to inject less fuel, sometimes it goes too far and doesn't inject enough. Here again the O2 sensor saves the day by reporting a voltage that can go as low as 0.050 to 0.100 Volts.
Too little fuel means that the air/fuel mixture is too lean and the PCM starts to inject more. - As long as the engine is running, these alternating Lean and Rich Conditions, as reported by the O2 Sensor to the PCM, play a crucial part in regulating emissions and gas mileage (among several things).
- With your scan tool in Live Data mode, you'll be able to see these Lean and Rich Conditions switching back and forth and this is how I'm gonna' show you how to test them.
- A correctly working O2 sensor will produce a voltage that will switch between a lean and rich condition several times every few seconds. So, if the voltage output of the O2 sensor stays fixed (when testing it), the O2 sensor has failed.
To find out what are some of the most common symptoms of a failed oxygen sensor, take a look at the section: Symptoms Of A Bad Oxygen Sensor.
O2 SENSOR TEST: Creating A Rich Condition With Carb Spray

To test the oxygen sensor (O2S11), the very first thing you'll do is to induce a Rich condition.
You'll do this by spraying a little carburetor cleaner into the engine while it's running. My preferred method is to spray carb spray into a vacuum hose.
Once the carb spray hits the engine cylinders (and gets burned), you'll get an instant Rich condition, and if the O2 sensor is any good, it'll react by producing a maximum voltage or 0.900 Volts +, which you'll be able to confirm on your scan tool (in Live Data mode).
Alright, this is what you'll need to do:
- 1
Start your car or mini-van and let it run for about 15 minutes. This is important, since this Engine run time will get the O2 sensor to activate.
Connect your scan tool and get to its Live Data mode (Don't have a scan tool? Need a scan tool? Check out my recommendation: Actron CP9580 Scan Tool). - 2
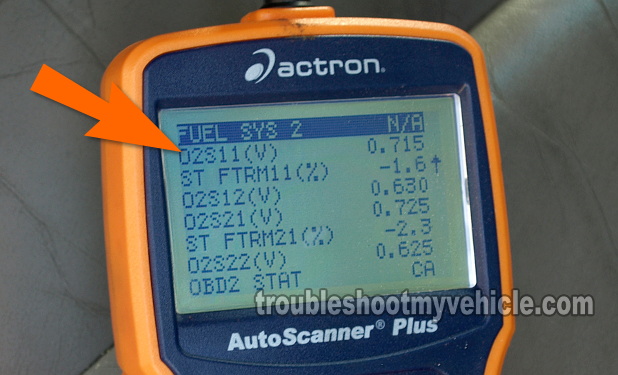
Once you're in Live Data mode, scroll down to the PID that's labeled O2S11. This PID will show you what the oxygen sensor is doing.
O2S11 is the upstream or pre catalytic converter oxygen sensor. In case you're wondering, O2S12 is the downstream oxygen sensor. - 3
What you should see, if the engine has been idling for about 15 minutes, is the O2 Sensor switching between a Lean and Rich condition. This means that the O2 Sensor's voltage numbers will be moving between 0.100 and 0.900 Volts constantly.
If the Voltage value stays fixed, don't worry about this yet, continue to the next step. - 4
With the engine running, spray a little carburetor cleaner into a vacuum hose (that has engine vacuum) while you observe your scan tool's display screen.
You're not going to be able to spray carb cleaner into the throttle as the engine is running, because if you were to do this, the engine will die as soon as you disconnect the air duct from it (to spray into it).
If you spray too much, the engine will stall. If this happens to you, just restart the engine and repeat the step and spray less carb cleaner spray. - 5
As you spray some short burst of carb cleaner into the vacuum hose, you should see the voltage numbers of O2S11 immediately spike to 0.800 to 0.900 Volts. And as long as you're spraying, these voltage number should stay there.
- 6
When you stop spraying, the O2 sensor values should come down and within a few seconds, they should start oscillating between 0.100 Volts to 0.900 Volts. If they don't, don't worry about it yet.
OK, the test is done, let's take a look at what your test results mean:
TEST RESULT 1: O2S11 voltage numbers spiked to 0.900 Volts when you sprayed carb spray into the vacuum hose. This tells you that the oxygen sensor is OK at this point in time. It does not need to be replaced, since whatever's causing the PCM to think it's fried is something else.
For more info on this, go to the section: Oxygen Sensor Codes Keep Coming Back.
TEST RESULT 2: O2S11 voltage numbers DID NOT spike to 0.900 Volts when you sprayed carb spray into the vacuum hose. This confirms that Bank 1 Oxygen Sensor 1 is no longer working. You can replace the oxygen sensor.
Oxygen Sensor Codes Keep Coming Back
So you tested the oxygen sensor and they tested good or you have already replace one or both and yet the PCM keeps accusing them as being bad (which also means that the check engine light is back on).
When this happens, it's usually due to either a Rich condition or Lean condition that's being caused by some other component on the engine.
What sucks about this, is that whatever is causing the Rich or Lean condition is not present all of the time (specially when you're conducting the tests). This happens quite a bit. The strategy here is to wait a few days for the condition (that's causing the O2 sensor issues) to get worse. When this occurs, you'll be able to test it and solve it.
More Test Articles
I've written quite a few Quad 4 2.4L 'how to' tutorials that may help you troubleshoot the issues on your car or mini-van. You can find the complete list at: GM 2.4L Index Of Articles.
Here's a sample of the GM 2.4L articles you'll find:
- How To Test The Fuel Injectors (GM 2.4L Quad 4).
- How To Test The MAP Sensor (GM 2.4L Quad 4).
- How To Test For A Blown Head Gasket (GM 2.4L Quad 4).
- How To Test The Starter Motor (GM 2.4L Quad 4).
- How To Test The Ignition Coils (GM 2.4L Quad 4) (at: easyautodiagnostics.com).

If this info saved the day, buy me a beer!

