
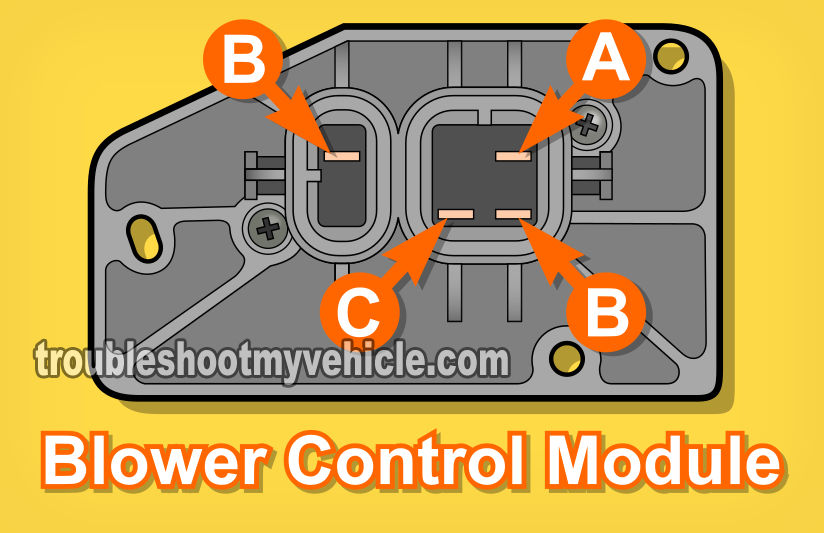
If the blower motor in your 3.8L GM vehicle is stuck in only one speed (usually stuck in high) or no blower speeds work, then there's a good chance that the blower control module is bad and behind the problem.
Although the blower control module can not be tested with simple multimeter resistance tests, it can be tested and finding out if it's bad (or not) is not hard.
In this tutorial, I'll show you how to get it done in a step-by-step way.
NOTE: Even though this tutorial is filed in the GM 3.8L index of this website, this tutorial applies to some 1992 and 1993 Cadillac vehicles. This is because this particular blower control module was used in several models from 1992 to 1999. To find out if your particular GM vehicle is covered by this troubleshooting tutorial, check the box titled “Applies To:” on the right column.
To aid you in further knowing if this tutorial applies to your Buick, Cadillac, Chevrolet, or Pontiac vehicle, this tutorial applies to the following aftermarket blower control module part numbers:
- AC Delco 158548.
- Airtex/Wells 3A1124.
- Duralast JA1543.
- Four Seasons 20219.
- Standard Motor Products RU304.
Contents of this tutorial:
- Basics Of Troubleshooting The Blower Control Module.
- Where To Buy The Blower Control Module And Save.
- TEST 1: Verifying The Blower Control Module Is Getting Battery Power And Ground.
- TEST 2: Bypassing The Blower Control Module.
- TEST 3: Verifying The Blower Speed Voltage Signal.
- More 3.8L GM Tutorials.
ES  You can find this tutorial in Spanish here: Cómo Probar El Módulo del Motor del Soplador (3.8L GM) (at: autotecnico-online.com).
WIRING DIAGRAM: The following wiring diagram may come in handy: Blower Motor Circuit Diagram (1996-1999 3.8L Buick, Oldsmobile, Pontiac) (at: easyautodiagnostics.com).
Basics Of Troubleshooting The Blower Control Module
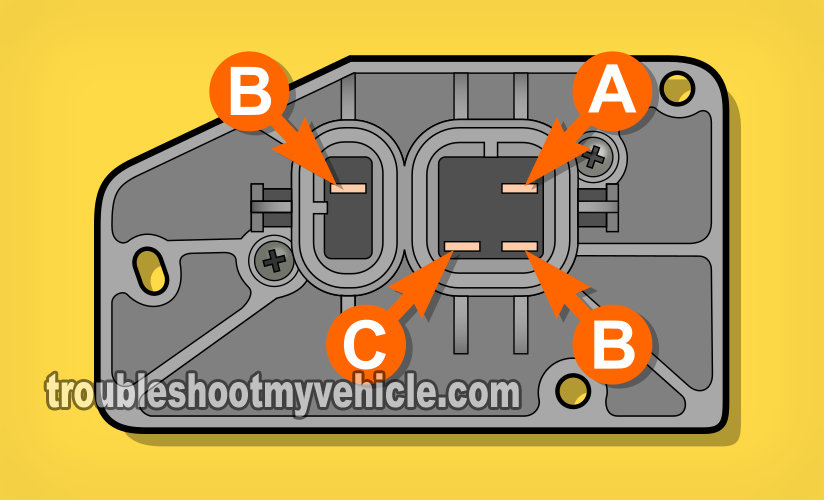
The blower control module is a solid state device unlike the old style blower motor resistors that actually use resistors.
It controls blower motor speed by varying the voltage it sends to the blower motor. Depending on what blower speed is selected from the A/C-Heater control panel, this voltage can range between 0 and 12 Volts.
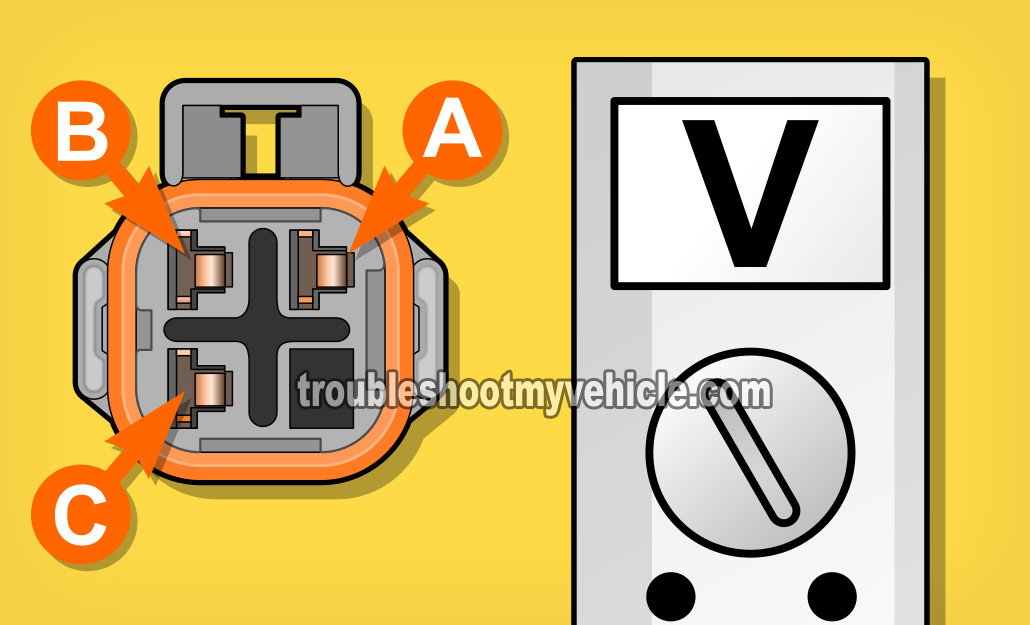
To be a little more specific: To determine appropriate output voltage (the voltage it sends the blower motor), the blower control module monitors a varying voltage signal (between 2-10 Volts) from A/C-Heater control panel (programmer) on terminal B of the 4-terminal connector.
This varying voltage signal is the blower motor speed signal that tells it what blower speed you've just selected on the A/C-Heater control panel.
The blower control module then translates this blower motor speed signal from the A/C-Heater control panel signal and applies the corresponding voltage directly to the blower motor.
| Blower Control Module 2 Pin Connector | ||
|---|---|---|
| Pin | Wire Color | Description |
| A | -- | Empty. |
| B | PPL | Battery Power From Underhood Fuse Box. |
| Blower Control Module 4 Pin Connector | ||
|---|---|---|
| Pin | Wire Color | Description |
| A | PPL | Variable Voltage Output to Blower Motor. |
| B | GRY/BLK | Blower Speed Input From A/C-Heater Control Panel. |
| C | BLK | Output to Chassis Ground. |
| D | -- | Empty. |
NOTE: There's a good chance that the color of the wires described above DOES NOT match what's on your particular vehicle. This is no cause for concern since the circuit descriptions are the same for all of the GM vehicles covered by this repair tutorial.
Where To Buy The Blower Control Module And Save
The blower control module is a pretty expensive part that usually runs over US$150. There's a good chance that you can buy it online for a whole lot cheaper than somewhere local.
The following links will help you comparison shop for the blower control module and the blower motor:


Disclosure: As an Amazon Associate, I earn from qualifying purchases. If my tutorials help you, using these links is an easy way to support the site at no extra cost to you. Thank you!
TEST 1: Verifying The Blower Control Module Is Getting Battery Power And Ground
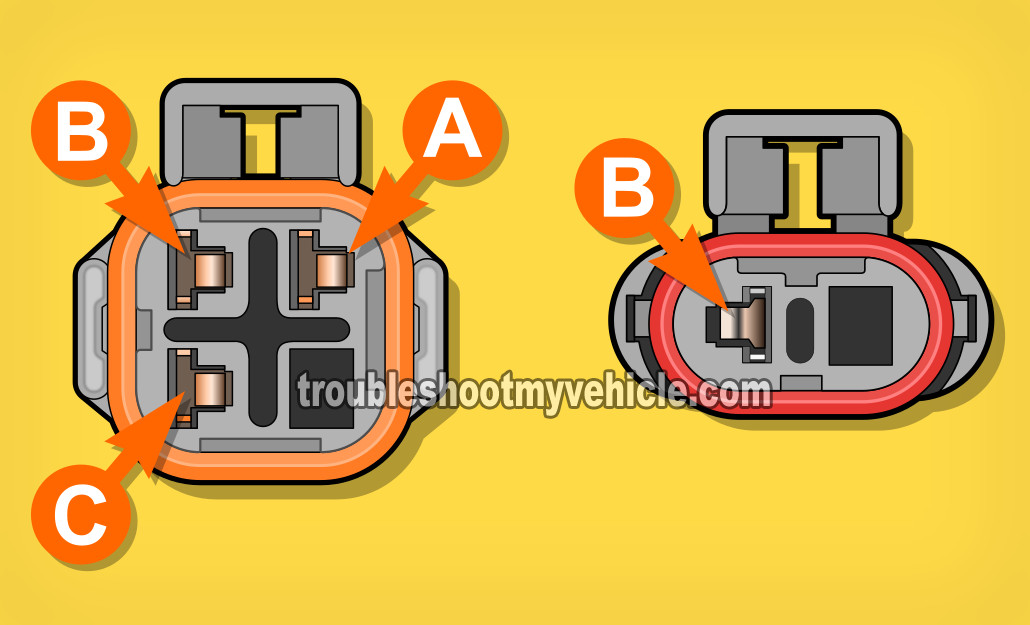
We're gonna' start our blower control module diagnostic by checking the basics: battery power and Ground. We need to make sure that these two are being fed to the blower control module.
Terminal B of the small 2 terminal connector is the one that feeds battery power (12 Volts) to the blower control module (see illustration above).
And terminal C of the large 4 terminal connector feeds the module with Ground (see illustration above).
Checking for battery voltage and Ground can be done with a simple multimeter voltage and continuity test and in the following steps I'll show you how.
Alright, these are the test steps:
- 1
Disconnect the blower control module from both of its harness connectors and turn the key to the on position (but don't start the engine).
NOTE: All of the tests in this section are done on the blower control module's harness connectors and not on the module itself. The illustrations in the image viewer show the front view of the female metal terminals of the connectors. - 2
Check for battery voltage (12 V) on terminal B of the small connector with your multimeter in Volts DC mode.
This is the circuit that feeds the blower control module with power from the under-hood fuse box and should be hot all the time. - 3
Place your multimeter in Ohms mode (Ω) and check for continuity between terminal C and the battery negative (-) terminal.
Terminal C belongs to the larger blower control module connector.
Your multimeter should register continuity. To be a bit more specific, your resistance value should be 0.5 Ohms or less.
Let's take a look at what your test results mean:
CASE 1: Power and Ground were present in the indicated terminals. This is the correct and expected multimeter test result and tells you that the blower control module is getting power and Ground.
The next step is to make sure that the blower motor is functioning correctly. We can accomplish this by bypassing the blower control module with a jumper wire and checking to see if the blower motor runs on HI speed. For this test go to: TEST 2: Bypassing The Blower Control Module.
CASE 2: Power and/or Ground were NOT present in the indicated terminals. Double check that you're testing the correct terminals and repeat the test.
If your multimeter still does not register battery power or Ground in the indicated blower control module connector terminals, then you have found the problem that' s keeping the blower motor from working or functioning correctly.
If power is missing from the small connector Terminal B, then you need to check to see if the underhood fuse is blown. Replace as necessary and re-test.
If Ground is missing from terminal C of the large connector, then my suggestion to you is to repair this Ground by adding a Ground wire to the wire connecting to this terminal and re-test.
Resolving the issues that are preventing this power and/or Ground from reaching the blower control module will solve the blower motor problem your vehicle is experiencing.
TEST 2: Bypassing The Blower Control Module
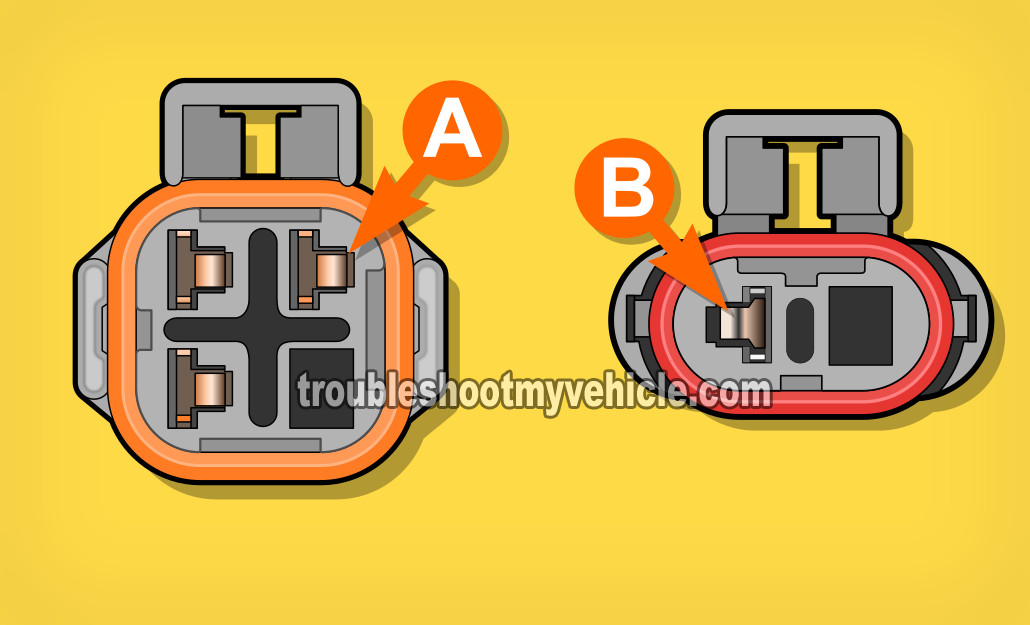
Now that you have checked and confirmed that the blower motor is getting power and Ground, the next step is to make sure that the blower motor runs and that's what we'll do in this test step (before jumping to TEST 3).
We can accomplish this by either by applying battery voltage directly to the blower motor or by jumpering together two specific terminals of the blower control module connectors.
In this test step we'll jumper these two terminals. The factory manual suggests that when you make your jumper wire, you include an inline fuse as a safety precaution.
IMPORTANT: Use a small diameter wire as a jumper wire or you run the risk of damaging the blower control module connectors' female metal terminals. If you use a too thick jumper wire, you may permanently open these terminals up and create an intermittent ‘open’ problem.
NOTE: If the blower motor on your vehicle is stuck on High, you can skip this test step and go to TEST 3. Having the blower motor stuck on High whether the key is on or not confirms that the blower motor runs.
Alright, these are the test steps:
- 1
Disconnect the blower control module from its harness connector and turn the key to the on position (but no need to start the engine).
NOTE: All of the tests in this section are done on the blower control module's harness connectors and not on the blower control module itself. The illustrations in the image viewer show the front view of the female metal terminals of the small and large blower module connector. - 2
Jumper terminal B (of the small connector) to terminal A of the large connector.
The blower motor should run at full speed.
Let's take a look at what your test results mean:
CASE 1: The blower motor DID NOT run when you jumpered the indicated terminals. This tells you that that specific circuit is bad or that the blower motor is bad.
You'll need to apply battery voltage and Ground to the blower motor directly to see if it runs. If the blower motor does not run, the blower motor is bad and needs to be replaced.
CASE 2: The blower motor ran when the indicated terminals were jumpered together. So far so good since this test result tells you that the blower motor is OK and not the cause of the problem.
Your next and last step is to verify that the blower control module is getting a blower fan speed signal from the A/C-Heater control panel. For this test, go to: TEST 3: Verifying The Blower Speed Voltage Signal.
TEST 3: Verifying The Blower Speed Voltage Signal
If you've reached this point, you have:
One: Confirmed that the blower control module is getting power and Ground (TEST 1).
Two: That the blower motor runs (TEST 2).
Now, we're gonna' check to see if the blower control module is getting an activation signal (blower speed signal) from the A/C-Heater control panel.
Without this blower speed signal, the blower control module won't activate the blower motor.
To go into more details about this test, we want to make sure that whenever you increase or decrease the blower fan speed (on the panel) there is a corresponding voltage signal reaching the blower control module.
This is a pretty easy test that you can accomplish with your multimeter in Volts DC mode.
NOTE: This voltage test is done on the blower control module connector and NOT on the module itself.
OK, these are the test steps:
- 1
Disconnect the blower control module from its electrical connectors. Set your multimeter to Volt DC mode.
Don't have a multimeter or need to upgrade yours? Check out my recommendation: Tekpower TP8268 AC/DC Auto/Manual Range Digital Multimeter (Amazon affiliate link)). - 2
Probe the terminal labeled with the letter B (of the 4 terminal connector) with the red multimeter test lead (see illustration above).
Ground the black multimeter test lead on a good Ground point (or directly on the battery negative (-) terminal). - 3
Have a helper turn the key on and increase/decrease the blower speed on the A/C-Heater control panel.
Your job is to see the voltage your multimeter registers. - 4
The voltage should increase/decrease between 2 to 10 Volts DC as your helper increases/decreases the blower speed from inside the vehicle.
NOTE: The voltage on your particular vehicle may not go all the way down to 2 Volts and may not go all the way up to 10 Volts. But if the signal is present you'll see a varying voltage moving up and down and this will be enough to confirm the signal is present.
Let's take a look at what your test results mean:
CASE 1: The voltage increased/decreased as your helper changed the blower speed. This is the correct and expected test result and lets you know that the blower control module is getting the blower speed signal from the AC heater control panel.
This test result also tells you that the blower control module is bad and needs to be replaced because it's not responding to the A/C Heater control panel's command to start the blower motor. I'll explain in more detail: You have already:
- Confirmed that the blower control module is getting power and Ground (TEST 1).
- Confirmed that the blower runs when the blower control module is bypassed (TEST 2).
- Confirmed that the A/C-Heater control panel is sending a blower speed signal (this test section).
Taking into account all of these specific test results, you can conclude with confidence that the blower control module is bad and needs to be replaced to solve the blower motor issue. NOTE: If your blower motor was stuck in HIGH, then this test result also confirms that the blower control module is bad and needs to be replaced.
If you'd like to save a few bucks on the blower control module, check out the section: Where To Buy The Blower Control Module And Save.
CASE 2: The voltage DID NOT increase/decrease as your helper changed the blower speed. Double check that you' re testing the correct terminal on the blower control module connector and repeat the test.
If the multimeter does not show an increase/decrease in the voltage signal (as your helper changes the blower speed from the A/C-Heater control panel), then this test result eliminates the blower control module as being defective.
Why? Because without this varying voltage, from the A/C-Heater control panel, the blower control module won't activate the blower motor.
Although it's beyond the scope of this tutorial to test the A/C-Heater control panel or the circuits between the panel and the blower control module, my suggestion to you is to get a wiring diagram of your particular GM vehicle and check the continuity between the blower control module connector and the heater control panel connector for opens or shorts.
More 3.8L GM Tutorials
If you enjoyed and/or found this ‘How to’ article helpful, I have written several more 3.8L specific test articles. You can find a complete list of 3.8L tutorials here: GM 3.8L Index Of Articles.
- How To Test The Fuel Injectors (GM 3.8L).
- How To Do A Fuel Injector Noid Light Test (GM 3.8L)
- How To Test The 3.8L GM Crank Sensor With A Multimeter.
- How To Test The Camshaft Position Sensor -P0341 (GM 3.8L).
- How To Troubleshoot A No Start (GM 3.8L).
- GM 3.8L Ignition Control Module and Crank (3X, 18X) Sensor Test (at: easyautodiagnostics.com).

If this info saved the day, buy me a beer!


