Diagnosing a misfire on a 'Spider' fuel injector equipped GM pick up, SUV or van can seem almost impossible but the truth is quite the contrary.
What makes it easy, is having a diagnostic strategy and knowing some specific tests to perform. In this case study, I'll show you exactly what I did to get to the bottom of a hard to troubleshoot rough idle condition.
In the process of 'spinning this yarn', you'll see what the overall diagnostic strategy was and what testing techniques I used to get to the bottom of the issue causing the misfire/rough idle condition (on my neighbor's 1995 Chevy Blazer with a Vortec 4.3L).
Although this case study is about my neighbor's 1995 Chevy Blazer with a CPI equipped 4.3L engine, the info easily applies to any CSFI 'Spider' equipped 4.3L, 5.0L, and 5.7L equipped GM vehicle.
Contents of this tutorial:
No Misfire Diagnostic Trouble Codes
Like most of the folks in my circle of friends and family, my neighbor owns a small generic scan tool (he does all of his own 'wrenching' and I have seen him many a time repairing something on his beloved Blazer). So, the very first thing I asked him was what misfire diagnostic trouble codes the PCM was spitting out. But there were no trouble codes at all. Just to make sure, I asked him for the scan tool and checked myself too!
Since he's had the Blazer for ever and has replaced the 'Spider' injector 3 times (because of fuel leaks), he felt that the symptoms resembled those of a leaking 'Spider' fuel injector and was getting ready to replace it again before he called me (I've always been impressed by the fact that he can replace them and have the engine running in under 30 minutes).
Having been neighbors for so many years, I'd showed him how to test the 'Spider' fuel injector assembly for leaks many years ago. So, knowing that he knew how to test for 'Spider' fuel leaks, I asked him if he had done a fuel pressure leak down test. He had and the fuel pressure leak down test told him the 'Spider' wasn't leaking (you can find the leak down test here: How To Test The 'Spider' Fuel Injector Assembly (4.3L, 5.0L, 5.7L)).
But, simply not trusting the fuel pressure leak down test results, he had also removed the intake manifold's plenum to visually confirm that there were no leaks (there were none).
What complicates a rough idle/misfire condition is having the PCM not register any specific misfire codes. In my neighbor's Blazer, the PCM wasn't even registering a P0300, but it was obviously running very rough (at idle that is).
Since it was obviously missing, I needed to find the misfiring cylinder. So, is there a way to find out which cylinder is the one that's misfiring? Thankfully, there's a way to do this with some very simple tools.
Doing A Cylinder Balance Test
Knowing how to do a manual cylinder balance test is one of the most important testing techniques I have learned during my automotive repair career (and it doesn't require any expensive diagnostic equipment to boot!). Over the years, this test has helped me solve tons of hard to find misfires on pre-OBD II and OBD II vehicles.
The idea behind a cylinder balance test is to 'short out' an engine cylinder to see if the cylinder is 'dead' or not (at idle). Normally, this is done by simply unplugging each injector (one at a time) and seeing if unplugging it makes the engine shake more (idle rougher) or not.
This isn't possible on the GM 4.3L, 5.0L, and 5.7L Vortec engines with a 'Spider' fuel injector (the fuel injector is inside the intake manifold plenum and its outside electrical connector doesn't allow for such a test).
What some folks do, to do a manual cylinder balance test, is to simply remove one spark plug wire from the distributor cap (at a time) while the engine is running. Unfortunately, with this method you risk damage to the ignition coil. Is there is a safe and effective alternative? Yes, there is!
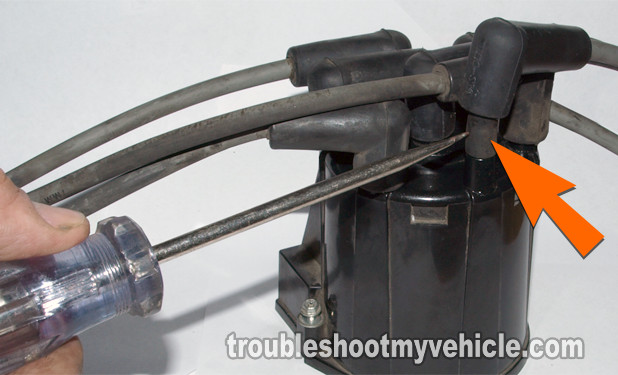
This alternative method is to use a small piece of vacuum hose, installed between the distributor cap tower and its respective spark plug wire, and a 12 volt automotive test light to 'short out' that cylinder.
Here are the step-by-step instructions and exactly the procedure I followed on my neighbor's Chevy Blazer:
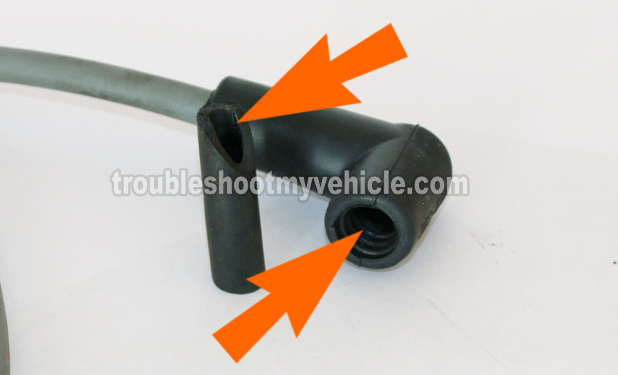
- Cut 2 small pieces of vacuum hose about 1.25 inches long (no longer).
- Make a small 30 degree cut on one end.
- This end is going to be inserted in the spark plug wire's metal terminal (inside it's rubber boot).
- Choose 2 distributor cap towers you want to test.
- Disconnect their spark plug wires.
- Insert the vacuum hose into the spark plug wire's metal terminal (inside its rubber boot), then connect this spark plug wire (with the vacuum hose) back onto the distributor cap.
- Repeat the above on the other spark plug wire.
- Once you have both spark plug wires with the piece of vacuum hose between the towers, start the engine.
- If the vacuum hoses are inserted correctly, the spark will be channeled across the vacuum hose and into the spark plug wire.
- As the engine idles, 'short out' the spark plug wire by touching the vacuum hose with an automotive 12 Volt test light (see large photo above).
- NOTE: The 12 V. test light has to be grounded, preferably directly on the battery negative (-) terminal.
- This will channel the spark thru' the test light (don't worry, it's very safe) and effectively kill the cylinder.
- If the cylinder is 'dead' to begin with, shorting the spark plug wire WILL HAVE NO EFFECT on engine idle.
- If the cylinder is NOT 'dead', then this will have a negative effect on engine idle since it will get worse.
- Repeat this test on the remaining 4 spark plug wires (testing 2 at a time).
The result? The result of the cylinder balance test was that cylinder #1, on my neighbor's Blazer, was dead! The #1 cylinder was the one that, when I would short out the spark plug wire, the engine's idle was not affected!
Identifying the 'dead' cylinder or cylinders is always half the diagnostic battle when troubleshooting a misfire or rough idle condition. But, what next? Let's turn the page and find out.


