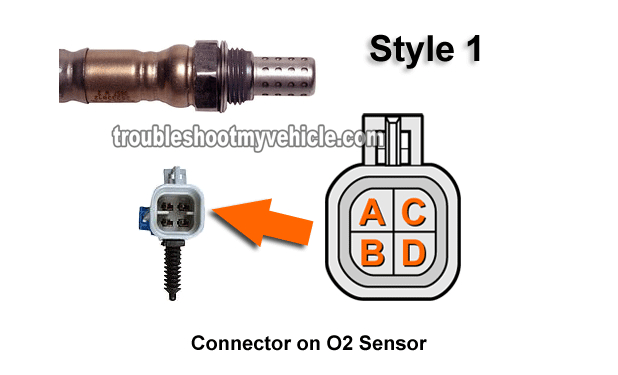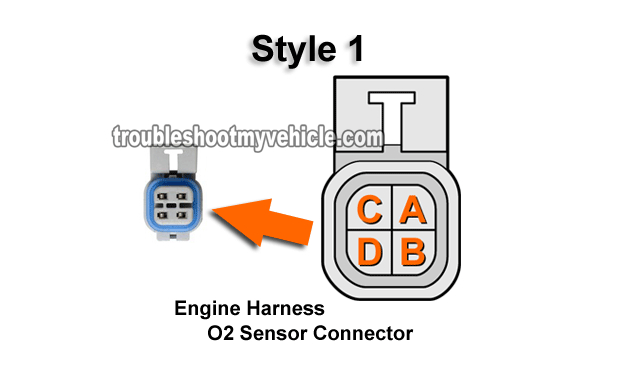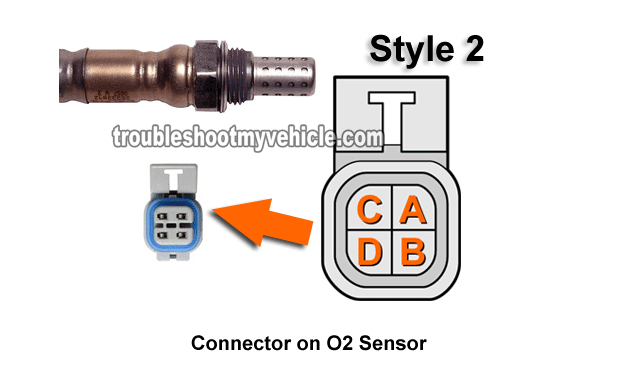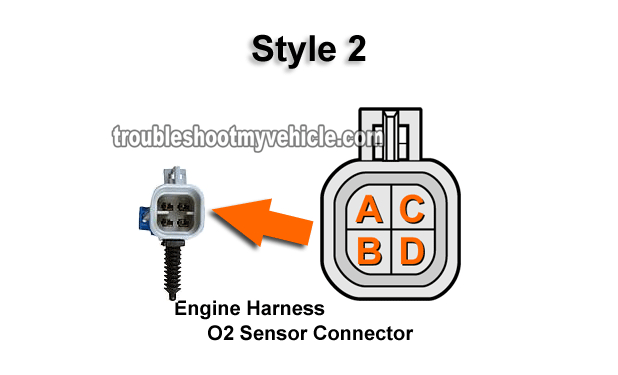
This tutorial will help you to test diagnostic trouble codes P0135 and P0155 on specific 2003, 2004, and 2005 Chevy and GMC Pickups, Vans, and SUVs with either a 4.8L, 5.3L, or 6.0L V8.
If you're wondering if this tutorial applies to your specific 2003-2005 Chevy/GMC pickup, van or SUV, take a look at the 'Applies To:' box on the column on the right. If this tutorial doesn't cover your specific vehicle, take a look at the index of tutorials here: O2 Sensor Tutorial Index.
Also, your GM vehicle may use one of two different types of oxygen sensors depending on where it was built. This tutorial covers both. What's the difference? The difference is in the connector of the oxygen sensor. The photo above will help in identifying them.
Contents of this tutorial:
Before you start testing/troubleshooting codes P0135 and/or P0155, I recommend that you take a look at the following oxygen sensor tutorial:
That tutorial (Testing P0135, P0141, P0155, P0161 O2 Heater Performance Problem) answers a lot of the most common questions like:
- Symptoms Of A bad oxygen sensor heater element.
- Where are the O2 sensors located?
- What tools do I need?
- What does the heater inside the oxygen sensor do?
Circuit Descriptions Of The Upstream Oxygen Sensors
You'll notice that in the photo (in the image viewer above), the connectors are identified with either a number 1 or a number 2.
This is because GM uses one of two types of upstream oxygen sensors on your pickup, SUV, or van and depending on which one is installed on your vehicle, the wire colors may be different.
In the circuit descriptions below I've taken this into account and I'll make reference to these numbers (as Type 1 or Type 2) whenever there's a difference in the color of the wire.
| Oxygen Sensor Bank 1 Sensor 1 Circuits | ||
|---|---|---|
| Pin | Wire Color | Description |
| A | Tan | HO2S Low Signal |
| B | Purple w/ White stripe | HO2S High Signal |
| C <-> | Light Blue | Heater Element Ground (Provide by PCM) -Type 1 |
| C <-> | Black w/ White stripe | Heater Element Ground (Provide by PCM) -Type 2 |
| D | Pink | Heater Element 12 Volts (O2 sensor fuse) |
| Oxygen Sensor Bank 2 Sensor 1 Circuits | ||
|---|---|---|
| Pin | Wire Color | Description |
| A | Tan | HO2S Low Signal |
| B | Purple | HO2S High Signal |
| C <-> | Purple w/ White stripe | Heater Element Ground (Provide by PCM) -Type 1 |
| C <-> | Light Green | Heater Element Ground (Provide by PCM) -Type 2 |
| D | Pink | Heater Element 12 Volts (O2 sensor fuse) |
Where To Buy The Oxygen Sensor And Save
You could buy the oxygen sensor at your local auto parts store but you'll end up paying quite a bit for it (last time I checked, they were going for around US$85.00) or you could buy it online and save a few bucks.
At the bottom you'll see two boxes with a photo of an oxygen sensor and a price. Why two different oxygen sensors? Because, depending where your specific GM pickup, van, or SUV was built, it'll have one or the other for the upstream oxygen sensors.
One oxygen sensor has metal Spade Terminals in its connector (Type 1), the other type of oxygen sensor (GM used) has female terminals in its connector (Type 2). Both of these are not interchangeable. So you'll need to take a look at the connector of the oxygen sensor on your pickup (or van or SUV) to buy the right one.
Disclosure: As an Amazon Associate, I earn from qualifying purchases. If my tutorials help you, using these links is an easy way to support the site at no extra cost to you. Thank you!
Not sure if the O2 sensor fits your vehicle. No worries? Once you get to the site, you'll be asked for the specifics of your particular vehicle. If it doesn't fit, they'll find you the right one.
TEST INFO: The Basics Of Testing The Oxygen Sensor Heater Element
IMPORTANT: Do not test the oxygen (O2) sensor while it's hot or the engine is running (while using the info in this tutorial). Testing a hot O2 sensor can cause severe burns. Be careful and use common sense while testing the oxygen sensors on your vehicle.
OK, keeping the above safety precautions in mind and in a nutshell, troubleshooting the O2 sensor's heater element requires that you first start by making sure that the oxygen sensor heater element is getting power (10 to 12 Volts) and Ground.
- Power is provided by the D circuit wire.
- This wire will be the Pink one, regardless of the type of O2 sensor GM has installed on your vehicle.
- Ground is provided by the C wire.
- This wire will be one of several colors. To find out which one, you'll need to consult the charts above.
If the O2 sensor is not getting power or Ground, then you've found the cause of the P0135 and/or P0155 diagnostic trouble code (since without power and/or Ground, the O2 sensor's heater element won't work).
If you do find that the oxygen sensor's heater is getting both power and Ground, then the next step, is to measure the resistance (with a multimeter) of the heater element inside the oxygen (O2) sensor to see if it's fried or not.
As you can see, testing DTCs P0135 and/or P0155 is not hard to do at all. OK, in the next few pages are the step-by-step testing instructions you'll need to get to the bottom of the problem.
TEST 1: Checking For 12 Volts (Pink Wire)
Our first order of business, is to make sure that the O2 sensor is getting power. This power is provided only when you turn the key to the ON position and/or when the engine is running.
IMPORTANT: Just a friendly reminder, don't test the O2 sensor's circuits/wires with a hot engine, or you run the risk of severe burns. If the O2 sensor's are hot, let your vehicle cool down completely before starting.
With the key in the RUN position (but engine OFF), this voltage will range between 10 to 12 Volts DC on your multimeter.
You could test this power with a 12 Volt Automotive Test Light but to make sure that you're getting the right amount of Voltage, I recommend using a multimeter. If you don't have one or need to upgrade yours, check out my recommendation here: Buying A Digital Multimeter For Automotive Diagnostic Testing at: easyautodiagnostics.com).
OK, to get our P0135/P0155 DTC troubleshooting under way, this is what you need to do:
- Locate the upstream oxygen sensor you need to test
- Bank 1 Sensor 1 is on the 'driver' side of the engine (P0135).
- Bank 2 Sensor 1 is on the 'passenger' side of the engine (P0155).
- Jack up the vehicle and support it on jack stands (if applicable) to access the oxygen (O2) sensors.
- Never trust the jack to hold up the vehicle. Use jack stands!
- Disconnect the oxygen sensor.
- Locate the Pink wire of the engine wiring harness oxygen sensor connector.
- The letter D will be embossed on the connector.
- With the Key On Engine Off, this wire should have 10 to 12 Volts DC.
Let's take a look at your test results:
CASE 1: 10 to 12 Volts are present in the Pink wire with the Key On Engine Off- This confirms that the oxygen (O2) sensor's heater element is getting juice.
The next step is to make sure that the oxygen sensor's heater element is getting a good Ground on the C circuit wire. For this test, go to: TEST 2: Checking Ground (Circuit C Wire).
CASE 2: 10 to 12 Volts ARE NOT present in the D circuit wire with the Key On Engine Off- This usually means that the O2 sensor fuse, in the Engine Compartment Fuse Box is blown.
This also indicates that the other upstream oxygen sensor isn't getting power too. Check the oxygen sensor fuse and if blown, replace it and retest.


