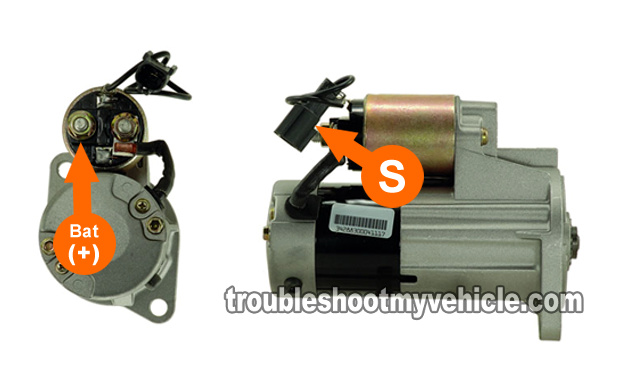
This tutorial will help you test the starter motor, on your 2.4L Nissan Frontier or Xterra, without removing it to bench test it. All the tests are explained in plain English and are accomplished with basic tools.
By the way, this article covers two types of 2.4L Nissan Xterra/Frontier starter motors and you'll see the two types of starter motors in the image viewers in each test.
Contents of this tutorial:
Important Safety Precautions
SUGGESTION 1: You don't need to remove the starter motor from the vehicle to perform the test steps in this article/tutorial. The photos I'm using show it off of the vehicle just to make it easier to show you where to make your connections.
SUGGESTION 2: The battery in your Nissan needs to be fully charged to perform all of the tests. Also, the battery cable terminals and battery posts must be clean and corrosion free.
SUGGESTION 3: Use jack stands to keep your Nissan Xterra or Frontier up in the air. Don't trust the jack alone! Take all necessary safety precautions, like using jack stands to hold up the vehicle, wearing eye-protection (safety glasses), etc.
SUGGESTION 4: If your vehicle has a standard transmission, make sure that it's out of gear and in neutral, and the parking brake is activated/on.
Symptoms Of A Bad Starter Motor
When the starter motor goes bad on your 2.4L Nissan Xterra or Frontier, you'll see one of the following symptoms:
- When you turn the key to crank the engine, nothing happens. In other words, the engine doesn't turn over (crank).
- A jump start does not help. The vehicle's engine still refuses to crank.
- The battery has been charged and/or replaced and still your Nissan does not crank.
- When you turn the key to crank the engine, all you hear is a small knock and nothing else.
Although the above list is a not a very complete list of symptoms, the theme that runs thru' them, and any other related symptom, is that the engine will not turn over when the key is turned to crank the engine in your Nissan 2.4L Frontier or 2.4L Xterra.
Tools Needed To Test The Starter Motor

Disclosure: As an Amazon Associate, I earn from qualifying purchases. If my tutorials help you, using these links is an easy way to support the site at no extra cost to you. Thank you!
You don't need expensive test equipment to test the starter motor on your 2.4L 4 cyl. Nissan Frontier or Xterra but you do need a few things. These are:
- Jack.
- Jack stands.
- Remote starter switch.
- If you'd like to see what a remote starter switch looks like, you can follow this link: Innova 3630 Remote Starter Switch (Amazon affiliate link).
- You can either buy this tool online or you can buy it at your local auto parts store (AutoZone, O'Reilly, Pepboys, etc.).
- Multimeter or a 12 Volt automotive test light.
- If you don't have a multimeter or need to upgrade yours, check out my recommendation here: Tekpower TP8268 AC/DC Auto/Manual Range Digital Multimeter (Amazon affiliate link).
- A wire piercing probe.
- This tool is not an ‘absolute must-have tool’ but I can tell you from experience that it makes it a whole lot easier to probe the S terminal wire for the Start Signal.
- If you'd like to see what this tool looks like, you find out more about it here: Goupchn 4mm Banana to Banana Plug Test Leads Kit (Amazon affiliate link).
- A helper.
You'll need to raise your vehicle to gain access to the starter motor. Never trust the jack alone to hold your Nissan up in the air! Use jack stands!
STARTER TEST 1: Applying 12 Volts To The Starter Motor S Terminal
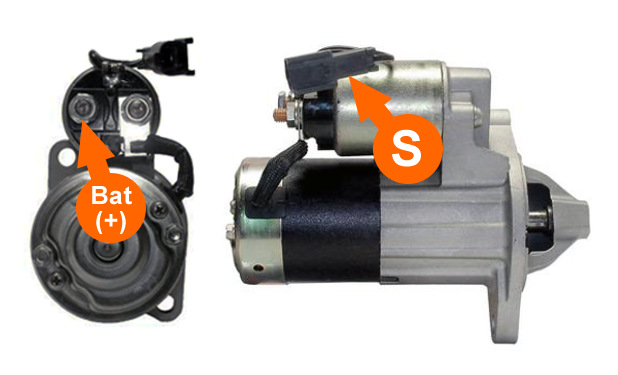
The very first thing we're gonna' do, to find out if the starter motor on your 2.4L Nissan Frontier or Xterra is bad or not, is to manually apply 12 Volts to the starter motor solenoid S terminal.
Since getting to the starter motor solenoid is not that easy, I suggest you use a wire piercing probe to pierce the S terminal wire and then connect your remote starter switch to it and proceed from there.
OK, this is what you'll need to do:
- 1
Jack up your Frontier (or Xterra) and place on it jack stands. Remember, to only way to gain access to the starter motor is from underneath your Frontier or Xterra.
- 2
Disconnect the battery negative (-) terminal.
You'll reconnect it back in one of the following steps, for now, it's a safety precaution as you set up the test.
- 3
Attach a remote starter switch to the S terminal of the starter motor solenoid.
This is easier said than done. So take your time and make sure the connection is on the S terminal of the starter motor solenoid.
Also, in case you're wondering, you can leave the starter motor solenoid's S terminal wire connected to the engine's wiring harness connector or not, the test will work either way. - 4
Reconnect the battery negative (-) cable to the battery negative post.
Now, apply 12 Volts to the S terminal wire of the starter motor starter solenoid with your remote starter switch. As you apply these 12 Volts (to the S terminal wire of the starter motor solenoid), you'll get one of two results:- The starter will activate and will turn over the engine
- -OR-
- The starter motor won't do a thing.
Let's take a look at what your test results mean:
CASE 1: The starter motor cranked the engine. This means that the starter motor is good and that you have an electrical issue keeping the starter motor from cranking the engine.
The next step is to go to TEST 2 and see if the starter motor is getting the Start signal on the S terminal wire (circuit). Go to: STARTER TEST 2: Verifying The Start Signal.
CASE 2: The starter motor DID NOT crank the engine. This usually means that your starter motor is bad and needs to be rebuilt or replaced.
I suggest 2 more tests and these are make sure that the starter motor is getting its 12 Volt Start signal and to test the battery cable (that attaches to the starter motor solenoid) for corrosion. This can be accomplished very easily with a voltage drop test.
- Go to: STARTER TEST 2: Verifying The Start Signal.
- Go to: STARTER TEST 3: Voltage Drop Testing The Battery (+) Cable.
STARTER TEST 2: Verifying The Start Signal
As you may already know, when you turn the key to crank/start the engine, the starter motor gets 12 Volts on the S terminal wire of the starter motor solenoid. These 12 Volts are known as the Start signal.
So, in this test step, we're gonna' see if the starter motor solenoid is getting this Start signal on the S terminal wire. Since you already have your vehicle up on jack stands, this test won't be that hard to do.
You can use a multimeter or a 12 Volt automotive test light. OK, here's what you'll need to do:
- 1
Lift the vehicle and place it on jack stands (if it isn't already up in the air). Now, while underneath the vehicle, connect the red multimeter test lead to the S terminal wire of the starter motor.
The S terminal wire, of the starter solenoid, must remain connected to it's engine wiring harness connector for this test to work. - 2
Attach the black multimeter test lead to a clean and rust-free spot on the engine or on the vehicle frame.
Here I'm going to recommend something to you: Use a battery jump start cable to Ground the black multimeter test lead to a clean Ground point on the engine. The reason why is that depending on how rusty and dirty the underneath of the vehicle, you may NOT be able to find a clean and rust-free spot to Ground the multimeter's black test lead. - 3
Now, have your helper hop inside the vehicle and turn the key to crank the engine.
The engine won't turn over, but the idea is to verify that the starter motor solenoid is getting the 12 Volt start signal from the ignition switch. - 4
Your multimeter is going to register one of two results: Either 10 to 12 Volts DC or no voltage at all.
OK, let's make sense of the readings that your multimeter recorded in the test:
CASE 1: Your multimeter registered 10 to 12 Volts. This test result lets you know the starter solenoid is receiving the Start signal (crank signal).
This means that we can forget about the safety neutral switch and the ignition switch being bad. OK, now the next test is to do a very easy and simple voltage drop test. Go to: STARTER TEST 3: Voltage Drop Testing The Battery (+) Cable.
CASE 2: If your multimeter DID NOT register 10 to 12 Volts. This result exonerates the starter motor. Your starter motor is not bad.
Here's the reason why: Without this 10 to 12 Volt Crank Signal, the starter motor will not crank the engine. Now, although it's beyond the scope of this article to test the neutral safety switch or the ignition switch, you have eliminated the starter motor and this means saving money by not buying a part your vehicle does not need.
STARTER TEST 3: Voltage Drop Testing The Battery (+) Cable
In this starter motor test step, you're gonna' verify that the battery positive (+) cable that attaches to the large stud on the starter solenoid is supplying all of the battery's power to the starter motor.
Here's why: Unseen corrosion somewhere on the battery positive (+) cable, either at the end that connects to the battery positive post or on the end that connects to the starter solenoid could be causing a voltage drop.
In this case, a voltage drop is simply a condition in which unseen corrosion blocks a lot of the battery power from reaching the starter motor. When this happens, the starter motor will not be able to crank the engine in your Nissan 2.4L Frontier or 2.4L Xterra, even though the battery is in a fully charged state.
- 1
Place your multimeter in Volts DC mode. Attach the red multimeter test lead to the center of the positive battery terminal. If the positive battery post isn't clean, then clean a spot right on the top of it. It's important that the multimeter test lead make contact right in the center of the positive battery post.
You may need two helpers for this test step, since someone will have to hold the red multimeter test lead onto the battery positive (+) terminal and someone else will need to crank the vehicle while you perform the next step. - 2
With the black multimeter test lead, touch the center of the starter solenoid stud to which the big battery cable attaches to. You'll maintain the black multimeter test lead in this position throughout the next step.
- 3
Now, have a helper turn the key to crank the engine from inside the vehicle. This is important, since a voltage drop test has to be done while the component in question is working (or trying to work).
- 4
OK, if all is good (no voltage drop), your multimeter will register 0 Volts (0.5 Volts is still 0 Volts). If there's a voltage drop, your multimeter will register voltage (usually above 7 Volts DC).
Let's take a look at what your results mean:
CASE 1: Your multimeter registered 0 Volts (no voltage drop). This result indicates that the starter motor is receiving all of the battery voltage and Amperage it needs to crank the vehicle.
This also means that the starter motor is bad, and here's why:
- In STARTER TEST 1 you confirmed that the starter motor doesn't work when you apply power to the S terminal wire of the starter motor solenoid.
- STARTER TEST 2 you confirmed that the starter motor is receiving the crank signal.
- In this test step you have confirmed that no voltage drop exists on the battery positive cable.
These 3 test results, taken together, indicate that the starter motor is bad. Replacing the starter motor should solve your 'no-crank' condition.
I'm going to make two more recommendations to you. 1.) Before removing the starter motor, manually turn the engine using a 1/2 ratchet and the appropriate socket on the crankshaft pulley. This is just to make sure the engine or the A/C Compressor have not locked up and causing the no-crank condition and 2.) Bench test the starter motor after removing it. This is a super easy test to do and you can find this article by clicking here: How To Bench Test A Starter Motor (Step By Step) (at: easyautodiagnostics.com).
CASE 2: Your multimeter registered 5 Volts or more. This result tells you that a voltage drop does exist and this is not a good result.
The good news is that this can easily be corrected, since a voltage drop is always caused by some sort of corrosion issue on the battery positive cable or terminals or the battery positive post.
The solution is to thoroughly clean the battery positive post and the battery positive (+) terminal (both the end that attaches to the battery positive post and the end the connects to the starter motor solenoid).
After cleaning, try cranking the engine. If it cranks and starts, no further testing is required.
Related Test Articles
You'll find a complete list of Nissan 2.4L tutorials in the following index: Nissan 2.4L Index Of Articles.
Here's a small sample of the articles/tutorials you'll find in the index:
- How To Troubleshoot Misfire Codes (Nissan 2.4L).
- How To Troubleshoot A Blown Head Gasket (Nissan 2.4L, 2.5L).
- How To Test Engine Compression (Nissan 2.4L).
- How To Test The Ignition Coil 2.4L Nissan Frontier, XTerra (1998-2004) (at: easyautodiagnostics.com).

If this info saved the day, buy me a beer!