
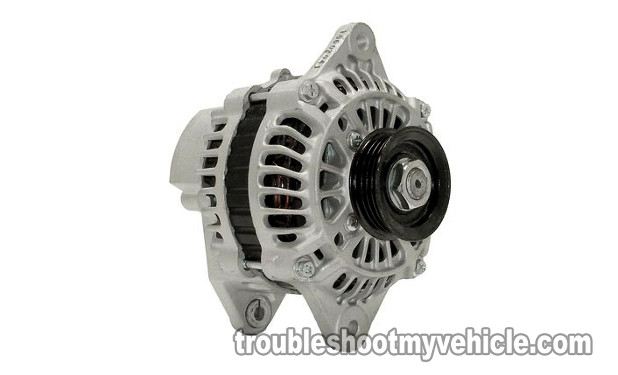
Testing the alternator on your 1.3L Suzuki Swift (Chevy Metro) is one of the easiest diagnostic procedures that you can do on your car.
The tests that I'm gonna' show you in this tutorial will help you to accurately diagnose a bad alternator using a multimeter.
Contents of this tutorial:
Symptoms Of A Bad Alternator
Cranking your Suzuki's engine (to get it started) draws a lot of battery ‘juice’ and it's the alternator's job to replenish the battery once the engine has started and is running.
Your Suzuki's alternator is also tasked with providing the electrical current required to run the: fuel pump, ignition coils, A/C compressor, radio, blower motor, headlights, etc., as you're driving down the road.
When your Suzuki's alternator fails, you'll notice one or more of the following bad alternator symptoms:
- The charge light (also known as the battery light) will be shining nice and bright on your Suzuki's instrument cluster.
- Whenever you turn on the headlights (night driving), they glow very dim.
- The engine won't crank. It will only crank and start if you jump start your Suzuki.
- The only way your Suzuki cranks and starts is if you charge the battery.
- Your Suzuki stalls and won't crank (unless you jump-start it).
With this info under our belts, let's get our first test under-way.
TEST 1: Battery Voltage Test With Engine Running
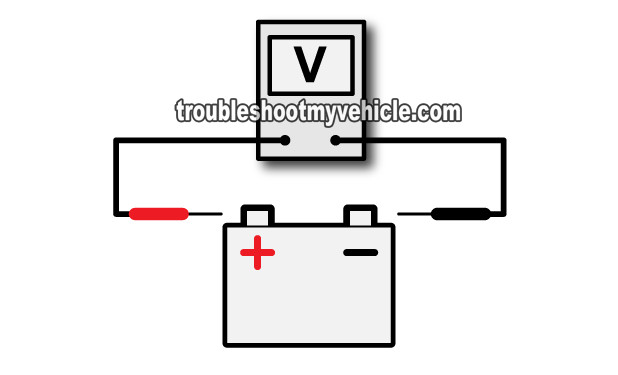
To get this show on the road, we're first gonna' see what the battery's voltage is with the engine running.
If the alternator is doing what it should, the battery's voltage (with the engine running) should be between 13.5 to 14.5 Volts DC.
If the alternator is fried, the voltage will be around 12.5 Volts (or less). The longer the engine runs, the lower this battery voltage will become (till the engine stalls).
NOTE: You'll need to make sure that the battery has enough of a charge to keep your Suzuki Swift (Chevy Metro) running for at least 5 minutes to do this test. If the battery is completely dead, charge it up enough so that it can crank and start the engine.
These are the test steps:
- 1
Crank and start your car and select Volts DC mode on your multimeter.
- 2
Probe the positive battery terminal with the red multimeter test lead.
With the black multimeter test lead, probe the negative battery terminal on your Suzuki's battery. - 3
Your multimeter is gonna' register one of two possible readings and they are:
1.) A steady 13.5 to 14.5 Volts DC.
2.) Or 12.5 Volts that will decrease the longer the engine stays running. - 4
Put an electrical load on the alternator to further confirm that it's either charging or not charging.
You can do this by turning on every accessory possible (inside the vehicle). For example: Turn on the A/C or heater on high, turn on the windshield wipers, turn on the headlights, turn on everything and anything that uses electricity inside and outside of the vehicle. - 5
Your multimeter will show you one of two things (as you turn on all of this stuff):
1.) The multimeter will register a nice and steady 13.5 to 14.5 Volts DC no matter what gets turned on.
2.) It will register 12.5 V DC and this voltage will decrease more and more as you turn on stuff inside your Suzuki (Chevy) vehicle.
OK, let's interpret your multimeter test results:
CASE 1: Battery voltage with the engine running was 13.5 to 14.5 Volts. This voltage test result tells you that the alternator is working (charging the battery).
No further testing is required, since this multimeter test result eliminates the alternator on your Suzuki Swift (Chevy Metro) as bad.
Now, if you're having to jump-start your Swift (Metro) to get it going, this test result points to a bad battery or a parasitic drain. A parasitic drain is tech-speak for something staying on (usually inside the vehicle, for example: a dome-light) and draining the battery while the engine is off.
CASE 2: Battery voltage with the engine running steadily dropped down to 9-10 Volts. This is a clear indication that your car's alternator IS NOT charging the battery.
Replacing the alternator at this point usually solves around 90% of the No Charge conditions. That's right, you could stop testing here and say: ‘The alternator is fried' and be done but..
I suggest two more easy tests to be absolutely sure it is bad. For the first test of the two, go to: TEST 2: Checking The Continuity Of The Bat (+) Cable.
TEST 2: Checking The Continuity Of The Bat (+) Cable
As you're probably already aware, the alternator has two connectors. One connector is a 3-wire connector.
The other is a simple 1-wire connector. This one wire connector has a heavy gauge wire attached to it and connects to the alternator via a nut and stud configuration.
Well, this heavy gauge wire is the one that transmits the alternator's charge output to the battery. This wire doesn't connect directly to the battery. It connects to a 80 Amp mega fuse first. This mega fuse then connects to the battery positive cable.
Every now and then, this mega fuse gets blown. So, in this step we're gonna check this circuit both visually and with a multimeter continuity test.
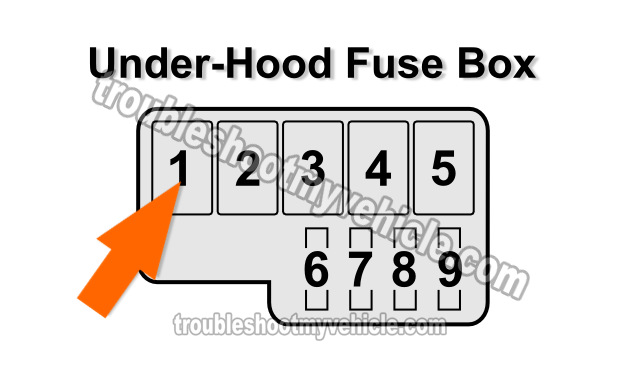
Now in case you're wondering where this mega fuse is located... it's located in the engine compartment fuse box and is labeled with the number 1 in the 2nd illustration in the image viewer above.
NOTE: The battery negative terminal must be disconnected from the battery negative post to perform this continuity test.
This is what you'll need to do:
- 1
Disconnect the battery negative (-) cable terminal from the battery negative post. The positive cable remains connected.
IMPORTANT: Don't continue to the next step without first disconnecting the negative cable from the negative battery post. - 2
After disconnecting the battery negative (-) cable, turn on your multimeter and select Ohms mode.
IMPORTANT: The engine must be cold to perform this test, or you run the risk of getting burned by the engine's hot surfaces! - 3
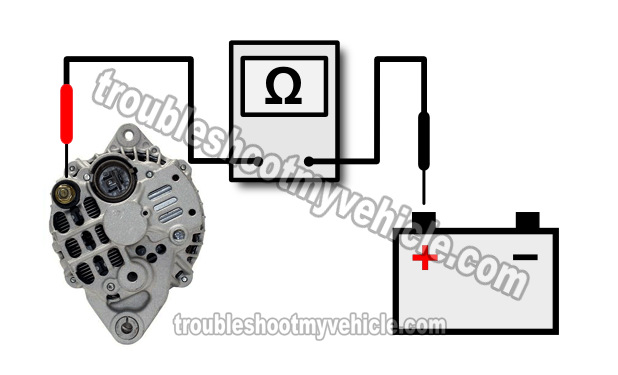
Your Suzuki's alternator has only one big wire attached to it. This wire is attached with a nut. So, place your multimeter's RED test lead on the stud to which this wire is connected to.
See the illustration in the image viewer. - 4
With the black multimeter test lead, probe the center of the battery positive post on your Suzuki's battery.
- 5
You'll get one of two results.
1.) If the mega fuse, protecting this circuit, is blown, your multimeter will indicate a reading of OL (which means over limit). In other words, there will be NO continuity.
2.) If the inline fusible link is OK and not blown, your multimeter will register an Ohms reading of 0.5 Ohms or less. In other words, there will be continuity.
Let's take a look at what your results mean:
CASE 1: Your multimeter registered continuity. This is good, since it indicates that the inline fusible link protecting this circuit is OK and not blown.
Your next step is to check the under-dash fuse (that also feeds the alternator battery voltage) in the under-dash panel fuse box. For this test go to: TEST 3: Checking The Alternator Fuse.
CASE 2: Your multimeter DID NOT register continuity. This result tells you that the 70 Amp mega fuse is blown and this will keep the alternator from charging the battery.
Your next step is to check and replace this mega fuse (if applicable) and retest. Replacing this mega fuse (if blown) should solve your No Charge condition. You'll have to investigate the reason this mega fuse blew, since they don't get blown for no particular reason.
TEST 3: Checking The Alternator Fuse
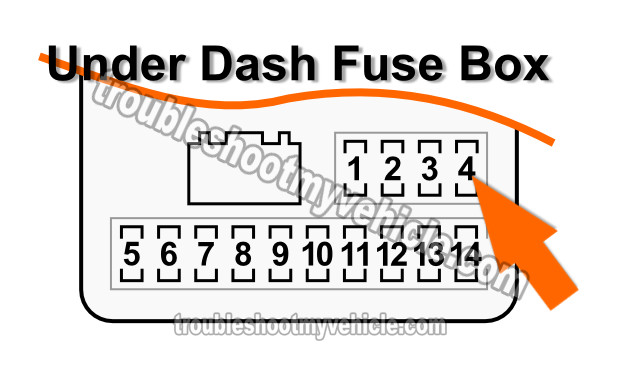
If you've reached this point you have checked/confirmed 3 things:
One: Your Suzuki Swift's alternator is not charging the battery and the battery light is shining nice and bright on the instrument panel.
Two: The battery voltage with the engine running is below 12.5 Volts and decreases when you turned everything one to 10 Volts or less (TEST 1).
Three: There's continuity between the battery positive post and the battery output terminal on the alternator (TEST 2).
The next and last step is just to make sure that the alternator fuse IS NOT blown in the under-dash fuse box.
This is what you need to do:
- 1
Reconnect the battery negative cable to the battery.
- 2
Locate the under-dash fuse box fuse labeled with the #4 in illustration in the image viewer.
- 3
Remove the fuse and check to see if it's blown (or not).
Let's take a look at what your test results mean:
CASE 1: The fuse IS NOT blown. This tells you that the alternator FIELD circuit is getting power and confirms that the alternator is bad and needs to be replaced to solve the ‘no charge’ problem.
If you'd like to save some bucks on the alternator and belt, take a look at: Where To Buy The Alternator And Save.
CASE 2: The fuse is blown. This tells you that the alternator's FIELD circuit is not getting power and without this battery power the alternator won't charge.
Replace the fuse and retest the alternator.
Where To Buy The Alternator And Save
The alternator can get expensive and the best place to save some bucks on it and the serpentine be is by shopping online.
The following links will help you comparison shop for the alternator and serpentine belt:


Disclosure: As an Amazon Associate, I earn from qualifying purchases. If my tutorials help you, using these links is an easy way to support the site at no extra cost to you. Thank you!
Not sure if the above alternator and serpentine belt fit your particular vehicle? Once you get to the site they'll make sure they fit by asking you the specifics of your particular Suzuki Swift (Chevy Metro). If it doesn't fit, they'll find you the right parts.
More 1.3L Swift (Chevy Metro) Tutorials
You can find a complete list of tutorials in this index: Suzuki 1.3L Index Of Articles.
Here's a small sample of the 1.3L Swift tutorials you'll find in the index:
- How To Test The MAP Sensor (1998-2001 1.3L Swift / Chevy Metro).
- How To Test The TP Sensor (1998-2001 1.3L Swift / Chevy Metro).
- How To Test The Ignition Coils Suzuki: Swift, Vitara - Chevy: Metro, Tracker (at: easyautodiagnostics.com).
- How To Troubleshoot A Misfire (Suzuki 1.3L, 1.6L, 1.8L, 2.0L, 2.3L) (at: easyautodiagnostics.com).
- How To Do A Compression Test (Suzuki 1.3L, 1.6L, 1.8L, 2.0L, 2.3L) (at: easyautodiagnostics.com).
- Blown Head Gasket Test (Suzuki 1.3L, 1.6L, 1.8L, 2.0L, 2.3L, 2.5L) (at:easyautodiagnostics.com).

If this info saved the day, buy me a beer!
