

In this tutorial, we're going to troubleshoot OBD-I Code 25, which points to a problem with the Idle Air Control (IAC) valve on the 1992–1995 3.9L V6 Dodge Ram Pickup.
The IAC valve plays a key role in maintaining a stable idle, and when it goes bad —or its wiring fails— the engine is gonna idle rough, stall, or refuse to stay running unless you keep your foot lightly on the gas pedal.
I'll walk you through step-by-step tests to check the IAC valve itself, its wiring, and the PCM circuits using a simple multimeter —no expensive diagnostic equipment required.
With each test, you'll get clear, actionable results to help you pinpoint the issue and fix it right the first time.
Contents of this tutorial:
- What Does The IAC Valve Do?
- Symptoms Of A Bad Idle Air Control (IAC) Valve.
- Most Common Causes Of A Diagnostic Trouble Code 25.
- IAC Valve Connector Pinout.
- TEST 1: Connector Wiggle Test.
- TEST 2: Checking For Shorted IAC Valve Wires.
- TEST 3: Checking The IAC Valve Wires For A Short To Ground.
- TEST 4: Checking IAC Valve Stepper Motor Resistance (From FI Computer Connector).
- What If The PCM Itself Is Bad?
- How To Repair Shorted IAC Wires (Real-World Fix).
- More 3.9L V6 Dodge Ram Pickup Tutorials.
ES  You can find this tutorial in Spanish here: Cómo Diagnosticar Código 25 OBDI —Válvula IAC (1992-1995 3.9L V6 Dodge Ram Pickup) (at: autotecnico-online.com).
APPLIES TO: This tutorial applies to the following vehicles:
- 3.9L V6 Dodge Ram 150 Pickup: 1989, 1990, 1991, 1992, 1993.
- 3.9L V6 Dodge Ram 250 Pickup: 1989, 1990, 1991, 1992, 1993.
- 3.9L V6 Dodge Ram 1500 Pickup: 1994, 1995.
- 3.9L V6 Dodge Ram 2500 Pickup: 1994, 1995.
1996-2001 IAC VALVE TESTS:
What Does The IAC Valve Do?
On the 1992-1995 3.9L V6 Dodge Ram Pickup, the idle air control (IAC) valve valve is located on the back of the throttle body assembly and is connected to the intake manifold air stream.
The IAC valve is responsible for managing and maintaining the engine's idle speed. It ensures that the engine continues running smoothly when the throttle plate is closed —like when you're sitting at a stoplight or coasting with your foot off the gas.
This component is a four-wire stepper motor assembly. Internally, it contains two small stepper motors —and each motor is controlled by a pair of wires connected directly to the PCM.
The PCM sends electrical pulses to these motors, which precisely move a pintle (a round needle-like valve) in or out of an air passage inside the throttle body.
As this pintle moves, it opens or closes the bypass air passage that routes air around the closed throttle plate.
By adjusting this bypass airflow in very small increments, the IAC valve allows the PCM to fine-tune the amount of air entering the engine during idle conditions, ensuring stable and responsive idle RPMs.
Let's look at two real-world examples of the IAC valve at work:
- Coming to a stop or releasing the gas pedal:
- As you let off the gas pedal, the throttle plate closes —but the engine still needs air to keep running.
- The PCM quickly responds by adjusting the IAC valve, allowing just the right amount of air to bypass the closed throttle plate.
- This prevents the engine from stalling and keeps idle RPM steady while you're coasting, braking, or waiting at a stop.
- When an electrical or mechanical load is applied:
- Turning on accessories like the A/C compressor, headlights, or power steering adds extra load to the engine.
- The PCM senses this and immediately commands the IAC valve to open slightly more, increasing airflow and raising the idle speed just enough to maintain smooth operation.
- Without this automatic adjustment, the engine might stumble or stall under the added strain.
In short, the IAC valve is a small but critical component that allows the PCM to adapt idle speed on the fly —whether the load is changing, the throttle is closing, or the engine is simply trying to stay alive at idle.
Symptoms Of A Bad Idle Air Control (IAC) Valve
The PCM constantly monitors the IAC valve's electrical system. If it detects something off —such as:
- Voltage levels or resistance values in the IAC valve circuit that fall outside the expected range —usually caused by shorted or open wiring between the IAC valve and the PCM connector.
- Idle speed readings that don't match the idle speed the PCM is commanding.
...it'll trigger Code 25: Idle Air Control (IAC) Circuits and illuminate the check engine light (CEL).
When there's an issue with the IAC system, you're likely to notice one or more of these common symptoms:
- Stalling or low idle: The engine may die unless you keep your foot lightly on the gas pedal.
- Idle speed is unusually high or unstable: You might see RPMs hovering around 1500, or fluctuating up and down erratically.
- Rough idle: The engine runs unevenly when sitting still, often with a noticeable vibration.
- Normal idle, but code is still present: Even if the engine seems to idle fine, the PCM might detect an electrical problem and store the fault code anyway.
Most Common Causes Of A Diagnostic Trouble Code 25
Below are some of the most frequent causes behind a Code 25 fault:
- Bad IAC valve: While it's built to last, it'll eventually wear out. The IAC valve contains a pair of stepper motor coils —if one burns out, the valve won't function properly.
- Pintle stuck due to carbon buildup: Over time, deposits can accumulate on the pintle, restricting its movement or preventing it from sealing correctly, which disrupts the PCM's ability to adjust idle airflow accurately.
- Bad IAC electrical connector: If the connector is damaged, the electrical connection to the valve becomes unreliable, interrupting the PCM's control of the IAC valve.
- Open or Grounded IAC wiring: A break in the wire (open-circuit) or contact with bare metal (short to Ground) is a common issue that blocks the PCM's signals from reaching the IAC valve.
- IAC wires shorted to battery power: Another frequent issue —if the IAC valve wires carrying power and Ground are damaged and touch (short together), unwanted voltage can enter the Ground circuit and disrupt the PCM's control of the valve.
- PCM malfunction: Rare but possible —an internal failure in the PCM's IAC control circuit can prevent it from sending movement commands to the valve entirely.
IAC Valve Connector Pinout
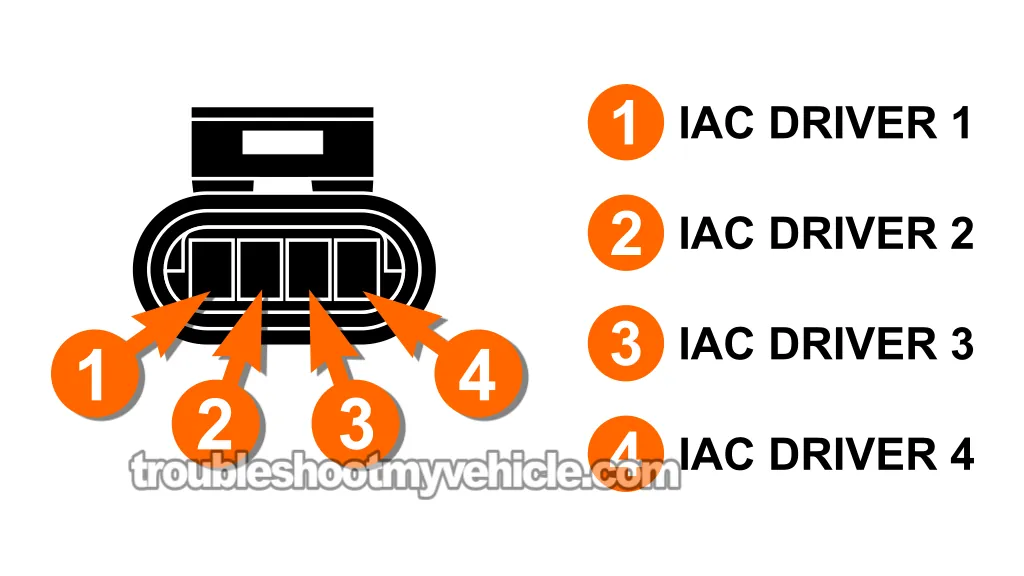
| 1996-2001 IAC Connector Pinout | ||
|---|---|---|
| Pin | Wire Color | Description |
| 1 | Grey with red stripe (GRY/RED) | IAC Driver 1 |
| 2 | Yellow with black stripe (YEL/BLK) | IAC Driver 2 |
| 3 | Brown with white stripe (BRN/WHT) | IAC Driver 3 |
| 4 | violet with black stripe (VIO/WHT) | IAC Driver 4 |
NOTE: The violet with white stripe (VIO/WHT) wire is also referred to as the purple with white stripe (PPL/WHT) wire.
TEST 1: Connector Wiggle Test
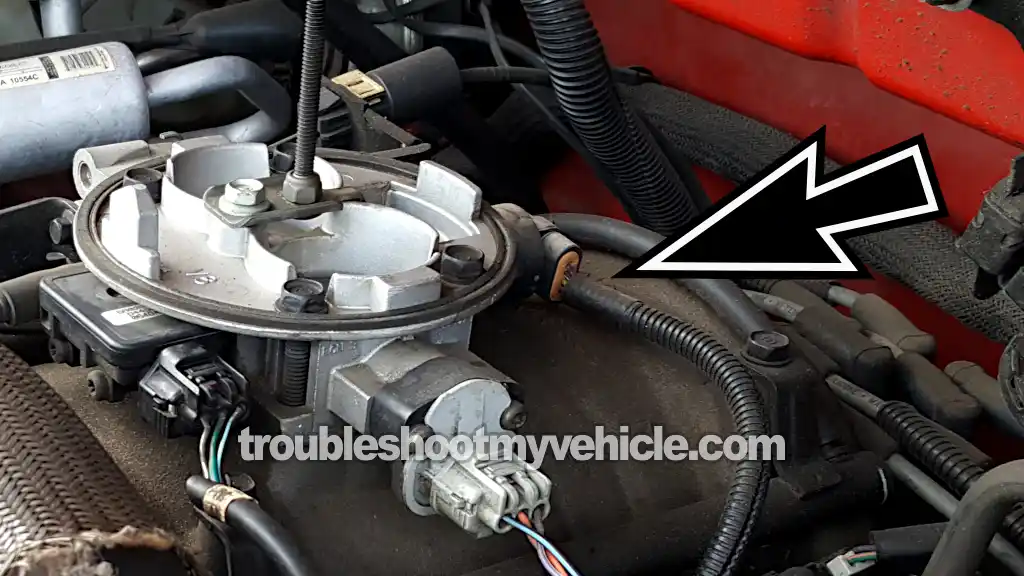
Over time, connectors and wires can develop hidden faults that only show up when the engine is vibrating or the wiring is moved around.
A quick and effective way to uncover these intermittent issues is by performing a wiggle test on the IAC valve connector and its wiring.
This test can help you catch loose terminals, broken wires, or internal shorts that might not be visible from the outside.
If moving the connector or harness causes a change in idle speed, you've found the root of the IAC valve problem.
IMPORTANT SAFETY NOTE: Since this procedure is done while the engine is running, be extremely careful. Keep your hands, tools, and clothing well away from spinning components —including the cooling fan, drive belts, and pulleys. Stay alert while working around a running engine.
Here's how to perform the wiggle test:
- 1
Start the engine and let it settle into an idle.
- 2
Gently move/wiggle the IAC connector and the wires leading into it.
Gently flex and shift the wires along their length, working your way back to where they merge with the main engine harness. - 3
Watch the idle speed as you wiggle the wiring.
If the RPM stays constant, the wiring and connector are fine. But if the engine stutters, drops in RPM, or stalls out —you've found a wiring or connector fault. - 4
Once you're done, shut off the engine.
Now, let's break down what the test results tell you:
CASE 1: Engine stumbles, surges, or shuts off when the connector or wires are moved. This confirms a bad connection or a loose wire inside the IAC 4-wire connector.
Replace the connector or if the fault lies within the wires, repair or replace the damaged section.
NOTE: If you're splicing in new wire, avoid crimp (butt) connectors —solder the splice instead. The heat and constant vibration in the engine bay will loosen crimped connectors over time, leading to hard-to-trace intermittent failures.
For more info on repairing the IAC valve wires, see: How To Repair Shorted IAC Wires (Real-World Fix).
CASE 2: Wiggling the connector and wiring has no effect —idle remains stable. That's the result we want. It means the connector and its wiring are likely in good shape.
The next step is to test the continuity of the wires. Head to: TEST 2: Checking For Shorted IAC Valve Wires.
CASE 3: The engine won't start, or stalls out immediately after starting. This could point to something more serious —like a completely failed IAC valve, damaged wiring, or even a malfunction inside the fuel injection computer.
To continue your IAC valve diagnostic, go to: TEST 2: Checking For Shorted IAC Valve Wires.
TEST 2: Checking For Shorted IAC Valve Wires
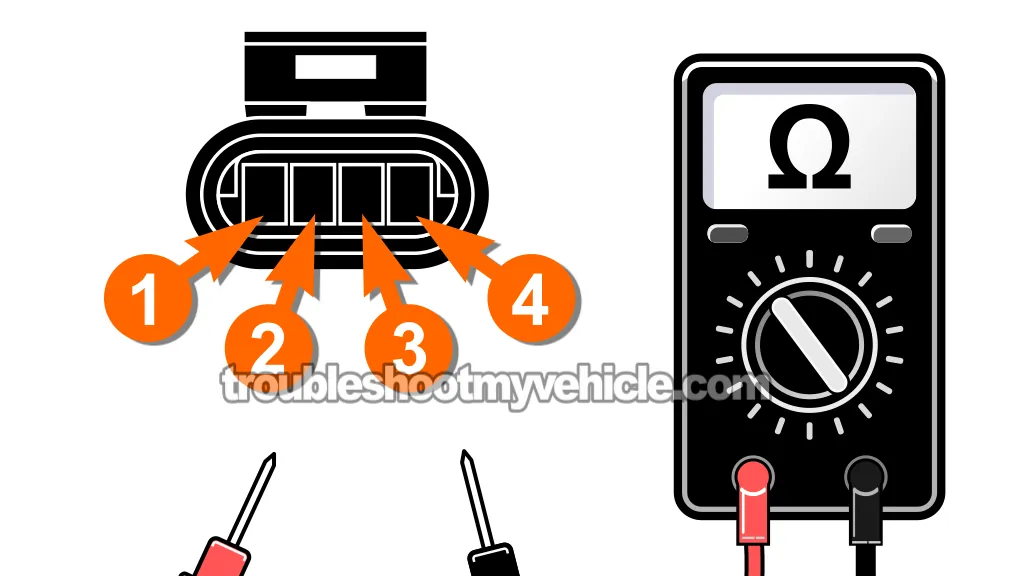
Each wire going to the IAC valve should be electrically isolated from the others —none of them should be shorted together.
In this test, we're going to check for any internal shorts between the wires by measuring resistance between each terminal at the IAC connector.
If any two terminals show continuity (low resistance), that's a problem —it usually means melted insulation or damaged wiring inside the engine wiring harness.
NOTE: Don't have a multimeter or need to upgrade yours? This is the one I use and recommend: Tekpower TP8268 AC/DC Auto/Manual Range Digital Multimeter (Amazon affiliate link).
Follow these steps to carry out the test:
- 1
Turn the ignition OFF and disconnect the negative (–) battery cable from the battery terminal.
NOTE: This precaution helps protect your multimeter and prevents accidental shorts while testing. - 2
Unplug both the IAC valve connector and the FI computer's 60-pin connector.
- 3
Set your multimeter to Ohms mode.
- 4
Touch one probe of your multimeter to Terminal 1 on the IAC connector.
- 5
Use the other probe to check Terminals 2, 3, and 4 —one at a time.
- 6
No continuity should be detected —the multimeter should display infinite resistance between Terminal 1 and the rest.
- 7
Repeat the process for each of the other terminals.
Move the first lead to Terminal 2 and check against 3 and 4. Then do the same for Terminal 3. - 8
Have a helper wiggle the engine wiring harness.
While the probes are in place, your helper should gently flex and move the wiring harness near the IAC valve connector and along its path toward the PCM.
If the multimeter reading suddenly changes, you've found an intermittent short between wires.
If you get a low resistance reading —typically 5 Ohms or less— between any two terminals, it means those wires are shorted together.
Here's how to read your test results:
CASE 1: Multimeter shows infinite resistance (or OL) between all terminals. That's the correct test result. Each wire is electrically separate as it should be —no shorts detected.
You're clear to move on to the next test: TEST 3: Checking The IAC Valve Wires For A Short To Ground.
CASE 2: There's continuity between two or more terminals —5 Ohms or less. That confirms the wires are shorting together somewhere along the harness.
The most common cause? Damaged insulation inside the engine wiring harness. Here are some tips on how to fix it: How To Repair Shorted IAC Wires (Real-World Fix).
CASE 3: Readings shift as you move the wiring harness —or you see sporadic continuity (5 Ohms or less). This confirms a short circuit issue, or an internal wire break that's making intermittent contact.
Worn or cracked insulation on the wires is often to blame. Follow the repair suggestions outlined here: How To Repair Shorted IAC Wires (Real-World Fix).
TEST 3: Checking The IAC Valve Wires For A Short To Ground
This test is designed to find out if any of the IAC valve wires are unintentionally Grounded. Just like in TEST 2, each wire coming from the IAC connector should not only be isolated from each other —it should also show no connection to Ground.
A short to Ground typically happens when the wire's insulation becomes damaged or worn, allowing the bare copper to touch a metal surface such as the engine block or another Grounded component.
This kind of fault will definitely interrupt the PCM's control over the IAC valve and trigger the check engine light (CEL) with a Code 25: Idle Air Control (IAC) Circuit.
IMPORTANT: Before beginning this test, disconnect the negative (-) battery cable. This ensures the battery doesn't interfere with your multimeter readings or cause accidental shorts.
Alright, let's check for any shorts to Ground in the IAC wiring:
- 1
Disconnect the negative (-) battery cable from the battery terminal.
You'll use the free end of this cable as your Ground reference during testing. - 2
Unplug both the IAC valve connector and the PCM's 60-pin connector.
NOTE: This isolates the wiring so you're testing only the engine wiring harness —with no influence from these components. - 3
Set your multimeter to Ohms mode.
- 4
Place one probe of your multimeter on Terminal 1 of the IAC connector. Use the other probe to touch the loose negative battery cable —your Ground point.
- 5
Check the multimeter for continuity (5 Ohms or less).
- 6
The meter should show infinite resistance (no continuity) usually indicated by the letters OL.
If you see a low resistance reading —typically 5 Ohms or less— that means the wire is Grounding out somewhere along the circuit. - 7
Repeat this procedure for Terminals 2, 3, and 4, checking each one individually against Ground.
Let's evaluate your test results:
CASE 1: No continuity —meter shows infinite resistance on all four wires. This is what we need to see and confirms none of the IAC wires are shorted to Ground.
You're ready to move on to: TEST 4: Checking IAC Valve Stepper Motor Resistance (From FI Computer Connector).
CASE 2: Continuity (5 Ohms or less) found on one or more terminals. That tells you there's an unwanted Ground contact somewhere in the engine wiring harness between the IAC connector and the computer.
Carefully inspect the engine wiring harness, especially around areas where it may be rubbing against brackets, sharp surfaces, or hot engine components.
Repair or replace any damaged wiring. For some practical tips on this type of repair, see: How To Repair Shorted IAC Wires (Real-World Fix).
TEST 4: Checking IAC Valve Stepper Motor Resistance (From FI Computer Connector)

OK, so up to now, your tests have eliminated the usual wiring faults:
- The connector and all four IAC wires checked out fine (TEST 1).
- No internal shorts between any IAC circuits (TEST 2).
- No wires Grounding out (TEST 3).
Now it's time to evaluate the IAC valve itself —specifically, its two stepper motors that move the pintle in and out to regulate idle airflow.
Each of these motors is operated through a dedicated pair of wires connected directly to the PCM. In this step, you'll measure the resistance across the correct pins at the PCM's 60-pin connector to test the health of each motor.
On a properly functioning IAC valve, you'll typically see around 35 Ohms of resistance for each motor coil —though values between 8 and 10 Ohms are also commonly reported. These aren't official factory numbers, but they're considered normal for working IAC valves.
What matters most is that both readings are similar. If one coil reads drastically different —or you see infinite resistance (an open-circuit) or close to zero Ohms (a short)— then that motor has failed, and the IAC valve needs to be replaced.
IMPORTANT WARNING: Be extremely cautious when testing the female terminals inside the FI computer's 60-pin connector. Never force standard multimeter probes into these small round terminals —they're too large and can permanently deform or damage the connectors. This kind of damage can cause weak electrical contact, erratic behavior, or a total circuit failure. Always use properly sized test probes made for terminal pin testing. Handle this step with precision and care.
OK, here's the step-by-step:
- 1
Make sure the negative (-) battery cable is still disconnected before proceeding.
- 2
Disconnect the PCM from its 60-pin wiring connector.
- 3
Reconnect the IAC valve to its 4-wire connector.
- 4
Set your multimeter to Ohms (Ω) mode.
- 5
To test Stepper Motor 1:
Place your multimeter probes on terminals 39 and 60 of the FI computer connector.
You should see a reading around 35 Ohms. Some IAC valves may show between 8 to 10 Ohms, which is still normal. - 6
To test Stepper Motor 2:
Move the probes to terminals 40 and 59 on the same connector.
Expect a resistance reading in the same general range —around 35 Ohms, or possibly 8 to 10 Ohms. - 7
Both motors should return nearly identical resistance values. Large differences between them indicate a problem.
If your meter shows either an open-circuit (infinite resistance) or a short-circuit (near-zero resistance), that means one of the stepper motor windings has failed, and the IAC valve will need to be replaced.
Here's how to interpret your results:
CASE 1: Both resistance values are close to the indicated Ohms value. That's a good sign —the internal motor coils are intact.
If idle problems persist and Code 25 doesn't want to go away, it could be due to mechanical issues like a sticky pintle or carbon deposits inside the valve.
There's also the possibility (although very rare) that the PCM is bad. See: What If The PCM Itself Is Bad?
CASE 2: One or both readings show infinite resistance. That's a sign of a broken internal winding —an open-circuit— in the IAC valve. The IAC valve will need to be replaced.
CASE 3: One or both readings are close to zero Ohms. This indicates a shorted coil, which renders the valve non-functional. Replacement is the only fix.
What If The PCM Itself Is Bad?
Although rare, a malfunctioning Powertrain Control Module (PCM) —specifically, a failure within the IAC driver circuits —can sometimes be the root cause of a Code 25.
But, I want to be very clear and emphasize: this kind of failure is highly unusual.
What makes it challenging is that there's no direct way to test the IAC driver circuits inside the computer using a scan tool or multimeter.
These driver circuits are embedded solid-state components. If one of them fails, the computer might stop sending proper signals to the IAC valve, resulting in idle problems like stalling, erratic or elevated RPMs, and eventually a Code 25 fault.
A bad PCM should only be suspected after you've ruled out all other likely causes.
Be sure the following items have passed inspection before considering computer failure:
- All four IAC wires are free of shorts —to each other or to Ground.
- Resistance readings on both IAC valve stepper motors are within normal range.
- The IAC connector is in good condition —no corrosion, broken terminals, or loose fit.
- The intake manifold gasket is sealing correctly —as in no vacuum leaks.
- No vacuum leaks are present near the throttle body area.
- The throttle plates and bores are clean and moving freely —no sticking.
- The idle stop screw hasn't been tampered with or misadjusted.
If all of these components are functioning correctly, yet idle issues persist and Code 25 keeps returning, it may be time to suspect an internal computer fault.
The only way to confirm this is to install a known-good PCM and monitor whether the issue disappears. If the symptoms vanish, the original computer was definitely the problem.
Still, it bears repeating: true PCM failures are uncommon. Start by troubleshooting the wiring, IAC valve, and mechanical components thoroughly before considering a PCM replacement.
How To Repair Shorted IAC Wires (Real-World Fix)
If you've confirmed that two IAC wires are shorted —and the damaged portion is hidden deep within the wiring harness, out of view or hard to access— don't panic.
You don't need to tear apart the entire harness or trace the wire inch by inch. That's not how it's usually handled in real-world repairs.
The practical and reliable solution is to bypass the faulty section by installing a new wire. It's a straightforward method and, when done correctly, provides a durable and lasting fix.
Here's how to go about it:
- Cut the affected wire(s) at least 3 to 4 inches away from the IAC connector to ensure you're working beyond the problem area.
- Make a similar cut near the FI computer connector, choosing a section of clean, undamaged wire.
- Splice in new wire that matches the original gauge and insulation type. Strip the ends and solder the connections for a solid, dependable joint.
- Skip the butt connectors. While they may seem convenient, they will loosen over time due to engine vibration, leading to intermittent or total failure.
- Once soldered, use heat shrink tubing or high-quality electrical tape to insulate and protect the repair from moisture and wear.
Although replacing the entire wiring harness would be the textbook fix, it's almost never required. A clean, well-executed splice like this will be a a solid IAC circuit issue solution.
More 3.9L V6 Dodge Ram Pickup Tutorials
I've written several more tutorials for the V6 Dodge Ram pickups that may be of interest to you that you can find in this index:
Here's a sample of the tutorials you'll find in the index:
- How To Test The TPS (1992-1996 3.9L V6 Dodge Ram Pickup).
- How To Test The MAP Sensor (1992-1996 3.9L V6 Dodge Ram Pickup).
- How To Test The Fuel Pump (1992-2001 3.9L V6 Dodge Ram Pickup).
- How To Test The Intake Air Temp (IAT) Sensor (1992-1997 3.9L V6 Dodge Ram Pickup).

If this info saved the day, buy me a beer!
