

P0505: Idle Control Malfunction is one of those trouble codes that can drive you nuts. You've probably already swapped out the idle air control (IAC) valve —but the darn code keeps coming back, and the engine's idle still isn't behaving.
The good news is that testing the IAC valve and its circuits (between the IAC valve and the PCM) isn't difficult.
I'll show you exactly how to test the wiring between the IAC connector and the PCM —step by step— so you can stop guessing and start pinpointing the real issue.
I've laid out all the tests in a clear and practical way, so you can narrow down the true cause behind that P0505 code —and finally get it resolved.
Contents of this tutorial:
- What Does The IAC Valve Do?
- Symptoms Of A Bad Idle Air Control (IAC) Valve.
- Most Common Causes Of A P0505 Diagnostic Trouble Code.
- IAC Valve Connector Pinout.
- TEST 1: Connector Wiggle Test.
- TEST 2: Checking For Shorted IAC Valve Wires.
- TEST 3: Checking The IAC Valve Wires For A Short To Ground.
- TEST 4: Check IAC Valve Stepper Motor Resistance (From PCM Connector).
- What If The PCM Itself Is Bad?
- How To Repair Shorted IAC Wires (Real-World Fix).
- More 3.9L V6 Dodge Ram Pickup Tutorials.
ES  You can find this tutorial in Spanish here: Cómo Diagnosticar Código P0505 —Válvula IAC (1996-2001 3.9L V6 Dodge Ram Pickup) (at: autotecnico-online.com).
APPLIES TO: This tutorial applies to the following vehicles:
- 3.9L V6 Dodge Ram 1500 Pickup: 1996, 1997, 1998, 1999, 2000, 2001.
- 3.9L V6 Dodge Ram 2500 Pickup: 1996, 1997, 1998, 1999, 2000, 2001.
1992-1995 IAC VALVE TESTS:
What Does The IAC Valve Do?
In the 1996–2001 3.9L V6 Dodge Ram pickups, idle speed is managed by an idle air control (IAC) valve, which is bolted directly to the throttle body.
This 4-wire valve uses a pair of stepper motors to move a pintle in or out in small increments. Each movement adjusts how much air bypasses the closed throttle plate when the engine is idling.
By allowing just the right amount of air around the throttle plate, the IAC valve helps maintain a smooth idle —especially when your foot's off the gas and the throttle is fully closed.
The job of keeping idle speed steady falls on the Powertrain Control Module (PCM), which constantly monitors engine load and adjusts the IAC valve as needed to hold the target RPM. Here are two common examples:
- Extra load from accessories —like turning on the A/C or headlights— prompts the PCM to open the IAC valve more, increasing airflow and idle speed to keep the engine from shutting off.
- When slowing down or coming to a stop, the PCM adjusts the IAC valve to gently stabilize RPM, preventing the engine from stalling as speed drops.
Symptoms Of A Bad Idle Air Control (IAC) Valve
The PCM constantly keeps tabs on the IAC valve's electrical circuit. If it detects something off —like abnormal resistance, voltage out of range, an open or short-circuit, or even if the idle speed can't match the PCM's command —it will trigger a P0505 Idle Control Malfunction code and turn on the check engine light.
When the IAC system isn't working properly, you might notice one or more of the following symptoms:
- Stalling or extremely low idle: The engine won't stay running unless you keep pressing the gas pedal.
- Idle that's too high or erratic: RPMs might hover around 1500 or fluctuate unpredictably, going up and down without input.
- Rough or shaky idle: The engine may sound uneven or vibrate while idling —especially if a vacuum leak is making things worse.
- Normal idle but the code is still present: Sometimes the engine idles fine, but a problem in the IAC circuit still causes the code to set.
Most Common Causes Of A P0505 Diagnostic Trouble Code
To put it simply, the PCM relies on the IAC valve to manage how much air enters the engine at idle —which directly controls idle RPM.
Because it continuously tracks engine speed anytime the engine is running, any malfunction in this system —whether it's mechanical, electrical, or airflow-related —can lead the PCM to set a P0505 Idle System Malfunction trouble code.
Here are some of the most common causes of a P0505 code:
- Worn-out or stuck IAC valve: Although these valves are generally durable, they can fail over time. Problems might include a stuck pintle due to carbon buildup, internal motor coil failure (it has two), or physical wear that affects movement.
- Damaged IAC connector: If the plug or terminals are corroded, loose, or broken, it can disrupt electrical contact and interfere with valve operation.
- Open or shorted IAC wiring (to Ground): This is one of the more frequent issues. It means a wire going to the IAC valve is either broken or has rubbed against metal and Grounded out —cutting off or misrouting the signal between the PCM and the valve.
- Short to power within the IAC circuit: Also a common failure. This happens when one wire in the IAC harness touches another that carries voltage. When an IAC valve Ground wire gets hit with voltage from another circuit, the PCM can no longer regulate the valve correctly.
- PCM failure: Rare, but possible. If one of the internal driver circuits that controls the IAC motor burns out, the PCM won't be able to command valve movement at all.
IAC Valve Connector Pinout
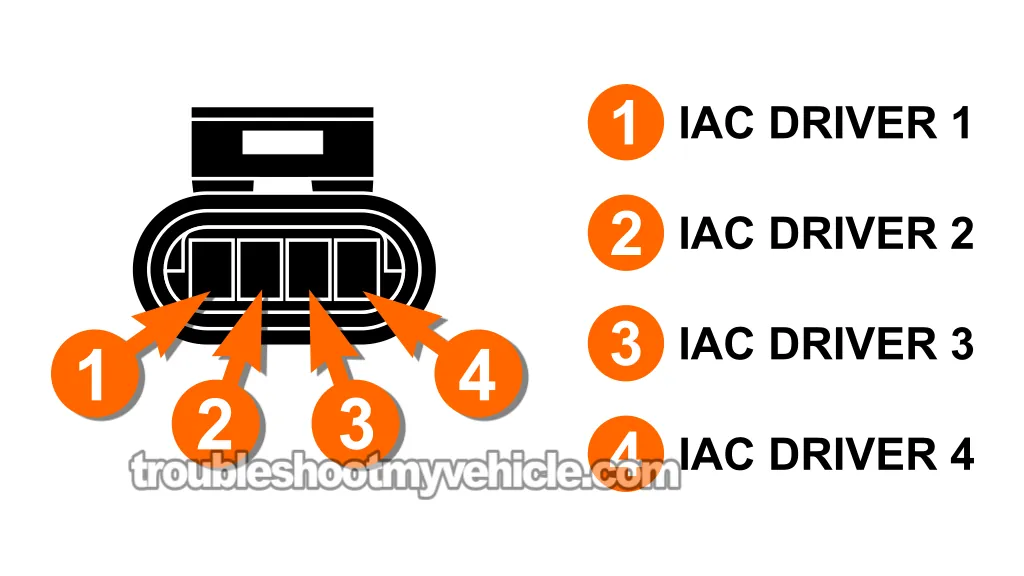
| 1996-2001 IAC Connector Pinout | ||
|---|---|---|
| Pin | Wire Color | Description |
| 1 | Grey with red stripe (GRY/RED) | IAC Driver 1 |
| 2 | Yellow with black stripe (YEL/BLK) | IAC Driver 2 |
| 3 | Brown with white stripe (BRN/WHT) | IAC Driver 3 |
| 4 | violet with black stripe (VIO/WHT) | IAC Driver 4 |
NOTE: The violet with white stripe (VIO/WHT) wire is also referred to as the purple with white stripe (PPL/WHT) wire.
TEST 1: Connector Wiggle Test
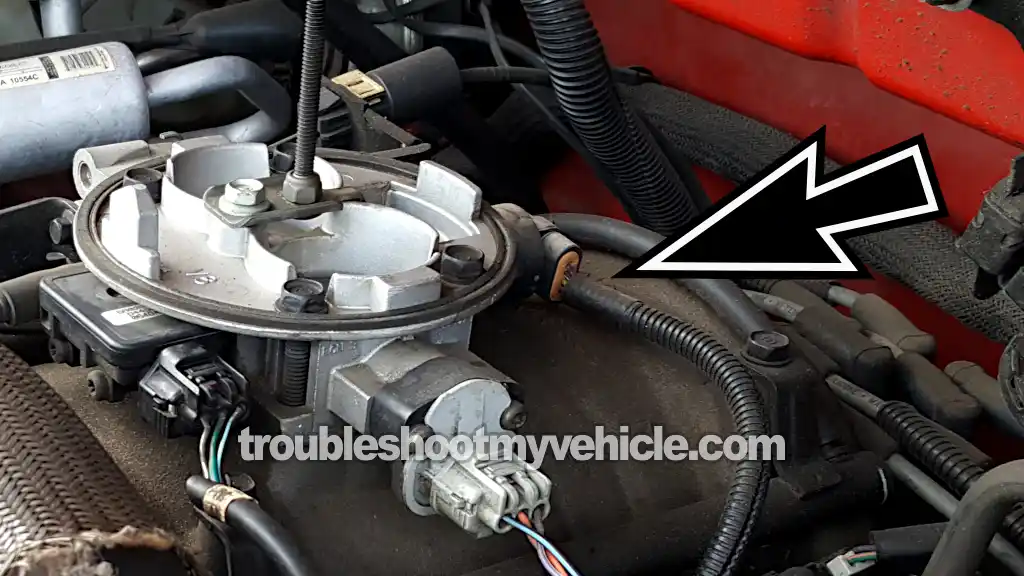
Over time, vibration, heat, and age can take a toll on the IAC valve's electrical connector and its wiring. Terminals may loosen, wires can break internally, or insulation can wear down and cause shorts —often without any visible damage.
These types of issues can lead to intermittent idle problems that are hard to catch through visual inspection alone.
One of the easiest ways to uncover hidden faults like this is with a simple wiggle test while the engine is running —a safe and effective way to see if wiring movement affects idle stability (which it shouldn't).
CAUTION: This test must be done with the engine running. Use extreme care. Keep your hands, tools, and clothing away from the fan, pulleys, and belts. Stay alert and take all safety precautions while working under the hood.
Alright, let's get going:
- 1
Start the engine and let it settle into an idle.
- 2
Carefully wiggle the IAC connector and the wires leading out of it.
Trace the wiring as far as it's visible, gently moving it along its length —especially near bends and where it enters the main harness. - 3
Watch the idle as you move the connector and wires.
The engine should maintain a steady idle. If the idle dips, surges, or the engine stumbles, there's a connection or wiring issue. - 4
Shut off the engine once testing is complete.
Let's break down what your results mean:
CASE 1: The engine stumbles, surges, or dies when you wiggle the connector or wires. This usually points to a loose pin, poor contact, or internal break in the wiring or connector.
Replacing the connector often solves the issue. If the problem is in the wiring itself, repair the damaged section.
When replacing wire, solder the new piece in place instead of using butt connectors. Heat and vibration under the hood can cause butt connectors to loosen and create future intermittent problems.
Even though the info in the following section walks through replacing an entire IAC circuit (from the PCM to the IAC valve), the techniques shown also apply to fixing a smaller section of wiring near the connector:
CASE 2: No change in idle when wiggling the connector and wiring. This is the correct and expected test result and tells you the wiring and connector are OK.
Next step: TEST 2: Checking For Shorted IAC Valve Wires.
CASE 3: The engine won't start, or starts then immediately stalls. This could indicate a completely failed IAC valve, a serious fault in the wiring, or a problem with the PCM itself.
Your next step is: TEST 2: Checking For Shorted IAC Valve Wires.
TEST 2: Checking For Shorted IAC Valve Wires
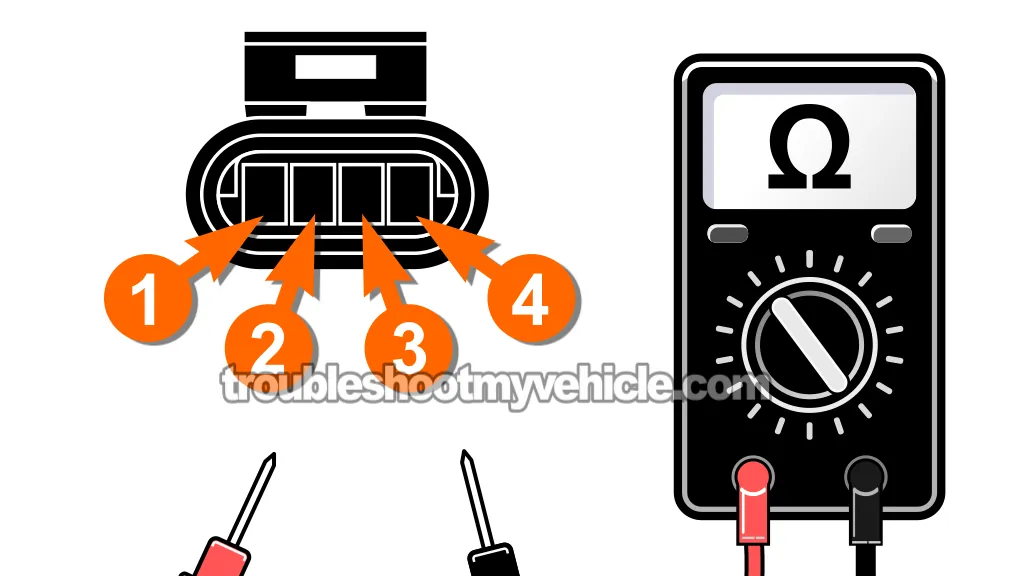
In this next step, we're going to check if any of the IAC valve wires are shorted to each other inside the harness.
The IAC system uses four separate circuits that run from the PCM directly to the valve. These wires should all be electrically isolated —there should be No continuity between any of them.
If you do find continuity between two or more IAC wires, it likely means there's a short somewhere in the engine wiring harness —often due to things like melted insulation or chafed sections.
To perform this test, you'll need to disconnect the IAC valve connector as well as all three PCM connectors. Then, we'll use a multimeter to check each pin at the IAC connector for continuity with the others.
NOTE: Don't have a multimeter or need to upgrade yours? This is the one I use and recommend: Tekpower TP8268 AC/DC Auto/Manual Range Digital Multimeter (Amazon affiliate link).
Let's get started:
- 1
Switch the ignition OFF and disconnect the battery negative (-) cable.
NOTE: This step helps protect both your multimeter and the vehicle's electronics from accidental shorts during testing. - 2
Unplug the IAC valve and all three PCM connectors.
- 3
Set your multimeter to Ohms mode.
NOTE: Don't use the Continuity setting (if your multimeter has one). - 4
Place one multimeter lead on Terminal 1 of the IAC connector.
- 5
Use the second lead to test Terminals 2, 3, and 4 one at a time.
- 6
You should see no continuity (infinite resistance) between Terminal 1 and any of the others.
- 7
Repeat the process with the remaining terminals.
Move your first lead to Terminal 2, and check for continuity to 3 and 4. Then repeat for Terminal 3.
The goal is to confirm that none of the terminals are shorted together internally.
If your multimeter shows a low resistance reading (typically under 5 Ohms) between any two terminals, that means those circuits are shorted together —and that's a problem that needs fixing.
Let's go over what your results mean:
CASE 1: Your multimeter shows infinite resistance between all four terminals. Perfect —this means the circuits are electrically isolated from one another, just like they're supposed to be.
Go ahead and move on to the next test: TEST 3: Checking The IAC Valve Wires For A Short To Ground.
CASE 2: Continuity exists between two or more terminals (resistance is low, typically under 5 Ohms). That indicates a short between the wires.
The most common cause is damaged insulation somewhere in the harness —especially where wires bend, rub, or have come in contact with an exhaust component.
You'll need to locate and repair the shorted section. Here's how: How To Repair Shorted IAC Wires (Real-World Fix).
CASE 3: Readings fluctuate or show momentary continuity as you move the wiring. This usually means there's an intermittent problem in the engine wiring harness —like a wire that's broken inside the insulation or two damaged wires that momentarily touch when the harness is bent or flexed.
You'll need to locate and repair the problem area in the harness. The following guide offers practical tips on how to fix this type of issue: How To Repair Shorted IAC Wires (Real-World Fix).
TEST 3: Checking The IAC Valve Wires For A Short To Ground
This test checks for a short to Ground in any of the IAC valve circuits. Just like in TEST 2, each of the four wires at the IAC connector should be completely isolated —not just from each other, but also from Ground.
A short to Ground usually happens when the wire's insulation wears away —whether from heat, vibration, or rubbing against something— and the exposed copper wire touches the engine block or another metal surface that's Grounded.
If any of the IAC wires are shorted to Ground, the PCM won't be able to control the valve properly, and you'll end up with a P0505 Idle Control Malfunction code.
NOTE: Make sure the battery's negative (-) cable is disconnected from the battery post before you begin. This prevents any interference during testing and helps avoid false readings.
Follow these steps to test for a short to Ground in the IAC valve wiring:
- 1
Disconnect the battery's negative (-) cable from the battery post.
You'll use the loose terminal end of the cable as your Ground reference during the test. - 2
Unplug the IAC valve connector and all three PCM connectors.
NOTE: This isolates the wiring from both the PCM and the valve, ensuring you're testing only the harness. - 3
Set your multimeter to Ohms mode.
NOTE: Don't use the Continuity setting of the multimeter (if it has one). - 4
Touch one multimeter probe to Terminal 1 of the IAC connector, and the other probe to the disconnected battery negative cable.
- 5
Check the reading on the multimeter.
- 6
You should see infinite resistance (open-circuit).
If your meter shows low resistance (typically 5 Ohms or less), that wire is shorted to Ground and needs attention. - 7
Repeat the test for Terminals 2, 3, and 4, always comparing each one against your Ground reference.
- 8
Have a helper gently wiggle the engine wiring harness (between the IAC connector and PCM connectors) while you keep an eye on the multimeter.
Focus on moving sections near sharp bends and areas where the harness touches brackets or engine components. - 9
Watch for sudden drops in resistance during the wiggle test.
If the meter suddenly shows low resistance (5 Ohms or less or any significant change), the wire is shorting to Ground when flexed —confirming an intermittent fault hidden inside the engine wiring harness.
Now, let's break down what your results mean:
CASE 1: All terminals show infinite resistance to Ground. Great —this confirms that none of the IAC wires are shorted to Ground, and the circuits (wires) are in good shape.
Continue to the next step: TEST 4: Check IAC Valve Stepper Motor Resistance (From PCM Connector).
CASE 2: One or more terminals show continuity (low resistance —5 Ohms or less) to Ground. This means a wire is shorted to the vehicle's body (chassis) or engine somewhere along the harness.
Carefully inspect the wiring along its route —especially near brackets, sharp edges, and hot components. Once you find the damaged section, repair or replace it as needed. For help on this, see: How To Repair Shorted IAC Wires (Real-World Fix).
TEST 4: Check IAC Valve Stepper Motor Resistance (From PCM Connector)
At this stage, you've already ruled out wiring issues —including:
- Hidden wire damage inside the engine wiring harness (TEST 1).
- Shorts between the IAC valve's four wires (TEST 2).
- And shorts to Ground (TEST 3).
Now it's time to check the IAC valve itself —specifically, the two internal stepper motors that control the pintle inside the throttle body housing.
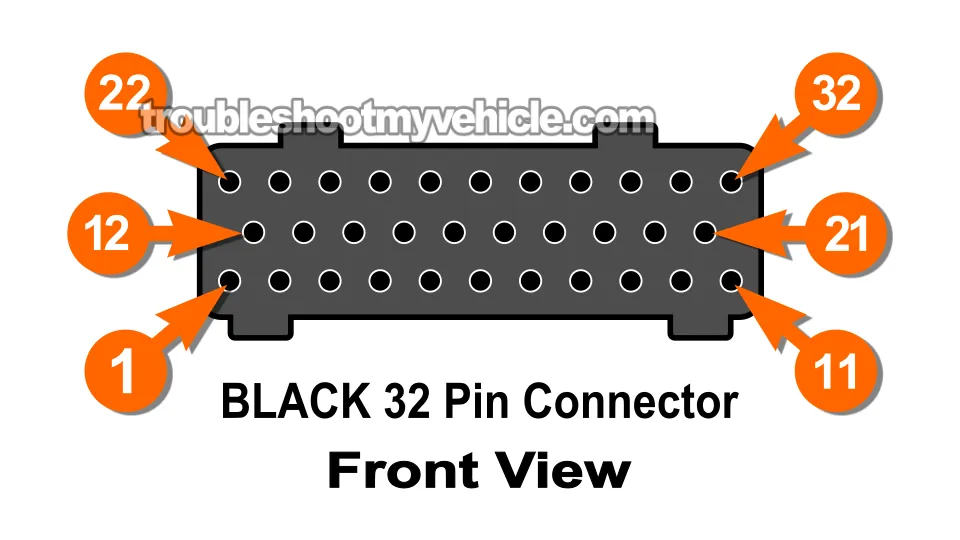
Each motor is controlled by its own pair of wires, which connect directly to the PCM. In this test, we'll measure the resistance across each wire pair at the PCM connector.
The typical resistance for each stepper motor is around 35 Ohms, although many good IAC valves test between 8–10 Ohms. While there's no official factory spec published, those ranges are generally considered normal.
The key is to look for similar resistance readings between the two motors. If one side reads significantly different —or shows infinite resistance (open-circuit) or near zero (short)— that motor is bad, and the IAC valve should be replaced.
CAUTION: When testing at the PCM connector, make sure you use a probe that fits properly into the round female terminals. Standard multimeter leads are usually too thick and can permanently damage or deform the PCM terminals if forced in.
To avoid this, use a fine-tip back probe or a proper terminal test probe designed for automotive connectors. Be extremely careful —damaging the PCM connector could lead to poor electrical contact, erratic drivability issues, or complete failure of the circuit.
OK, here are the test steps:
- 1
Confirm the battery's negative cable is still disconnected.
- 2
Plug the IAC valve back into its 4-wire connector.
- 3
Set your multimeter to the Ohms (Ω) setting to measure resistance.
- 4
Testing Stepper Motor 1:
Place your meter leads on PCM black connector terminals 19 and 20.
A good reading should be approximately 35 Ohms, though some valves may read as low as 8–10 Ohms. - 5
Testing Stepper Motor 2:
Now check resistance between PCM black connector terminals 10 and 11.
Expect a similar reading —again, either around 35 Ohms or possibly 8–10 Ohms.
If you get a result of infinite resistance (open-circuit) or close to zero (short), that motor coil has failed and the IAC valve needs to be replaced.
Let's break down what your readings mean:
CASE 1: Both motor circuits read around 35 Ohms (or between 8–10 Ohms). That's the result we need to see.
This means the valve's internal windings are intact. If idle issues continue, the problem may be carbon buildup inside the valve or a pintle that's sticking. It's also a good idea to check for vacuum leaks.
There's also a very slim chance the PCM is at fault. For more on that, see: What If The PCM Itself Is Bad?
CASE 2: One or both readings show infinite resistance (open circuit). This means one of the stepper motor windings is broken.
The IAC valve will need to be replaced if you have confirmed:
- The wiggle test showed no issues (TEST 1).
- No shorts exist between any of the IAC valve's four wires (TEST 2).
- None of the wires are shorted to Ground (TEST 3).
CASE 3: One or both readings show extremely low resistance (near 0 Ohms). This suggests an internal short in one of the stepper motor coils —but only if:
- The wiggle test passed without issues (TEST 1).
- No shorts were found between any of the IAC valve's four wires (TEST 2).
- No shorts to Ground were found (TEST 3).
... then —and only then— can you confidently replace the IAC valve, since it's no longer functioning properly.
What If The PCM Itself Is Bad?
Although rare, a failed PCM —specifically the internal driver circuits that control the IAC valve— can be the root cause of a P0505 Idle Control Malfunction code.
That said, these types of PCM failures are very uncommon, and unfortunately, there's no direct way to test the IAC control circuits inside the PCM using a multimeter or scan tool.
The IAC driver circuits are solid-state components sealed within the PCM. When one of them fails, it stops sending the proper signals to the IAC valve, which can lead to rough idle, stalling, high RPMs —and, of course, a persistent P0505 code.
But here's the key point: You should only suspect the PCM after you've eliminated all other possibilities.
That means confirming all of the following:
- The IAC valve has tested good —proper resistance, no open or shorted coils.
- No shorts to Ground or between IAC circuits in the wiring harness.
- All connectors are clean, tight, and free of corrosion or damaged pins.
- No intake manifold gasket leaks.
- No vacuum leaks around the throttle body area.
- The throttle plate moves freely and isn't binding or damaged.
- The idle stop screw hasn't been adjusted or tampered with.
Only after you've ruled out every other cause —wiring, IAC valve, vacuum leaks, and mechanical issues— should you consider the PCM a suspect.
And even then, the only reliable way to confirm a faulty PCM is by swapping in a known-good unit and observing whether the issue disappears. If it does, you've found your answer.
Just remember —PCM failure is the exception, not the rule. Most P0505 issues are caused by wiring faults, vacuum leaks, or a failing IAC valve. Always start there before pointing the finger at the computer.
NOTE: If you're installing a used PCM, it'll need to be flashed with your vehicle's VIN number to load the correct programming.
There's a common workaround, though: if you install a used PCM from a pickup that matches the exact same year, engine size, and transmission type, the engine will usually start and run.
This can help you confirm if the PCM is the problem —if the P0505 code stays gone and idle returns to normal, the old PCM is bad. But even then, you'll still need to get the replacement PCM flashed for proper long-term use.
How To Repair Shorted IAC Wires (Real-World Fix)
Once you've confirmed that two IAC wires are shorted together —and the damaged section is buried somewhere inside the engine harness, out of sight —there's no need to tear the whole harness apart trying to trace the wires end to end. That's usually not how it's done in real-world diagnostics or repair work.
One long-term solution is to bypass the damaged section by splicing in a new length of wire.
Here's how the repair is typically performed:
- Cut the faulty wire(s) at least 3 to 4 inches away from the IAC valve connector to ensure you're past the damaged area.
- Do the same on the PCM side —leave yourself enough clean wire to work with.
- Use replacement wire that matches the same gauge and insulation type as the original. Strip the ends and solder the new wire in place.
- Avoid using butt connectors. They might work temporarily, but vibration, heat, and road shocks will cause them to loosen over time —leading to hard-to-find intermittent issues later on.
- Once soldered, seal the connection with heat-shrink tubing and/or wrap it tightly with high-quality electrical tape to keep moisture and corrosion out.
Replacing the entire engine wiring harness would be the ideal solution —and in some cases, it's the only fix— but it's expensive and usually overkill for a problem limited to just the IAC valve circuits.
A much more practical and reliable solution is to splice in a new wire to replace the damaged section. When done correctly, this kind of repair is solid, long-lasting, and just as effective as replacing the whole harness.
More 3.9L V6 Dodge Ram Pickup Tutorials
I've written several more tutorials for the V6 Dodge Ram pickups that may be of interest to you that you can find in this index:
Here's a sample of the tutorials you'll find in the index:
- How To Test The Fuel Injectors (1992-1999 3.9L V6 Dodge Ram Pickup).
- How To Test The Intake Air Temp (IAT) Sensor (1998-2001 3.9L V6 Dodge Ram Pickup).
- How To Test The Fuel Pump (1992-2001 3.9L V6 Dodge Ram Pickup).
- How To Test For A Blown Head Gasket (1989-2001 3.9L V6 Dodge Ram Pickup).

If this info saved the day, buy me a beer!
