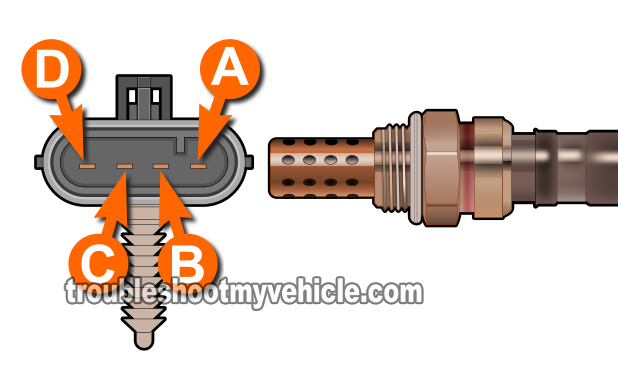
TEST 3: O2 Heater Resistance Test

So far you have verified that the O2 sensor's heater is being fed with power and Ground.
The last thing you now need to do, is to check the O2 sensor's heater element itself with your multimeter in Ohms (Ω) mode.
This resistance test will tell you if the heater element is fried or not, and if it's fried, then you can now buy a new sensor sensor knowing it's gonna' solve the problem.
OK, this is what you need to do:
- Disconnect the upstream oxygen sensor from the engine wiring harness connector (if it isn't already from the previous tests).
- NOTE: The O2 sensor must be disconnected from the vehicle's connector for this test!
- Locate the O2 sensor wires that correspond to:
- The circuit C and D.
- Both of these letters should be embossed on the O2 sensor's connector to aid you in further identifying the circuits you need to test.
- With your multimeter in Ohms mode, probe the terminals that correspond to the letters C and D.
- NOTE: Remember, you're testing the oxygen sensor itself.
- If all is OK, you should see about 5 to 16 Ω (Ohms).
- If the heater element is fried, your multimeter will show an open (usually indicated by the letters OL).
Let's take a look at your test results:
CASE 1: Your multimeter showed the indicated resistance. This tells you that you that the heater element within the sensor sensor is OK.
CASE 2: Your multimeter showed an open circuit (OL). This confirms that the upstream (Bank 1 Sensor 1) O2 sensor's heater element is fried.
Replacing the oxygen sensor with a new one will solve the P0135 diagnostic trouble code if you have:
- Confirmed that the O2 sensor's heater element is getting 10 to 12 Volts DC (TEST 1).
- Confirmed that the O2 sensor's heater element is getting Ground (TEST 2).

If this info saved the day, buy me a beer!

