TEST 2: Checking Ground (Black Wire)
In this section, you're gonna' confirm that the oxygen sensor's heater element is getting a good Ground.
This Ground is provided directly on the chassis of your vehicle and can be easily tested with your multimeter or 12 Volt automotive test light.
This is what you'll need to do:
- Disconnect the upstream oxygen sensor (if it isn't already from TEST 1).
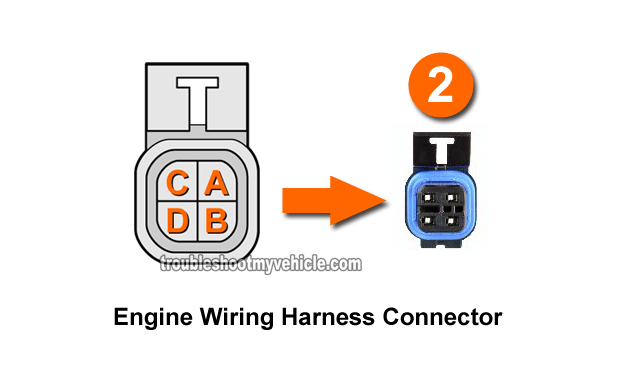
- Locate the circuit C wire (Black wire).
- You'll test the wire that is on the engine wiring harness oxygen sensor connector side.
- Place your multimeter in Volts DC mode and:
- Connect the red multimeter test lead to battery (+).
- Connect the black lead to the Black wire of the engine wiring harness O2 sensor connector.
- With the Key On Engine Off, this wire should have 10 to 12 Volts DC.
Let's take a look at your test results:
CASE 1: The multimeter registered 10 to 12 Volts DC. This test result tells yo that the pre-catalytic converter oxygen sensor's heater element is getting Ground (for this particular oxygen sensor).
The last thing you need to do now, is to check the resistance of the heater element inside the oxygen sensor itself. Depending on the result of this O2 heater element resistance test, you'll know if the O2 sensor is fried or not. For this test, go to: TEST 3: O2 Heater Resistance Test.
CASE 2: The multimeter DID NOT register 10 to 12 Volts DC. Re-check all of your connections and make sure you're testing the correct wire.
If your multimeter still does not indicate the 10 to 12 Volts DC, then the Black wire has an 'open-circuit' problem.
By an 'open', I mean that the wire is cut somewhere between it and its Ground point. To confirm this, you can use a Jumper Wire to Ground this circuit and repeat the test.
Repairing this Ground issue will solve the P0135 and/or P0155 issue you're having with your GM pickup, van, or SUV.
TEST 3: O2 Heater Resistance Test
If you've reached this point, you have already confirmed that the oxygen sensor's heater element is getting both power and Ground.
Power is supplied on the Pink wire and Ground is supplied on the Black wire.
The next step (and the last one) is to check to see if the oxygen sensor's heater element is fried inside the O2 sensor itself by measuring its resistance with your multimeter in Ohms mode.
You can test the O2 sensor's heater element with the O2 sensor on the vehicle or off, whatever is the easiest thing for you to do.
OK, this is what you need to do:
- Disconnect the oxygen sensor from the engine wiring harness connector (if it isn't already from the previous tests).
- NOTE: The O2 sensor must be disconnected from the vehicle's connector for this test!
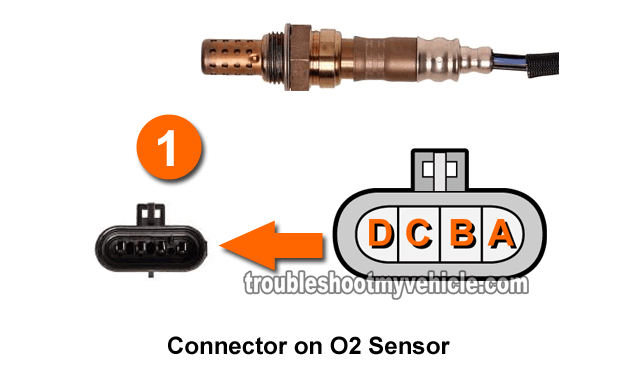
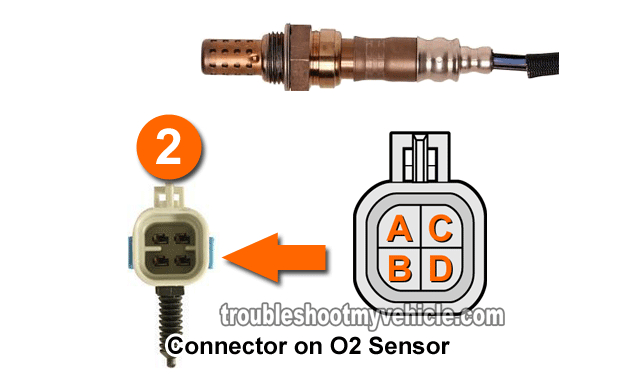
- Locate the O2 sensor wires that correspond to:
- The circuit C.
- -AND-
- The circuit D.
- Both of these letters should be embossed on the O2 sensor's connector to aid you in further identifying the circuits you need to test.
- With your multimeter in Ohms mode, probe the terminals that correspond to the letters C and D of the O2 sensor connector.
- NOTE: Remember, you're testing the oxygen sensor itself.
- If all is OK, you should see about 5 to 16 Ω (Ohms).
- If the heater element is fried, your multimeter will show an open (usually indicated by the letters OL).
Let's take a look at your test results:
CASE 1: Your multimeter showed the indicated resistance. This tells you that you that the heater element within the oxygen sensor is OK.
CASE 2: Your multimeter showed an open circuit (OL). This confirms that the heater element inside the O2 sensor is bad. Replace the oxygen sensor.
Depending on what oxygen sensor you're testing (either Bank 1 Sensor 1 or Bank 2 Sensor 1), replacing the oxygen sensor will solve the P0135 or P0155 diagnostic trouble code.

If this info saved the day, buy me a beer!


