Page 4 of 4
How To Adjust The Throttle Position Sensor Assembly

If you have removed the throttle position sensor (TPS) and have replaced it, you'll need to adjust it to the correct specification.
Thankfully, adjusting the TPS isn't hard and can be done with the same multimeter you used to test it in the previous pages. In this section I'll show you how.
NOTE: The TP sensor assembly needs to be connected to its connectors for this adjustment to take place.
This is what you'll need to do:
- Turn the ignition switch to its Off position and make sure the TP sensor assembly is connected to its connectors.
- Turn the ignition switch to its On position but don't start the engine.
- Place your multimeter in Volts DC mode and:
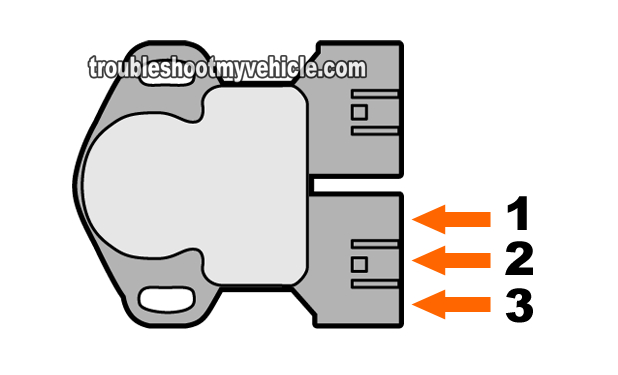
- Connect the red multimeter test lead to the wire that connects to the pin labeled with the number 2 (see the illustration in the image viewer above).
- Ground the black multimeter test lead on the battery negative (-) terminal.
- NOTE: Remember the throttle position sensor assembly must remain connected to its connectors through the entire adjustment.
- Adjust the TPS sensor by rotating it until the output voltage is within specification:
- Specification: 0.3 to 0.7 Volts DC.
- Once the output voltage has reached the above voltage specification, tighten the TP sensor assembly mounting bolts.
- Once you're done, recheck the output voltage to make sure the TP sensor didn't move on you when you tightened the two bolts.
More Nissan 3.3L Test Tutorials
If this tutorial was helpful/informative, you can find a complete list of tutorials here: Nissan 3.3L Index Of Articles.
Here's a sample of the tutorials you'll find there:
- How To Troubleshoot A No Start (Nissan 3.0L, 3.3L, 3.5L).
- How To Test Engine Compression (Nissan 3.0L, 3.3L, 3.5L).
- Mass Air Flow (MAF) Sensor Test 3.3L Frontier, Quest, Pathfinder, XTerra (at: easyautodiagnostics.com).
- How To Bench Test A Starter Motor (Step By Step) (at: easyautodiagnostics.com).

If this info saved the day, buy me a beer!


