

The upstream oxygen sensor —located before the catalytic converter and commonly referred to as the front O2 sensor —can be tested to find out whether it's functioning correctly or it's toast.
You can test the sensor using a basic, cheap generic scan tool that has live data functionality. If your check engine light is on and the code you pulled suggests a faulty front oxygen sensor, I'll show you how to verify the sensor's condition before committing to a replacement.
In this step-by-step guide, you'll learn how to perform two easy diagnostic checks using a scan tool that can show live sensor data.
NOTE: Your V6 Dodge Ram van is equipped with two oxygen sensors. For the purposes of this tutorial, we'll focus exclusively on the upstream one —the sensor installed ahead of the catalytic converter. It's identified as Sensor O2S11.
Contents of this tutorial:
ES  You can find this tutorial in Spanish here: Cómo Probar El Sensor De Oxígeno Delantero (1996-2003 3.9L V6 Dodge Ram Van) (at: autotecnico-online.com).
APPLIES TO: This tutorial applies to the following vehicles:
- 3.9L V6 Dodge Ram B1500 Van: 1996, 1997, 1998, 1999, 2000, 2001, 2002, 2003.
- 3.9L V6 Dodge Ram B2500 Van: 1996, 1997, 1998, 1999, 2000, 2001, 2002, 2003.
Important Suggestions And Tips
TIP 1 – You'll need a scan tool with Live Data: To test the front O2 sensor, you'll need a scan tool that can display real-time sensor readings (live data).
- You don't need an expensive OEM Dodge scanner or a top-tier professional device (the kind that can cost a small fortune).
- A basic generic scan tool that provides live data output is more than sufficient for what we're doing here.
- Don't have one? Take a look at the: ANCEL AD530 OBD2 Scanner w/ Live Data (Amazon affiliate link).
TIP 2 –Don't remove the O2 sensor: The testing method I'm gonna show you is designed to test the front oxygen sensor without removing it —it stays mounted in the exhaust pipe and continues operating as it normally would.
TIP 3 –Warm up the engine completely: Before starting your test, allow the engine to reach its normal operating temperature.
While the oxygen sensor is equipped with an internal heater, you'll get much more accurate and consistent readings when the engine is fully warmed up.
TIP 4 –Rule out other sensor problems first: If your scan tool is detecting trouble codes from other components —such as the MAP sensor or the engine coolant temperature (ECT) sensor— you've got to address those issues first.
Faults with those components will interfere with the engine's air-fuel mixture, which could result in false readings from the O2 sensors. Fix them before proceeding with O2 sensor testing.
Symptoms Of A Bad Oxygen Sensor
A worn-out or faulty oxygen sensor doesn't always give itself away right away —the signs can be pretty subtle and may not drastically impact how your engine runs. Still, here are the most common red flags to watch for:
- Check Engine Light (CEL) comes on: One of the earliest signs is often the check engine light showing up on your dashboard.
- O2 sensor-related diagnostic trouble codes (DTCs): When a sensor begins to fail, the powertrain control module (PCM) will usually log one or more of the following codes:
- P0131: Upstream Heated Oxygen Sensor (O2S11) Circuit Out Of Range Low Voltage (Bank 1).
- P0133: Upstream Heated Oxygen Sensor (O2S11) Circuit Slow Response (Bank 1).
- P0151: Upstream Heated Oxygen Sensor (O2S21) Circuit Out Of Range Low Voltage (Bank 2).
- P0153: Upstream Heated Oxygen Sensor (O2S21) Circuit Slow Response (Bank 2).
- Noticeable drop in gas mileage: If the PCM isn't getting proper feedback from the sensor, it can't fine-tune the fuel-air mixture accurately —which often leads to more frequent fuel stops.
- Failed emissions inspection: In states or counties that require smog testing, a faulty upstream oxygen sensor is a common reason for failing the test.
- Possible engine performance issues: While not always present, symptoms may include mild hesitation, unstable idle, or laggy acceleration —especially if the sensor is stuck reporting a mixture that's too rich or too lean, which throws off fuel trim adjustments.
Oxygen Sensor Basics
Before jumping into the two scan tool tests I'll walk you through, let's take a quick moment to cover the basics of how the front oxygen sensor operates in your V6 Dodge Ram van. Understanding this will make the upcoming tests easier to follow.
Here's a breakdown of what you should know:
- The role of the oxygen sensor:
- The front O2 sensor works with the PCM (Powertrain Control Module) to fine-tune the fuel delivery to the engine.
- It generates a voltage signal based on the oxygen content in the exhaust stream.
- This voltage typically ranges between 0.100 and 0.900 Volts.
- The PCM reads this information to judge whether the air-fuel mix is running too rich or too lean.
- When the engine runs rich:
- Too much fuel in the mix means less oxygen remains in the exhaust gases.
- The oxygen sensor detects this and responds with a higher voltage signal —generally above 0.500 Volts, often nearing 0.900 Volts or higher.
- This lets the PCM know the engine is running rich.
- When the engine runs lean:
- To correct a rich mixture, the PCM reduces the fuel being injected.
- This causes more oxygen to be present in the exhaust, which drops the sensor's voltage —sometimes down to 0.050 to 0.100 Volts.
- Any reading under 0.500 Volts indicates a lean condition.
- The PCM then compensates by increasing fuel delivery to restore balance.
- This cycle repeats continuously:
- The process of detecting and correcting rich or lean conditions:
- Begins with the oxygen sensor reporting the current oxygen level,
- And prompts the PCM to adjust the fuel injection accordingly.
- This feedback system runs constantly while the engine is on and everything is operating normally.
- The process of detecting and correcting rich or lean conditions:
- Viewing this process live:
- Using a scan tool with Live Data functionality, you can actually observe the sensor voltage changing in real time.
- This is exactly the kind of behavior we'll be watching for in the upcoming diagnostic tests.
- What healthy sensor activity looks like:
- A properly functioning O2 sensor will switch rapidly between rich and lean signals.
- The voltage will fluctuate up and down multiple times each second.
- If the sensor's output remains flat or changes very little, it typically means the sensor has stopped working correctly.
If the upstream oxygen sensor (O2S11) fails:
- It stops supplying the PCM with accurate feedback about the exhaust's oxygen content,
- Making it impossible for the PCM to properly manage the air-fuel balance,
- Which can result in poor engine response, increased fuel use, and failed emissions tests.
Where Is The Front O2 Sensor Located?
NOTE: Depending on who you're talking to —or which scan tool brand you're using— the upstream oxygen sensor may be listed under different names:
- You might see them called "upstream", "pre-cat", "front", or simply "sensor 1".
All of these labels refer to the same general area: the sensor installed ahead of the catalytic converter.
When you're using Live Data mode on a scan tool, the upstream or pre-cat sensor usually appears under the following name:
- O2S11 –Bank 1 Sensor 1.
Wondering about the downstream O2 sensor? Just to clarify: the sensor located after the catalytic converter is labeled as follows:
- O2S12 – Bank 1 Sensor 2.
These rear-positioned sensors aren't involved in adjusting the fuel-air mixture. Instead, they monitor the performance of the catalytic converter —which is why they're not part of the focus of this tutorial.
TEST 1: Manually Inducing A Rich Condition
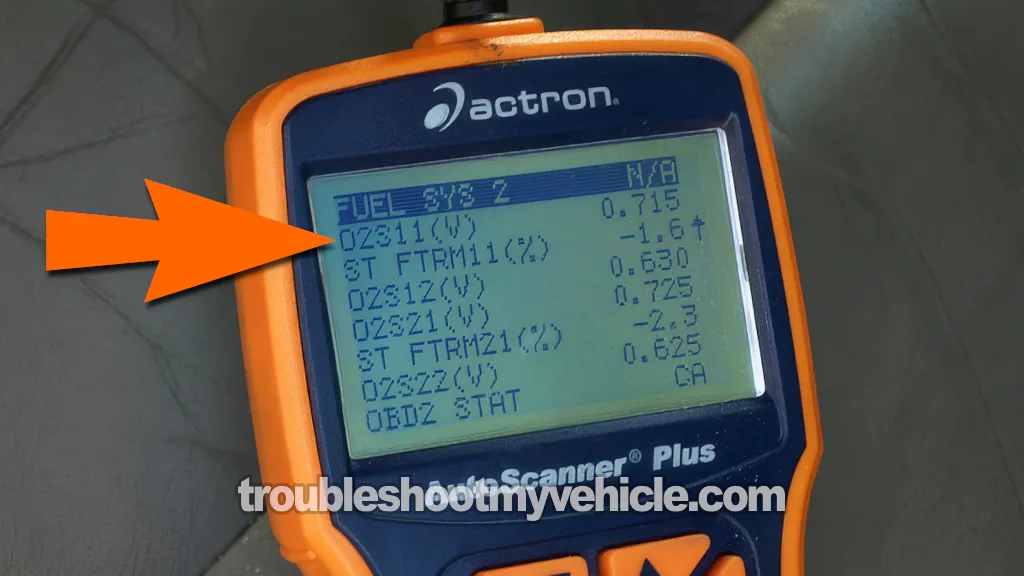
To kick off our oxygen sensor diagnostic, your first task is to deliberately create a rich fuel mixture.
The quickest and most reliable method is to carefully introduce a small amount of carburetor cleaner into the engine (while it's running) through a vacuum hose that pulls in engine vacuum.
When the engine burns the carb cleaner in the combustion chambers, it temporarily enriches the fuel mixture. This should cause the oxygen sensor voltage to jump —ideally reaching about 0.900 Volts on your scan tool.
Need a scan tool? I recommend checking out this one: ANCEL AD530 OBD2 Scanner w/ Live Data (Amazon affiliate link).
Let's get testing:
- 1
Start the engine and let it idle for around 15 minutes.
- 2
Hook up your scan tool and switch to Live Data mode.
- 3
Navigate through the available PIDs until you find O2S11.
This parameter ID (PID) represents the upstream O2 sensor voltage signals. - 4
Observe the voltage readings for O2S11.
When the engine is fully warmed up and idling, the voltages should be constantly shifting —usually between 0.200 and 0.900 Volts, switching several times each second.
If the readings don't change or only vary slightly, don't worry —continue to the next step. - 5
With the engine still running, spray a small amount of carburetor cleaner into a vacuum line that has vacuum.
If the engine stalls, it's not a big deal —just restart and try again using a bit less cleaner. - 6
Watch for the O2S11 voltage to rise sharply.
You should see the numbers quickly jump to about 0.800–0.900 Volts. As long as you're spraying, the values should remain high. - 7
Stop spraying and continue monitoring the voltages.
- 8
You should notice the readings gradually drop.
Within a few seconds, the voltages should return to their normal cycling pattern —bouncing between 0.100 and 0.900 Volts as they did before.
Let's look at what the results mean:
CASE 1: The O2S11 voltage spiked to around 0.900 Volts. That's a good sign —it means the upstream sensor is functioning properly and responding to the richer mixture.
The next step is to confirm whether it can also detect a lean condition. Go to: TEST 2: Manually Inducing A Lean Condition.
CASE 2: The O2S11 voltage did not spike. That shows Bank 1 Sensor 1 (O2S11) is not responding as it should and needs to be replaced.
TEST 2: Manually Inducing A Lean Condition
Just as we tested how the oxygen sensor reacts to a rich fuel mixture, we can also check its response to a lean condition.
The simplest way to manually create a lean mixture is by allowing unmetered air into the intake system. One of the easiest access points is the large vacuum hose connected to the brake booster's check valve —just slightly loosening it will do the trick.
This hose pulls in a good amount of air when it's loose, and that sudden rush of unmeasured air will cause a lean mixture that your upstream O2 sensor should detect almost immediately.
IMPORTANT: Don't fully remove the hose from the brake booster —doing so can stall the engine.
Instead, just back it out slightly —enough to let some extra air in and lean out the mixture without shutting the engine off. A soft hissing sound usually means it's loose enough.
IMPORTANT: It's a good idea to do a trial run while the engine is off. Try loosening the hose when everything is cold. If it's never been removed, it might be stuck —and that's not something you want to wrestle with while the engine is idling.
These are the test steps:
- 1
Start the engine and let it idle for approximately 15 minutes.
- 2
Plug in your scan tool and switch over to Live Data mode.
- 3
Locate the O2 sensor PID labeled O2S11.
- 4
Begin monitoring the voltage values for the front O2 sensor.
- 5
Carefully loosen the large vacuum hose at the brake booster check valve.
You only need to loosen it enough to allow additional air in. A gentle hissing noise usually confirms you're good to go. - 6
Watch the O2S11 voltage readings.
Both values should drop quickly below 0.200 Volts. In many cases, they may fall as low as 0.050 Volts. - 7
Once you observe the voltage drop and it holds steady, press the vacuum hose firmly back into place.
- 8
Wait a few moments and observe the voltage readings normalize —they should go back to fluctuating between 0.100 and 0.900 Volts just like before.
Now let's break down what your results mean:
CASE 1: The O2S11 voltage showed a drop below 0.200 Volts during the test. That confirms the upstream sensor is functioning correctly and properly detecting a lean mixture.
If you're still seeing O2 sensor codes, the cause may lie elsewhere. Check out the suggestions here: Oxygen Sensor Codes Keep Coming Back.
CASE 2: The O2S11 voltage didn't drop below 0.200 Volts. This means Bank 1 Sensor 1 (O2S11) failed to respond to the lean condition —it should be replaced.
Oxygen Sensor Codes Keep Coming Back
If you've made it this far, chances are you've already run the tests —and maybe even swapped out the upstream O2 sensor. But despite all that, the PCM is still flagging oxygen sensor-related trouble codes.
In other words, the check engine light is back on, and you're seeing the same O2 sensor codes show up again.
When this happens, it's often a sign that the engine is genuinely running either too rich or too lean —but the oxygen sensor itself isn't the real culprit.
To put it another way: something else is throwing off the air/fuel ratio, and the O2 sensor is simply reporting the imbalance —not causing it.
Below are some common issues that can lead to misleading O2 sensor codes:
- Weak fuel pump: If fuel pressure drops too low, the engine may run lean —and the PCM may mistakenly blame the O2 sensor for the problem. This tutorial explains how to check the fuel pump:
- Leaky intake manifold gaskets: Can allow unmeasured air into the intake, creating a lean mixture the PCM struggles to balance.
- Partially clogged or dirty fuel injectors: May result in uneven fuel delivery —some cylinders run too rich, others too lean —which can wreak havoc on the O2 sensor feedback loop.
- Malfunctioning manifold absolute pressure (MAP) sensor: Provides bad intake manifold pressure data, which leads to incorrect fuel calculations.
- Defective engine coolant temperature (ECT) sensor: If it reports that the engine is cold when it's not, the PCM may stay in open loop and overfuel the engine.
- Inaccurate intake air temperature (IAT) sensor: Incorrect readings here can skew how much fuel the PCM thinks is needed, upsetting the air/fuel balance.
- Thermostat stuck open or with the wrong temp rating: Prevents the engine from reaching proper operating temperature, which may keep the PCM in rich mode longer than necessary.
- Exhaust leak before the O2 sensor: Allows fresh air into the exhaust stream, fooling the sensor into thinking the mixture is lean —causing the PCM to add more fuel unnecessarily.
Each of these conditions can mislead the PCM, causing it to adjust the fuel mixture incorrectly —which may appear like an O2 sensor problem, even though the sensor is simply doing what it's supposed to.
The tricky part? These problems can be intermittent. If a sensor or component is just beginning to fail, it might behave normally during testing.
So what's the smartest move? Be patient. Allow time for the issue to become more predictable. Once it starts happening more often, your scan tool is far more likely to catch it in action —and that's when you'll be able to track it down and fix it once and for all.
More 3.9L V6 Dodge Ram Van Test Articles
I've written quite a few 3.9L V6 Dodge Ram van 'how to' tutorials. You can find all here:
Here's a sample of the tutorials you'll find in this index:
- How To Test The MAP Sensor (1997-2003 3.9L V6 Dodge Ram Van).
- How To Test The Intake Air Temp (IAT) Sensor (1998-2003 3.9L V6 Dodge Ram Van).
- How To Test The Camshaft Position Sensor (1998-2003 3.9L V6 Dodge Ram Van).
- How To Test The Engine Compression (1989-2003 3.9L V6 Dodge Ram Van).

If this info saved the day, buy me a beer!
