The intake air temperature (IAT) sensor keeps an eye on the temperature of the air moving through the intake manifold and sends that info straight to the powertrain control module (PCM).
From personal experience, I can tell you this is one of the easiest sensors to test using a multimeter. You won't need a scan tool at all (although it's great if you do have one).
In this tutorial, I'm gonna show you exactly how to measure the IAT sensor's internal resistance with a multimeter. The reading you get will tell you right away if the sensor's doing its job —or if it's toast and needs swapping out.
NOTE: The intake air temperature (IAT) sensor is also known as the air charge temperature (ACT) sensor.
Contents of this tutorial:
- Symptoms Of A Bad Intake Air Temperature (IAT) Sensor.
- What Does the Intake Air Temperature (IAT) Sensor Do?
- Common Intake Air Temperature (IAT) Sensor Issues.
- Initial Checks Before Starting the IAT Sensor Tests.
- Where To Buy The IAT Sensor And Connector.
- Checking Temperature To Resistance Value Relationship.
- More 3.9L V6 Dodge Ram Van Tutorials.
APPLIES TO: This tutorial applies to the following vehicles:
- 3.9L V6 Dodge Ram B150 Van: 1992, 1993, 1994.
- 3.9L V6 Dodge Ram B250 Van: 1992, 1993 1994.
- 3.9L V6 Dodge Ram B1500 Van: 1995, 1996, 1997.
- 3.9L V6 Dodge Ram B2500 Van: 1995, 1996, 1997.
Symptoms Of A Bad Intake Air Temperature (IAT) Sensor
Your V6 Dodge Ram van runs on a speed-density fuel injection system. In this setup, the PCM (powertrain control module) calculates how much air the engine's pulling in by looking at three main signals:
- Engine RPM —this comes from the crankshaft position sensor (CKP).
- Intake manifold vacuum pressure —measured by the manifold absolute pressure (MAP) sensor.
- Incoming air temperature —read by the intake air temperature (IAT) sensor.
With these signals, the PCM figures out exactly how much fuel to inject based on the amount of air coming into the engine.
If the IAT sensor stops working, the PCM logs a fault code and turns on the check engine light (CEL). One of the following codes will pop up:
- OBD-I (1993–1995):
- Code 24: Charge Air Temp Sensor Voltage is Too High or Too Low.
- OBD-II (1996–1997):
- P0112: IAT Sensor Voltage is Low.
- P0113: IAT Sensor Voltage is High.
On top of a lit-up check engine light and a trouble code, a bad IAT sensor causes a bunch of other problems, like:
- Hard starting: The engine struggles to start, especially when it's super cold or really hot.
- Weak acceleration: When you hit the gas, the engine's response is slow and feels underpowered.
- Rough idle: The engine stumbles or shakes when it's idling —like when you're sitting at a stoplight.
- Stalling: The engine might suddenly die without warning.
- No-start condition: Sometimes the engine won't crank at all if the IAT sensor's shot.
- Bad gas mileage: The PCM can't get the air/fuel mix right if the IAT is bad, so it dumps in extra fuel. You're definitely filling up more often.
What Does the Intake Air Temperature (IAT) Sensor Do?
The IAT sensor monitors the temperature of the air flowing into the engine and sends that data straight to the fuel injection computer.
The sensor is just a thermistor, which means its resistance changes depending on how hot or cold the air is. The computer supplies it with a steady 5-Volt reference, and the voltage drops depending on how much resistance the sensor gives off at that moment.
The PCM tracks that voltage drop, compares it to an internal reference chart, and figures out the real air temperature from there.
Accurate readings from the IAT sensor are crucial. The PCM needs that info to fine-tune the air/fuel ratio, get the best gas mileage, and keep the engine running smooth.
Common Intake Air Temperature (IAT) Sensor Issues
The IAT sensor can fail for a few well-known reasons.
- Normal wear and tear: Like most parts on your van, it eventually breaks down and quits working.
- Internal open circuit: A break in the sensor's internal circuit kills the signal —resulting in no IAT signal to the PCM.
- Internal short circuit: A short in the sensor itself cuts the signal too, knocking it out of commission.
- Damaged wire insulation: When the insulation on the wires cracks or peels (super common), the bare wires can touch and short. The sensor might still work, but the PCM won't receive a good signal anymore.
- Broken connector: The most frequent issue is the locking tab on the connector snaps off while unplugging it. Once that happens, the connector can get loose (as the engine runs) causing an intermittent false connection.
Any of these problems will make the PCM call out the IAT sensor as faulty, throw a trouble code, and turn on the check engine light. Plus, a faulty IAT sensor messes with engine performance in all kinds of ways.
Initial Checks Before Starting the IAT Sensor Tests
Before you break out the multimeter to check the IAT sensor's resistance, take a minute to do a quick visual inspection for these common issues:
- Scan the sensor wires for any signs of damage —cuts, exposed metal, or anything that looks off or worn.
- Look at the connector closely. Is the locking tab missing? Any cracks or broken parts?
- Take a good look at the sensor itself. If someone's handled it roughly, the plastic top might've snapped off the metal base.
Frayed wires right near the IAT sensor connector are a frequent problem. The insulation tends to crack and peel over time —usually from dry rot— leaving the bare wires underneath exposed.
Once those wires touch, they short out the signal. That messes with the IAT readings, and the PCM starts seeing bogus temperature data.
Here's a real-world example that shows exactly what this kind of damage looks like:
- IAT Sensor Wire Insulation Problem And Wires Shorted Together (source: easyautodiagnostics.com).
You've got two ways to fix it:
- If the damage is bad or right at the connector, replace the whole connector with a new one.
- If the wear is light and farther down the wire, wrapping it with electrical tape can hold you over for now.
NOTE: Electrical tape is only a temporary fix. To do it right, replace the damaged wire section or swap out the whole connector.
Where To Buy The IAT Sensor And Connector
Disclosure: As an Amazon Associate, I earn from qualifying purchases. If my tutorials help you, using these links is an easy way to support the site at no extra cost to you. Thank you!
Checking Temperature To Resistance Value Relationship
Like I said earlier, the IAT sensor's resistance changes depending on how warm or cool the air in the intake manifold is. Every resistance value matches up with a specific air temp.
If the sensor's working right, the reading should land within about 10 degrees (plus or minus) of the current outdoor temperature where you are.
When the sensor's bad, here's what your multimeter will show during a test:
- Open circuit: The multimeter will display "OL" (infinite resistance), meaning there's no connection running through the sensor.
- Short circuit: The reading will be "0 Ohms" —that means the sensor's totally fried.
IMPORTANT: Only do this resistance test when the sensor is cold. If the engine's been running, wait until everything cools off before you test —or you won't get a reliable reading.
Alright, here's the step-by-step:
- 1
Check the current outdoor temperature.
Pull up the weather on your phone or check a nearby thermometer. You need an accurate temp to make sense of your reading. - 2
Find the IAT sensor and disconnect the wiring harness.
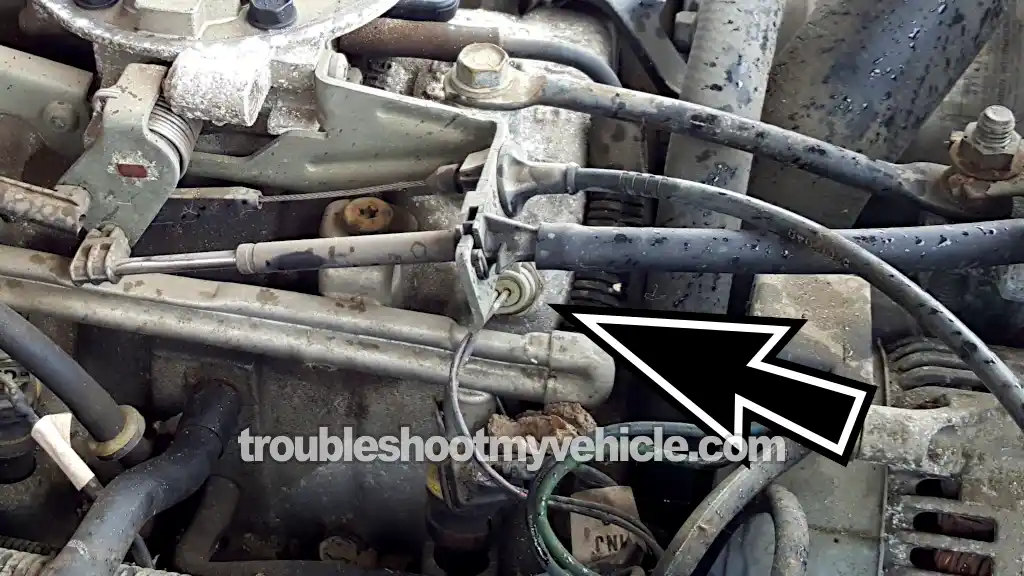
LOCATION: It's up front on the intake manifold, passenger side of the engine, above fuel injector #2 and behind the alternator. You'll see it in Photo 4 in the image viewer. - 3
OPTIONAL: Carefully remove the sensor from the intake manifold.
NOTE: You don't need to take it out to run this test. But if you've got better access that way, go ahead and pull it. - 4
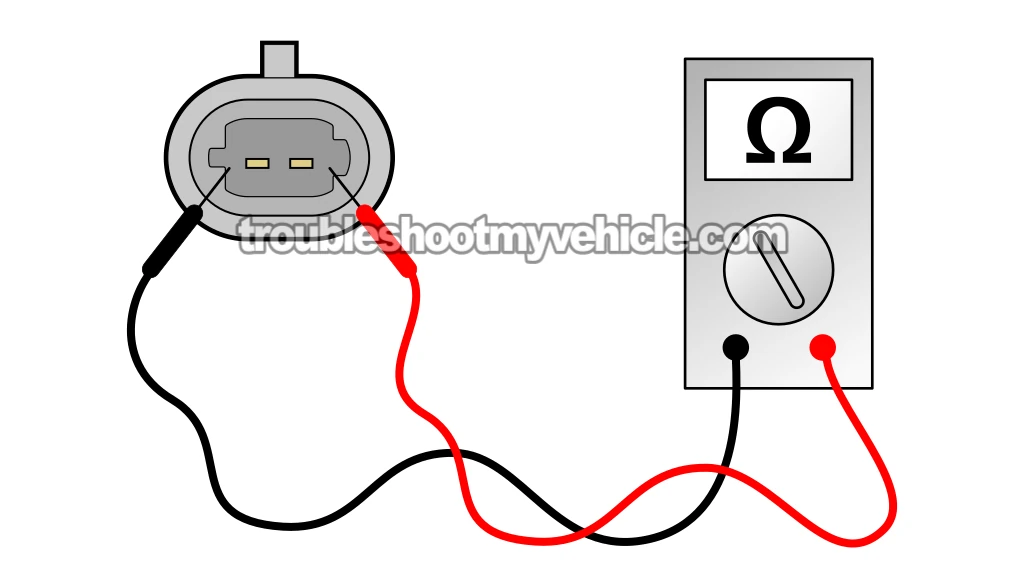
Switch your multimeter to Ohms (Ω) mode.
- 5
Touch the multimeter probes to the sensor's two male terminals to get a resistance reading.
- 6
Write down the number that pops up on the multimeter display.
- 7
Compare your result with the values in the Temperature-To-Resistance Chart (check the image viewer above for the chart).
The reading should be close to the outdoor temp, within about 10°F either way.
Now let's figure out what that result actually means:
CASE 1: The resistance is way off from what it should be for the current temp. That means the sensor's not working right and it's toast. Time to replace it.
CASE 2: The resistance lines up with the expected value. Your IAT sensor's good —no problems there.
More 3.9L V6 Dodge Ram Van Tutorials
You can find a complete list of tutorials for the 3.9L V6 Dodge Ram van in this index:
Here's a sample of the tutorials you'll find in the index:
- How To Test The Fuel Pump (1992-2003 3.9L V6 Dodge Ram Van).
- How To Test The MAP Sensor (1992-1997 3.9L V6 Dodge Ram Van).
- How To Test For A Blown Head Gasket (1989-2003 3.9L V6 Dodge Ram Van).
- How To Test The Engine Compression (1989-2003 3.9L V6 Dodge Ram Van).

If this info saved the day, buy me a beer!


