

Seeing a MAP sensor trouble code (DTC) along with poor engine performance in your van? There's a strong chance the sensor is at fault.
However, it's also possible the code is being triggered by an unrelated engine issue —not the MAP sensor itself.
The upside? Testing the MAP sensor on your Dodge Ram van is straightforward. You won't need a scan tool —just a basic multimeter and a vacuum pump. In this guide, I'll take you through the steps to test it accurately and easily.
Contents of this tutorial:
- Symptoms Of A Bad MAP Sensor.
- How The MAP Sensor Works.
- Where To Buy The MAP Sensor And Save.
- TEST 1: Verifying The MAP Signal.
- TEST 2: Making Sure That The MAP Sensor Is Getting Power.
- TEST 3: Verifying The MAP Sensor Ground Circuit.
- MAP Sensor Code Won't Go Away.
- More 3.9L V6 Dodge Ram Van Tutorials.
ES  You can find this tutorial in Spanish here: Cómo Probar El Sensor MAP Con Multímetro (1992-1997 3.9L V6 Dodge Ram Van) (at: autotecnico-online.com).
APPLIES TO: This tutorial applies to the following vehicles:
- 3.9L V6 Dodge Ram B150 Van: 1992, 1993.
- 3.9L V6 Dodge Ram B250 Van: 1992, 1993.
- 3.9L V6 Dodge Ram B1500 Van: 1994, 1995, 1996, 1997.
- 3.9L V6 Dodge Ram B2500 Van: 1994, 1995, 1996, 1997.
OTHER MAP SENSOR TESTS:
- How To Test The MAP Sensor (1989-1990 3.9L V6 Dodge Ram Van).
- How To Test The MAP Sensor (1991 3.9L V6 Dodge Ram Van).
- How To Test The MAP Sensor (1997-2003 3.9L V6 Dodge Ram Van).
Symptoms Of A Bad MAP Sensor
If your MAP sensor fails, the check engine light is gonna come on, often accompanied by one of these two diagnostic trouble codes (DTCs):
- OBD I (1992-1995):
- Code 13: MAP sensor signal issue detected.
- Code 14: MAP sensor voltage is outside the expected range (too low or too high).
- OBD II (1997-1997):
- P0107: MAP Sensor Voltage Too Low.
- P0108: MAP Sensor Voltage Too High.
In addition to a MAP-related code, you may also experience one or more of the following symptoms:
- Rough idle: The engine may shake or idle inconsistently when you're stopped in Drive —like while waiting at a red light.
- Black smoke: Black smoke coming from the tailpipe, especially when accelerating, is a common indicator of MAP sensor trouble.
- Unexpected engine stalls: The engine could shut off suddenly, either while coasting or right as you begin to accelerate.
- Stalls right after starting: The engine might fire up, then immediately die without warning.
- Loss of power: Acceleration may feel sluggish, and the van can struggle to gain speed.
- Limp-In Mode: To protect itself, the computer may engage limp mode, which cuts engine power significantly. You'll notice reduced performance and poor fuel economy.
NOTE: It's worth pointing out that other engine problems —not related to the MAP sensor —can trick the computer into setting a MAP code. That's why it's always best to test the sensor first before replacing it.
In this guide, I'll show you a simple bench test you can do to find out if the MAP sensor is the real issue. If the sensor passes the test, you'll know to keep looking elsewhere.
How The MAP Sensor Works
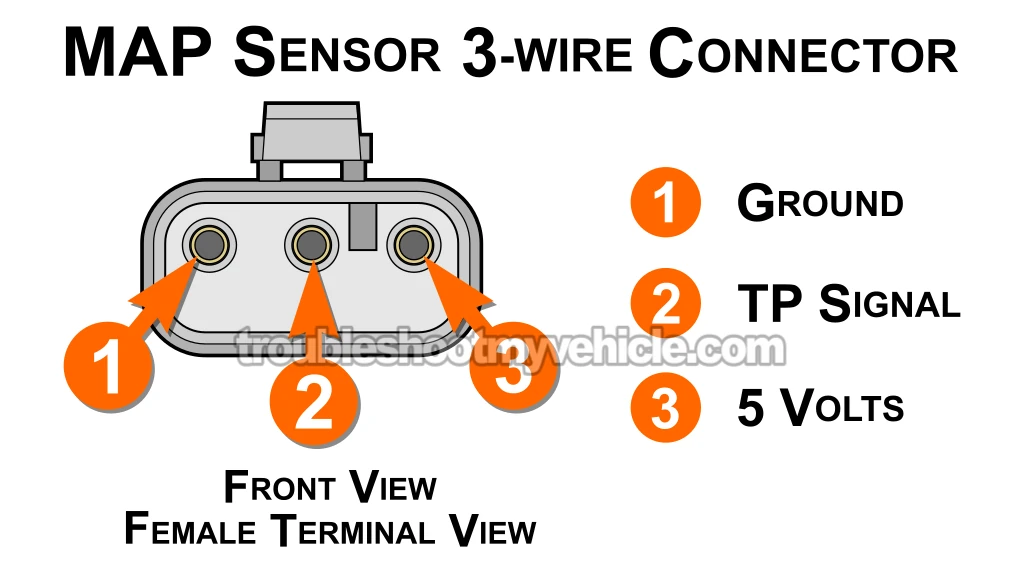
Your Dodge Ram van doesn't use a Mass Airflow (MAF) sensor to measure incoming air. Instead, it relies on what's called a Speed Density system to do the job.
In this setup, the fuel injection computer estimates airflow by constantly analyzing input from these three sources:
- The manifold absolute pressure (MAP) sensor.
- The intake air temperature (IAT) sensor – this tells the computer how cold or warm the air is.
- Engine RPM – provided by the crankshaft position (CKP) sensor.
With this data, the computer can calculate how much air is entering the engine and figure out exactly how much fuel needs to be injected.
Here's a quick breakdown of what happens when you start the engine:
- MAP sensor power-up: The computer activates the MAP sensor by supplying both power and Ground:
- The violet with white stripe (VIO/WHT) wire delivers 5 Volts DC and connects to terminal 3 (see illustration above).
- The black with light blue stripe (BLK/LT BLU) wire provides the Ground and connects to terminal 1.
- Monitoring vacuum pressure: The MAP sensor starts reading the vacuum levels inside the intake manifold.
- Fuel delivery management: With info from the MAP, IAT, and CKP sensors, the computer calculates the ideal air-fuel ratio. It then:
- Adjusts the injector pulse width —which controls how long each fuel injector stays open.
- Refines the ignition timing for better engine performance and efficiency.
Now that you've got a solid understanding of how it all works, let's jump into the testing process!
Where To Buy The MAP Sensor And Save
You can find a MAP sensor for your Dodge Ram van at almost any auto parts store –but you're probably gonna pay way more for it.
My advice is to shop around online, or at the very least, compare prices. That way, you'll get a good idea of how much money you could save. Here are my recommendations:


Disclosure: As an Amazon Associate, I earn from qualifying purchases. If my tutorials help you, using these links is an easy way to support the site at no extra cost to you. Thank you!
Not sure if the above MAP sensor fits your particular Dodge Ram van? Don't worry, once you get to the site, they'll make sure it fits by asking you the particulars of your vehicle. If it doesn't fit, they'll find you the right one.
TEST 1: Verifying The MAP Signal

Let's kick things off! The first step is to check whether your MAP sensor produces a changing voltage signal when vacuum is applied manually.
To do this, connect your multimeter to the MAP sensor's signal wire. Then, apply vacuum using a hand-held pump —or, if you don't have one, you can create vacuum by mouth.
Depending on the sensor's condition, you'll get one of two outcomes:
- Working Sensor: As vacuum is applied and released, the voltage on your multimeter should decrease and increase accordingly.
- Faulty Sensor: If there's a problem with the sensor, the voltage reading will stay frozen at a single value, no matter how much vacuum you apply.
NOTE: If you need to buy a multimeter (or upgrade yours) or a vacuum pump, these are the ones I have and use:
- Multimeter: Tekpower TP8268 AC/DC Auto/Manual Range Digital Multimeter (Amazon affiliate link).
- Vacuum pump: HTOMT 2 In 1 Vacuum Pump Test Set (Amazon affiliate link).
Alright, here's what you'll need to do:
- 1
Remove the MAP sensor from the throttle body.
- 2
Attach your vacuum pump to the MAP sensor's vacuum port.
IMPORTANT: Make sure the sensor stays plugged into its 3-wire connector. - 3
Set your multimeter to read DC voltage.
- 4
Connect the black lead from your multimeter to the battery's negative (-) terminal.
- 5
Attach the red multimeter lead to the wire marked as "2".
NOTE: You can use a back probe or a wire-piercing probe for this step. This is what I use: Goupchn 4mm Banana to Banana Plug Test Leads Kit, 15PCS Five Colors (Amazon affiliate link). - 6
Turn the ignition key to the ON position —but don't start the engine.
- 7
With the key ON and no vacuum applied, your multimeter should display around 4.7 Volts DC.
- 8
Apply vacuum to the MAP sensor using a hand pump or your mouth. You should notice the voltage drop as follows:
1.) 0 in. Hg ...... 4.7 Volts
2.) 5 in. Hg ...... 3.9 Volts
3.) 10 in. Hg .... 3.0 Volts
4.) 20 in. Hg .... 1.1 Volts
NOTE: Whether you're using a vacuum pump or mouth pressure, the voltage should drop as vacuum increases, and rise again when released.
Now let's go over what your results mean.
CASE 1: You saw the voltage change as vacuum was applied and released. That's a good sign —your MAP sensor is working as it should!
If you're still getting a MAP sensor DTC and the check engine light is on, check out this section: MAP Sensor Code Won't Go Away.
CASE 2: The voltage stayed fixed at one number. That usually means the MAP sensor is faulty.
To be certain, double-check that it's receiving both power and Ground. Start with this test: TEST 2: Making Sure That The MAP Sensor Is Getting Power.
CASE 3: You measured 0 Volts DC. This means the sensor either isn't working or isn't receiving power or Ground.
Next step: verify the sensor's power and Ground connections. Head over to: TEST 2: Making Sure That The MAP Sensor Is Getting Power.
TEST 2: Making Sure That The MAP Sensor Is Getting Power
At this point, you've confirmed that your MAP sensor isn't producing a variable voltage —meaning the voltage doesn't change when you apply or release vacuum. So now, let's check if it's getting power. Without power, the sensor simply can't do its job.
The power for the MAP sensor comes from the fuel injection computer. It sends out a steady 5 Volts DC through the violet with white stripe (VIO/WHT) in the MAP sensor's 3-wire connector.
This VIO/WHT wire connects to terminal 3, which is shown in the illustration of the MAP sensor's connector above.
Here's how to check if the MAP sensor is getting power:
- 1
Unplug the MAP sensor from its 3-wire electrical connector.
- 2
Switch your multimeter to DC Volts mode.
- 3
Attach the black multimeter lead to the battery's negative (-) terminal.
- 4
Turn the ignition key to the ON position, but don't start the engine.
- 5
Using the red multimeter lead, check the terminal labeled with the number 3.
This is the terminal that connects to the violet with white stripe (VIO/WHT) wire in the connector. - 6
Your multimeter should show one of the following readings:
1.) 4.5 to 5 Volts DC —power is present.
2.) 0 Volts —no power is reaching the sensor.
Let's take a look at what your test results mean:
CASE 1: Your multimeter showed 5 Volts. That confirms the MAP sensor is receiving power from the computer.
The next step is just as important —you need to make sure the sensor is also getting a solid Ground. Head over to: TEST 3: Verifying The MAP Sensor Ground Circuit to check that.
CASE 2: You didn't get a 4.5 to 5 Volt reading on your multimeter. First, double-check your connections and try again to rule out a test error.
If the voltage still doesn't show up, this explains why the MAP sensor isn't producing its variable output signal —without power, it can't function properly.
In this situation, the sensor itself is likely fine. Instead, your focus should be on restoring that missing 5 Volt supply. Common causes include:
- A break, short, or open in the 5 Volt wire between the MAP sensor connector and the fuel injection computer.
- A less common possibility: an internal fault in the fuel injection computer.
TEST 3: Verifying The MAP Sensor Ground Circuit
Alright, based on the results from the last two tests, here's what we know:
- First, the MAP sensor isn't generating a variable voltage when vacuum is applied or released (TEST 1).
- Second, the sensor is receiving proper power —specifically, between 4.5 and 5 Volts DC (TEST 2).
Now it's time for the final check —let's confirm whether the sensor is getting a solid Ground connection. You'll use a multimeter to perform this test.
The process is simple. You'll be testing the black with light blue stripe (BLK/LT BLU) from the MAP sensor's 3-wire connector. This wire supplies the Ground signal to the sensor.
IMPORTANT: This Ground wire connects straight to the fuel injection computer. Be cautious —never connect it directly to 12 Volts from the battery. Doing so can permanently damage the computer. The method described in the steps below uses a safe voltage test to confirm whether Ground is present in the circuit.
Follow these steps to test for a proper Ground connection:
- 1
Unplug the MAP sensor from its electrical connector.
- 2
Set the multimeter to measure DC voltage.
- 3
Connect the red test lead of your multimeter to the battery's positive (+) terminal.
- 4
Turn the ignition key to the ON position, but don't start the engine.
- 5
Use the black multimeter lead to probe the terminal marked with the number 1.
This terminal connects to the black wire with light blue stripe (BLK/LT BLU) in the connector. - 6
You should see a reading between 10 and 12 Volts DC if Ground is present.
Now let's interpret your test results:
CASE 1: Your multimeter shows 10 to 12 Volts. This confirms the sensor is getting a proper Ground signal from the computer.
In this case, the MAP sensor is faulty and should be replaced —but only if you've verified all of the following:
- The sensor doesn't produce a variable voltage during the vacuum test (TEST 1).
- It receives 4.5 to 5 Volts DC power from the computer (TEST 2).
- It has a confirmed Ground connection (as shown in this test).
Want to save some money on a replacement MAP sensor? Check out my top picks here: Where To Buy The MAP Sensor And Save.
CASE 2: You didn't get a 10 to 12 Volt reading. Double-check your setup and retest to rule out connection issues.
If there's still no voltage, this explains why the MAP sensor isn't producing a signal —it's missing a proper Ground.
That means the sensor itself is probably fine. The issue now is restoring that missing Ground connection. Most likely causes include:
- A break or fault in the Ground wire between the MAP sensor connector and the computer.
- In rare cases, a problem within the fuel injection computer itself.
MAP Sensor Code Won't Go Away
So, you've already gone through the MAP sensor tests and everything checks out fine. But that stubborn check engine light is still on —even after you've cleared the diagnostic trouble code (DTC) from the system?
Let's dig a bit deeper. There could be other issues triggering that code. Here are some common culprits that can mimic a bad MAP sensor:
- Significant vacuum leak: A major vacuum leak can throw off the air/fuel ratio, cause rough idling, and trick the computer into thinking the MAP sensor is at fault.
- Cracked or broken vacuum hose: Inspect the rubber hose running to the MAP sensor. If it's hardened, cracked, or falling apart, that could easily cause the problem.
- Poor engine compression: Low compression in several cylinders can result in unstable vacuum and rough idle. It's worth performing a compression test to be sure:
- MAP sensor with intermittent faults: Sometimes, a sensor can work fine one moment and fail the next. Try lightly tapping it with a screwdriver handle while applying vacuum. If the voltage reading jumps or cuts out, you've found the problem.
- Loose or damaged MAP sensor connector: Check the connector closely. A broken locking tab or loose fit can cause spotty connections and inconsistent readings.
- Weak fuel pump: If the fuel pump is starting to fail, it might not deliver the right amount of fuel or pressure. That can throw off performance and trigger fault codes. Be sure to test fuel pressure:
More 3.9L V6 Dodge Ram Van Tutorials
I've written several more tutorials for the 3.9L V6 Dodge Ram vans and you can find them in this index:
Here's a sample of the tutorials you'll find in the index:
- How To Test For A Blown Head Gasket (1989-2003 3.9L V6 Dodge Ram Van).
- How To Test The Engine Compression (1989-2003 3.9L V6 Dodge Ram Van).
- How To Test The Fuel Pump (1992-2003 3.9L V6 Dodge Ram Van).
- How To Test The TPS (1992-1997 3.9L V6 Dodge Ram Van).

If this info saved the day, buy me a beer!
