START HERE: Troubleshooting DTC P1122
The key to diagnosing the P1122 TP Sensor Signal Higher Than Expected OBD II diagnostic trouble code (DTC), that's lighting up your check engine light, is keeping in mind that the throttle position sensor (TPS) is stuck producing a high voltage signal.
If you recall, from the previous page, the TP sensor's voltage signal increases when the throttle plate opens and decreases when the throttle plate closes. So when a DTC P1122 is registered, the PCM sees the TP sensor reporting a high throttle angle when it knows, via other sensor inputs, that it should be reporting a lower voltage signal.
By manually testing the TP sensor with a multimeter (while it's still on the throttle body and connected to its electrical connector), you and I can find out if it's truly fried or not.
Here's a brief description of what you'll be doing test-wise:
- Check the TP sensor's voltage signal with a multimeter.
- You'll be connecting your multimeter to the TP sensor connector's middle wire and then manually opening and closing the throttle to see if the TP sensor produces a varying DC voltage signal.
- TEST 1: Testing The TPS Voltage Signal.
- Verify that the TP sensor is getting power (if TEST 1 is failed).
- This is a simple multimeter test too.
- TEST 2: Verifying The TPS Has Power.
- Verify that the TP sensor is getting Ground (if TEST 1 is failed).
- This is a simple multimeter test too.
- TEST 3: Verifying The TPS Has Ground.
TPS TEST 1: Testing The TPS Voltage Signal

Using a multimeter, the first thing we'll do is check to see if the TP sensor can create and report a variable voltage signal.
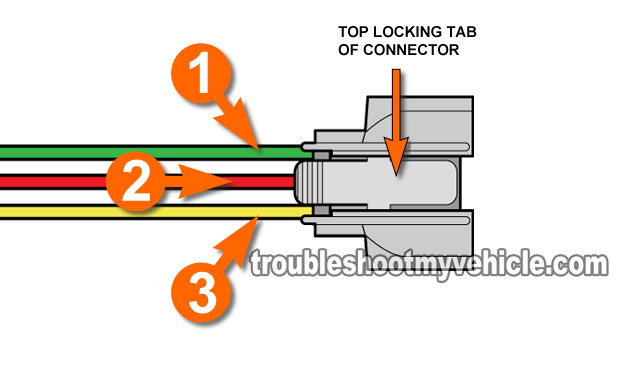
We'll attach the multimeter to the middle wire (circuit 2 in the image viewer) of the TP sensor and then manually rotate the throttle. Our multimeter should now record the TP signal voltage changes.
I'll explain everything in a step-by-step manner in the following instructions.
NOTE: To ensure the accuracy of your test, it's best to test the throttle position sensor (TPS) with the engine warmed up.
OK, let's start:
Part 1
- 1
Place your multimeter in Volts DC mode and with the red multimeter test lead probe the wire labeled with the number 2 in the photos. This is the circuit that supplies the TP Signal to the PCM.
If you don't have a multimeter or need to upgrade yours, check out my recommendation: Buying A Digital Multimeter For Automotive Diagnostic Testing (found at: easyautodiagnostics.com).
NOTE: The throttle position sensor has to remain connected to its connector for this test to work (this is where a wire piercing probe comes in handy to get to the signal inside the wire. To see what one looks like, click here: Wire Piercing Probe Tool). - 2
Ground the black multimeter test lead on the battery negative (-) terminal. Have your helper turn the key to the ON position, but don't start the engine (this will power up the TP sensor).
- 3
Your multimeter should report 0.4 to 0.9 Volts DC. If your multimeter doesn't, don't worry about it just yet, continue with the other steps.
Part 2
- 4
Now, slowly open the throttle (by hand and from the engine compartment) while you observe the change in voltage numbers on your multimeter.
For this test result to be accurate, you need to open the throttle by hand and not from inside the vehicle. - 5
As the throttle opens, the voltage numbers will increase. This increase in voltage should be smooth and without any gaps or skips. Once the throttle is wide open, your multimeter should read somewhere between 3.5 to 4.9 Volts DC.
- 6
Now, slowly close the throttle. As the throttle is closing, you should see the voltage decrease smoothly and without any gaps or skips, to the exact same voltage you noticed in step 4.
Part 3
- 7
OK, now you'll need someone to help you lightly tap on the throttle position sensor with the handle of a screw-driver (or something similar, and I want to emphasize the words ‘lightly tap’) as you slowly open and close the throttle and observe the multimeter.
If the TPS is bad, the tapping will cause the voltage numbers to skip or go blank. If the TPS is OK, the tapping will have no effect on the voltage numbers. - 8
Repeat step 7 several times to make sure of your multimeter test results.
Let's take a look at your test results:
CASE 1: The multimeter registered a smooth increase or decrease in voltage with no gaps. This is the correct and expected test result. In other words, the TP sensor passed with flying colors.
This test result also let's you know that the problem causing the P1122 trouble code is intermittent and not present at this point in time.
CASE 2: The multimeter DID NOT register a smooth increase or decrease in voltage, and you saw the voltage reading skip or go dead when tapping the TPS. Then this means that the throttle position sensor (TPS) is bad. Replace the throttle position sensor.
go to: Where To Buy Your TP Sensor And Save.
CASE 3: The multimeter DID NOT register any voltage. This test result doesn't condemn the TPS as bad just yet. Why?
Because the TPS may be missing either power or Ground. So the next step is to check that the TPS is getting power, go to: TPS TEST 2: Verifying The TPS Has Power.
