
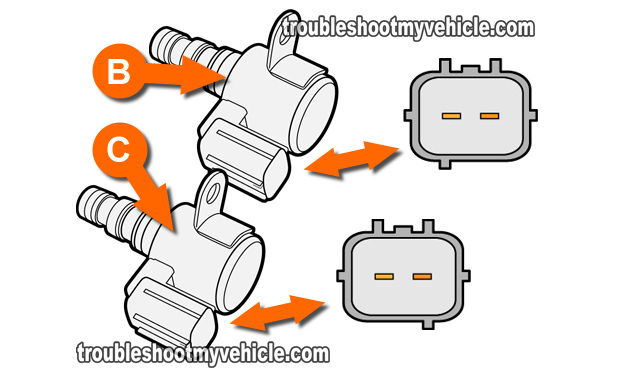
In this tutorial I'm gonna' show you how to test your Honda's shift solenoid B and shift solenoid C.
Testing the shift solenoids (B or C) involves 2 simple tests. One is a multimeter resistance test and the other is manually applying power (12 Volts) and Ground and listening for the solenoid to make a click sound.
This tutorial will also help you troubleshoot OBD II diagnostic trouble codes P0758: Shift Solenoid B Electrical and P0763: Shift Solenoid C Electrical.
Contents of this tutorial:
The following Honda automatic transmission tutorials may be of help too:
- How To Test: TCC Solenoid And Shift Solenoid A (Honda 2.2L, 2.3L).
- How To Test: A/T Clutch Pressure Control Solenoid A and B (Honda 2.2L, 2.3L).
- How To Test: Transmission Range Switch (Honda 2.2L, 2.3L).
ES  You can find this tutorial in Spanish here: Cómo Probar: Solenoide de Cambio B y C (Honda 2.2L, 2.3L) (at: autotecnico-online.com).
Symptoms Of A Bad Shift Solenoid B Or C
Here's a breakdown of the symptoms produced by each shift solenoid (when it fails):
Symptoms of a bad shift solenoid B:
- Trouble code P0758: Shift Solenoid B Electrical registering in the PCM's memory.
- D4 light blinking on the instrument cluster.
- Doesn't shift into 3rd or 4th gear (not to be confused with slippage in 3rd or 4th gear).
- Transmission starts in 3rd gear.
Symptoms of a bad shift solenoid C:
- Trouble code P0763: Shift Solenoid C Electrical registering in the PCM's memory.
- D4 light blinking on the instrument cluster.
- When shifting from N to D3 or D4, the transmission takes longer than normal to get into forward gear and/or shifts hard.
- When shifting from N to R, the transmission takes longer than normal to get into reverse gear.
- Transmission stays in limp-in mode.
- Abnormal and/or hard shift from 1st to 2nd gear or from 2nd to 1st gear.
- Abnormal and/or hard shift from 2nd to 3rd gear or from 3rd to 2nd gear.
- Abnormal and/or hard shift from 4th to 3rd gear or from 4th to 3d gear.
Basics Of Shift Solenoids B And C
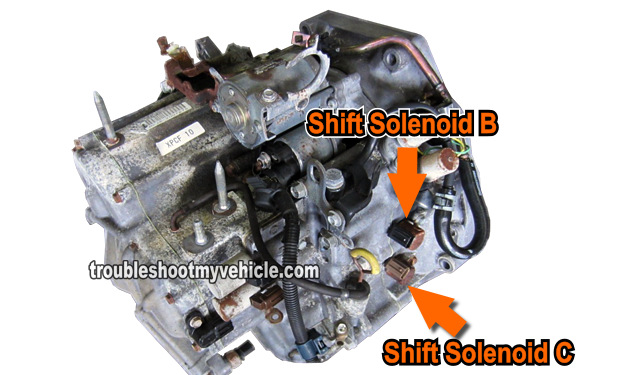
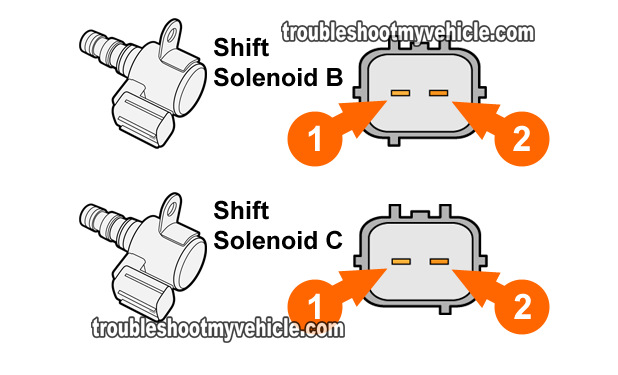
Shift solenoid B and shift solenoid C are located on the outside of the transmission case.
Image 1 of 2, in the image viewer, is your guide to the location of both shift solenoid B and C on the transmission.
The shift solenoids are not interchangeable. The connectors have guide tabs that will also make it impossible to connect them to the wrong engine wiring harness pigtail connector.
Here are some more basic details of both shift solenoid B and shift solenoid C:
Shift Solenoid B:
- The connector color is black.
- Terminal labeled #1 if fed Ground (chassis Ground).
- Terminal labeled #2 is the control circuit (from the PCM).
Shift Solenoid C:
- The connector color is brown.
- Terminal labeled #1 if fed Ground (chassis Ground).
- Terminal labeled #2 is the control circuit (from the PCM).
START HERE: Shift Solenoid B And C Tests
Troubleshooting shift solenoid B or shift solenoid C isn't hard. There are two basic tests and in this section I'll briefly describe them.
The 2 tests in this tutorial are:
- Resistance testing shift solenoid in question..
- This test simply involves measuring the resistance of the shift solenoid and comparing the value with the factory spec of 12-25 Ohms.
- TEST 1: Shift Solenoid Resistance Test.
- Manually applying 12 Volts and Ground to the shift solenoid in question.
- In this test, you'll apply power and Ground (from your Honda's battery) to the shift solenoid and listen for a clicking sound.
- TEST 2: Manually Applying Power And Ground.
TEST 1: Shift Solenoid Resistance Test
Both shift solenoid B and shift solenoid C are tested in the exact same way, so the test instruction below apply to them both.
The first thing we'll do is measure the resistance of the solenoid (B or C) with a multimeter in Ohms mode and see if it's up to specification.
You'll also be able to see if the shift solenoid's connector isn't broken (I've seen this quite a bit).
NOTE: The easiest, fastest way to test the shift solenoid B or shift solenoid C is off of the car.
OK, this is what you need to do:
- 1
Place your multimeter in Ohms mode.
Don't have a multimeter or need to upgrade yours? Check out my recommendation: Tekpower TP8268 AC/DC Auto/Manual Range Digital Multimeter (Amazon affiliate link). - 2
Measure the resistance between solenoid pins #1 and #2.
Remember, this test applies to either shift solenoid B or shift solenoid C. - 3
Your multimeter should register 12-25 Ohms if the shift solenoid is within specification.
Let's examine your test result:
CASE 1: The resistance was 12 to 25 Ohms. This test result tells you that the solenoid's internal coil is OK.
The next step is to bench-test the shift solenoid and apply 12 Volts and Ground to it. For this test, go to: TEST 2: Manually Applying Power And Ground.
CASE 2: The resistance WAS NOT 12 to 25 Ohms. This test result tells you that the shift solenoid that you're testing is fried and needs to be replaced.
If you're testing shift solenoid B, then this test result confirms trouble code P0758: Shift Solenoid B Electrical.
If you're testing shift solenoid C, then this test result confirms trouble code P0763: Shift Solenoid C Electrical.
TEST 2: Manually Applying Power And Ground
In this test, we're gonna' manually apply power and Ground to the shift solenoid.
The easiest and safest way to do this is using a power probe but not everyone has one (not too mention that they're kinda' expensive).
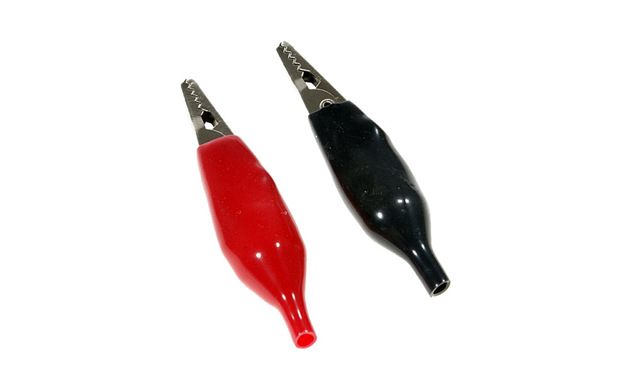
You can make your own jumper wires and I suggest using alligator clips with rubber insulating protectors (see photo 3 of 3 in the image viewer).
Using alligator clips with rubber insulating protectors will help you avoid shorting out the jumper wire that's carrying the juice (from the battery) to the solenoid.
OK, this is what you need to do:
- 1
Connect solenoid terminal #2 to battery power.
NOTE: Take all safety precautions when applying these 12 Volts to the terminal. - 2
Connect solenoid terminal #1 to Ground.
- 3
You should hear a clicking sound as soon as you Ground solenoid terminal #1.
Let's see what your test result means:
CASE 1: The shift solenoid clicked. This is the correct and expected test result.
If you're still having a shift solenoid B or a shift solenoid C trouble code, take a look at the test suggestions found here: Solenoids Are Good But Transmission Still Not Shifting.
CASE 2: The shift solenoid DID NOT click. This test result tells you that the shift solenoid you just got done testing is fried and needs to be replaced.
If you're testing shift solenoid B, then this test result confirms trouble code P0758: Shift Solenoid B Electrical.
If you're testing shift solenoid C, then this test result confirms trouble code P0763: Shift Solenoid C Electrical.
Solenoids Are Good But Transmission Still Not Shifting
If you've tested and found either solenoid (shift solenoid B or shift solenoid C) good and your Honda's transmission isn't slipping yet a P0758: Shift Solenoid B Electrical and P0763: Shift Solenoid C Electrical keeps popping up, I would suggest that you:
- Check the continuity of circuit #2 between the shift solenoid in question and the PCM with a multimeter.
- Check the continuity of circuit #1 between the shift solenoid in question and chassis Ground.
The above two test will help you eliminate a possible ‘open’ in the wiring between the shift solenoid and the PCM (circuit #2) and between the shift solenoid and chassis Ground (circuit #1). To be able to do this, you'll need a wiring diagram of your specific Honda.
If after testing the wiring and you find no faults, then there's a good chance that you'll have to replace the shift solenoid in question to see if replacing it solves the problem. I know this isn't something you want to hear, but in some cases there's just no other way to troubleshoot the issue (I speak from personal experience and from comments other readers have sent in).
If after testing the solenoid, its related wiring, and/or replacing the shift solenoid and the problem still persists, then you either have a bad transmission (internal mechanical/hydraulic problem) or the PCM is bad. Before you run out and buy a PCM, let me tell you that it's very, very rare for a PCM to go bad and keep the transmission from shifting (it does happen but you're more likely to get hit by lightening that have this happen to you).
Now, if your Honda's transmission is slipping, then replacing the shift solenoid in question isn't gonna' help bring the transmission back to normal. Slippage is a direct result of internal damage to the friction discs or hard parts. The only way to solve a slippage issue is overhauling the transmission.
More Honda Accord Tutorials
You can find a pretty big list of Honda Accord tutorials in this index: Honda 2.2L, 2.3L Index Of Articles.
Here's a small sample of the tutorials you'll find in the index:
- How To Test: TCC Solenoid And Shift Solenoid A (Honda 2.2L, 2.3L).
- How To Test The Radiator Fan Motor (Honda 2.2L, 2.3L).
- How To Avoid A Blown Head Gasket (Honda 2.2L, 2.3L).
- How To Test For A Blown Head Gasket (Honda 2.2L, 2.3L).
- How To Test For A Broken Timing Belt (Honda 2.2L, 2.3L).
- How To Test The Igniter, Ignition Coil Accord, Civic, CRV, and Odyssey (at: easyautodiagnostics.com).

If this info saved the day, buy me a beer!


