In this tutorial, I'm gonna' show you how to test the fan relay and, more importantly, how to test the radiator fan relay's circuits in the under-hood fuse box.
The results of your tests will help you troubleshoot the reason your Honda Accord's radiator fan motor isn't working.
Although this info applies to any 1998-2001 4 cylinder Honda Accord, the basic testing procedure (in each test step) can by applied to any Honda.
Since in this tutorial we're only troubleshooting the fan relay and its circuits, you'll find the radiator fan motor test here: How To Test The Radiator Fan Motor (Honda 2.2L, 2.3L).
Contents of this tutorial:
- Symptoms Of A Bad Radiator Fan Relay.
- The Basics Of The Radiator Fan Relay.
- START HERE: The Radiator Fan Motor Relay Tests.
- TEST 1: Checking The Radiator Fan Relay Power Circuits.
- TEST 2: Bypassing The Radiator Fan Relay.
- TEST 3: Bypassing The Radiator Fan Switch.
- TEST 4: Bench Testing The Radiator Fan Relay.
- More Honda Accord Tutorials.
Symptoms Of A Bad Radiator Fan Relay
If the radiator fan motor relay fails, the most obvious symptom that your Honda Accord will experience is overheating due to radiator fan not coming on.
You'll also see one (or more) of the following symptoms:
- Your temperature gauge will max out (as you're driving around).
- Your Honda will not re-start (once it has overheated).
- Coolant (or water) boiling in the radiator's overflow tank as the engine runs or when you turn off the engine.
- Coolant boiling in the radiator's overflow tank and the radiator fan motor does not activate.
The Basics Of The Radiator Fan Relay
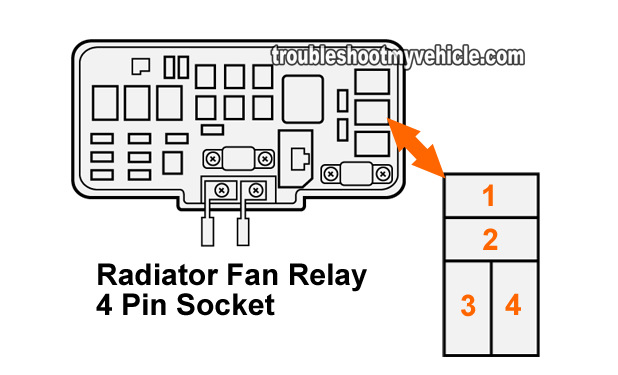
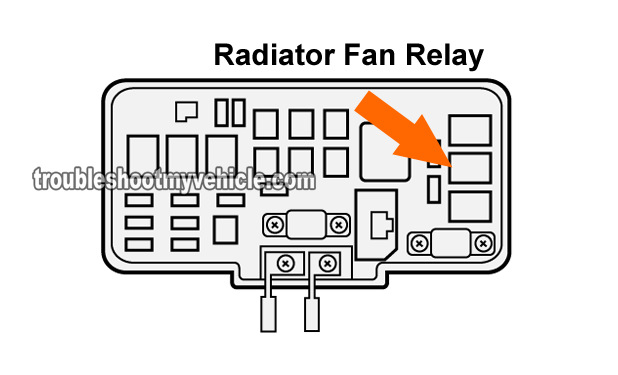
The radiator fan relay is located in the under-hood fuse box (see the illustrations in the image viewer).
The under-hood fuse box is located towards the rear of the engine compartment.
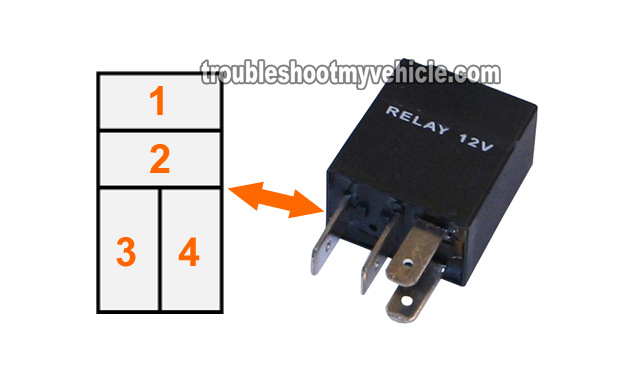
The radiator fan relay socket (in the under-hood fuse box) has four female terminals. Each terminal provides a specific signal
Since we're gonna' be testing these radiator fan relay circuits (in the under-hood fuse box), here's a brief description of each:
- Circuit labeled with the number 1.
- Battery power for the radiator fan motor.
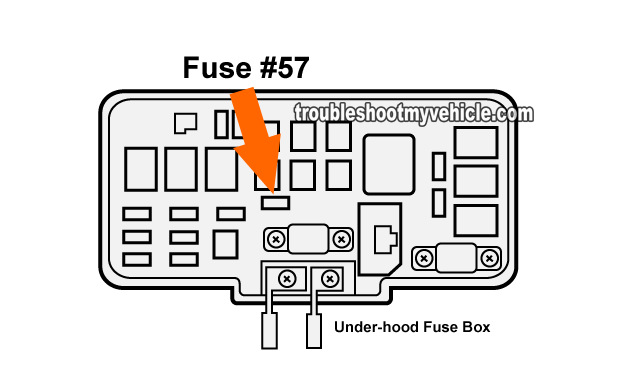
- Power provided by fuse #57 (20 Amp) of the under-hood fuse box (see image 3 of 4).
- Hot (+) all of the time.
- Circuit labeled with the number 2.
- Circuit that channels the battery power to the radiator fan motor when the relay closes.
- Circuit labeled with the number 3.
- Battery power for the radiator fan relay's coil.
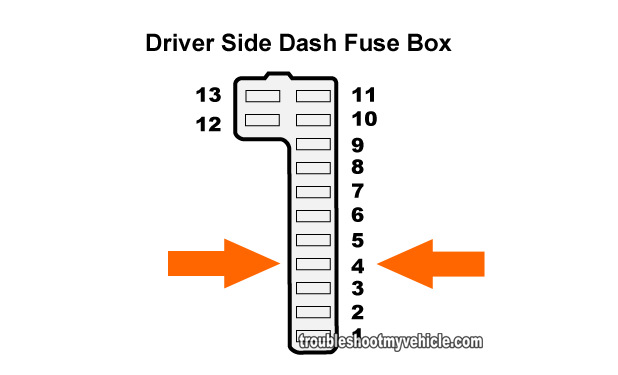
- Power provided by fuse #4 (7.5 Amp) of the left side dash fuse box (see image 4 of 4).
- Hot (+) only with Key On Engine Off (KOEO) or Key On Engine Running (KOER).
- Circuit labeled with the number 4.
- Circuit that feeds the radiator fan switch's ‘On’ or ‘Off’ signal to the radiator fan relay.
OK, let's get testing.
START HERE: The Radiator Fan Motor Relay Tests
There are four separate tests in this tutorial and each one is designed to take the complete novice through the entire troubleshooting experience in a step-by-step way.
Depending on your level of wrenching/diagnosing experience, you can apply the tests to fit your particular situation, or start from TEST 1.
Here's a brief description of each.
- Checking The Radiator Fan Relay Power Circuits.
- We'll remove the radiator fan relay from the under-hood fuse box and check that circuits 1 and 3 have power.
- TEST 1: Checking The Radiator Fan Relay Power Circuits.
- Bypassing The Radiator Fan Relay.
- After confirming that the radiator fan relay is getting juice (TEST 1), the next step is to jumper circuits 1 and 2 with a jumper wire to see if the radiator fan motor comes on.
- TEST 2: Bypassing The Radiator Fan Relay.
- Bypassing The Radiator Fan Switch.
- Here we're gonna' bypass the radiator fan switch with a jumper wire and see if the radiator fan motor comes on.
- TEST 3: Bypassing The Radiator Fan Switch.
- Bench Testing The Radiator Fan Relay.
- This last test is optional and shows you how to bench test the fan motor relay.
- TEST 4: Bench Testing The Radiator Fan Relay.
TEST 1: Checking The Radiator Fan Relay Power Circuits
The first order of business is to see if the radiator fan relay is getting power on circuits 1 and 3.
Circuit 1 is the one that gets power from fuse #57 (20 Amp) in the under-hood fuse box. Fuse #57 is the radiator fan motor's power source, once the fan relay is activated of course (see photo 3 of 4).
Circuit 3 gets power from fuse #4 (7.5 Amp) of the driver side under-dash fuse box. Fuse #4 provides power for the relay's coil and is one part of the relay's control circuit (the other part is the radiator fan switch) (see photo 4 of 4).
NOTE: The above fan motor relay fuse numbers are for the 1998 to 2001 Honda Accord. If your vehicle is not an Accord, the fuse number and its location may be different.
OK, this is what you need to do:
- 1
Remove the radiator fan relay from its place on the under-hood fuse box.
NOTE: You'll be making your multimeter test connections on the female terminals of the now empty relay socket of the radiator fan relay AND NOT on the relay itself. - 2
Check female terminal labeled #1 for 12 Volts.
Place your multimeter in Volts mode. Touch the red multimeter test lead to circuit #1 of radiator fan relay socket's female terminal. Black test lead to Ground (see the photo 1 of 4 in the image viewer). - 3
Turn the key to the ON position and check female terminal labeled #3 for 12 Volts.
Place your multimeter in Volts mode. Touch the red multimeter test lead to circuit #3 female terminal. Black test lead to Ground. - 4
Your multimeter should register 12 Volts for both parts of this test.
Remember: Female terminal #1, of the radiator fan relay socket, is hot all of the time. Female terminal #3 has power only with the KOEO and KOER.
Let's take a look at what your test results mean:
CASE 1: The multimeter registered 12 Volts for both circuits. So far so good, since this is the correct and expected test result.
This test result tells you 2 specific things:
- That fuse #57 (20 Amp) in the under-hood fuse box is good and supplying power.
- That fuse #4 (7.5 Amp) in the driver side dash fuse box is good and supplying power.
The next step is to jumper terminals #1 and #2 of the radiator fan relay socket. For this test, go to: TEST 2: Bypassing The Radiator Fan Relay.
CASE 2: The multimeter DID NOT register 12 Volts for circuit #1. Recheck your multimeter settings and connections and retest.
If you still don't get 12 Volts, then this usually means that fuse #57, in the under-hood fuse box, is blown.
Check the fuse and replace if necessary. If the fuse is blown, this is usually due to the fact that the radiator fan motor is bad. To test the radiator fan motor itself, see this tutorial: How To Test The Radiator Fan Motor (Honda 2.2L, 2.3L).
CASE 3: The multimeter DID NOT register 12 Volts for circuit #3. Recheck your multimeter settings and connections and retest.
If you still don't get 12 Volts, then this usually means that fuse #4, of the driver side fuse box, is blown. Check the fuse and replace if necessary and retest.
TEST 2: Bypassing The Radiator Fan Relay
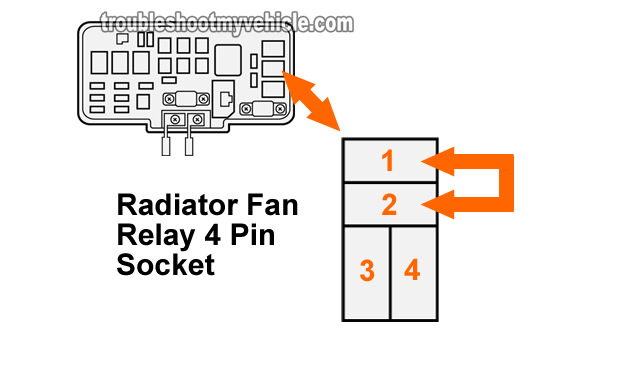
After confirming that female terminal #1 (of the radiator relay socket) is being fed with 12 Volt, the next step is to use a jumper wire and jumper together female terminal #1 and #2 of the radiator relay socket.
This test will, indirectly, tell us if the radiator fan relay is bad.
IMPORTANT: Be careful not to damage the female terminals with your jumper wire. If you open them up permanently, with the jumper wire, you'll need to replace the entire fuse box.
Alright, this is what you need to do:
- 1
Jumper female terminals #1 and #2 of the radiator fan relay socket (of the under-hood fuse box).
- 2
The radiator fan motor should come on, as soon as the two terminals are jumpered together.
- 3
Remove the jumper wire once you've confirmed that the radiator fan has or has not come on.
Let's take a look at your test results:
CASE 1: The radiator fan came on. This is the correct and expected test result. This test result confirms the following important things:
- The circuits between the radiator fan motor and the radiator fan relay socket (#1 and #2) are OK (otherwise the radiator fan motor would not have come on).
- The radiator fan motor is good.
The next step is test the radiator fan switch. Go to: TEST 4: Bench Testing The Radiator Fan Relay.
CASE 2: The radiator fan DID NOT come on. Double check all of your test connections and make sure that the radiator fan motor is connected to its connector and repeat the test.
If the radiator fan motor still doesn't activate and in TEST 1 terminal #1 of the relay socket has power, then the radiator is bad and needs to be replaced.
Now, if I where in your shoes, and if I hadn't already, I would test the radiator fan motor directly by applying power and Ground to it manually. I've written a tutorial for this particular test and you can find it here: How To Test The Radiator Fan Motor (Honda 2.2L, 2.3L).
TEST 3: Bypassing The Radiator Fan Switch
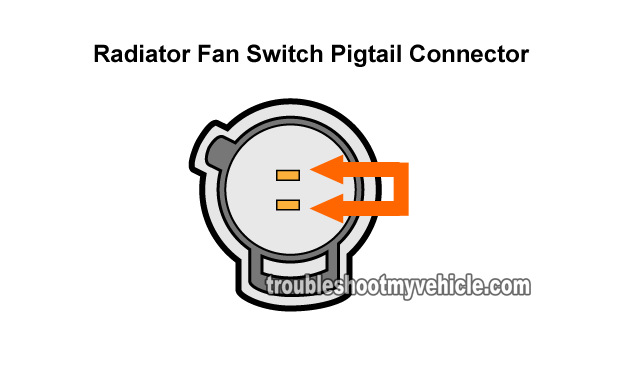
In this test step, we're gonna' test all of the circuits of the fan relay by bypassing the radiator fan switch with a jumper wire.
This is a very simple test but you do need to take one very important precaution and it's to use a small diameter jumper wire (gauge-wise).
This is to prevent the jumper wire from damaging the radiator fan switch's pigtail connector's female terminals.
NOTE: On 1998-2001 Honda Accords, the radiator fan switch is located on the thermostat housing.
OK, this is what you need to do:
- 1
Disconnect the radiator fan motor from its pigtail connector.
NOTE: The radiator fan relay must be in its place on the under-hood fuse box for this test to work. Also, your Honda's engine should be cold to avoid burns. - 2
Jumper the pigtail connector's 2 terminals.
IMPORTANT: Use the smallest diameter wire to jumper these two circuits. If you use anything thicker (gauge-wise) you could permanently damage the female metal terminals. - 3
Turn the ignition switch to the ON position, but don't start the engine (this test is done with the Key On Engine Off -KOEO).
- 4
The radiator fan motor should activate, as soon as you turn the key to the ON position (KOEO).
Let's examine your test result:
CASE 1: The radiator fan motor came on. This is the normal and expected test result.
This test result tells you several important things:
- The radiator fan motor relay is good (otherwise the fan would not have come on).
- The radiator fan motor and fan motor relay fuses are NOT blown (otherwise the fan would not have come on).
- The wires between the fan switch and radiator fan motor relay are not shorted (otherwise the fan would not have come on).
- The wires between the radiator fan motor and radiator fan motor relay are not shorted (otherwise the fan would not have come on).
Therefore, if your Honda Accord is overheating (and the radiator fan motor is not coming on), you can correctly deduce that the fan motor switch is bad and needs to be replaced.
CASE 2: The radiator fan motor DID NOT come on. Recheck your jumper wire connections and retest.
If the fan motor does not come on, then you have eliminated two important components as bad:
- The radiator fan motor.
- The radiator fan motor switch.
You can deduce that the radiator fan relay is bad since you have:
- Done TEST 1 and you have power in the relay socket terminals #1 and #3.
- Done Test 2 and the fan came on when you jumpered the relay socket terminals #1 and #2.
Suggestion: If I where in your shoes, I would now swap this relay with another on the fuse box and repeat this same test. If the fan motor now comes on, I now know that the radiator fan relay is truly fried.
TEST 4: Bench Testing The Radiator Fan Relay
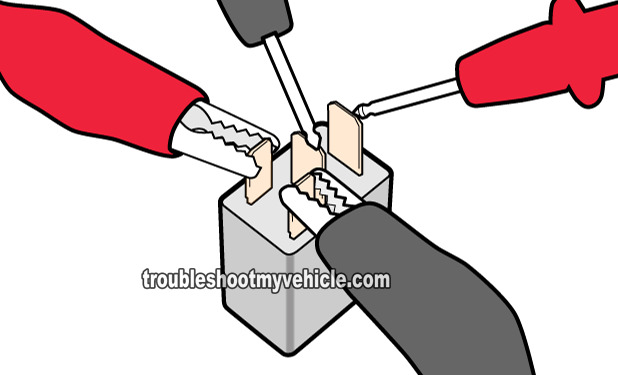
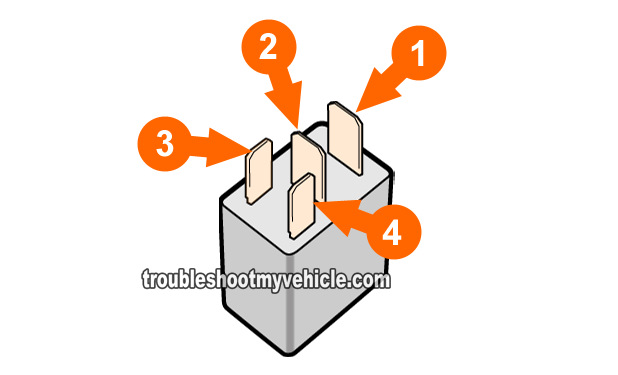
If you still have doubts that the radiator fan relay is good, you can bench-test it by manually applying power and Ground to it and seeing if circuit #1 and #2 show continuity (as tested with a multimeter).
Image 1 of 3 and image 2 of 3, in the image viewer, are an actual example of how your jumper wire and multimeter test lead connections should look like.
NOTE: The power and Ground source that you'll be using is your Honda's car battery.
These are the test steps:
- 1
Connect male spade terminal #4 to Ground, using one of your jumper wires.
- 2
Connect male spade terminal #3 to the battery's positive (+) terminal. This will energize and activate the relay. This can be confirmed by the audible click the radiator fan relay will make.
- 3
Measure the resistance across the relay's terminals #1 and #2 with your multimeter in Ohms mode (as seen in the photo).
- 4
Your multimeter should show continuity. If it doesn't show continuity, recheck all your connections and retest.
- 5
Remove and reconnect the jumper wire to terminal #3 several times, as you eye-ball the multimeter.
When the jumper wire IS NOT connected to power, the multimeter should show NO CONTINUITY.
When the jumper wire is connected to power, the multimeter should show continuity.
Let's examine your test results:
CASE 1: Your multimeter showed continuity. This test result tells you that the radiator fan relay is good.
CASE 2: Your multimeter DID NOT show continuity. Recheck all of your test connections and retest. If your multimeter still doesn't show continuity, then the radiator fan relay is fried and needs to be replaced.
More Honda Accord Tutorials
You can find a pretty big list of Honda Accord tutorials in this index: Honda 2.2L, 2.3L Index Of Articles.
Here's a small sample of the tutorials you'll find in the index:
- How To Test The Radiator Fan Motor (Honda 2.2L, 2.3L).
- How To Avoid A Blown Head Gasket (Honda 2.2L, 2.3L).
- How To Test For A Blown Head Gasket (Honda 2.2L, 2.3L).
- How To Test For A Broken Timing Belt (Honda 2.2L, 2.3L).
- How To Test The Igniter, Ignition Coil Accord, Civic, CRV, and Odyssey (at: easyautodiagnostics.com).

If this info saved the day, buy me a beer!