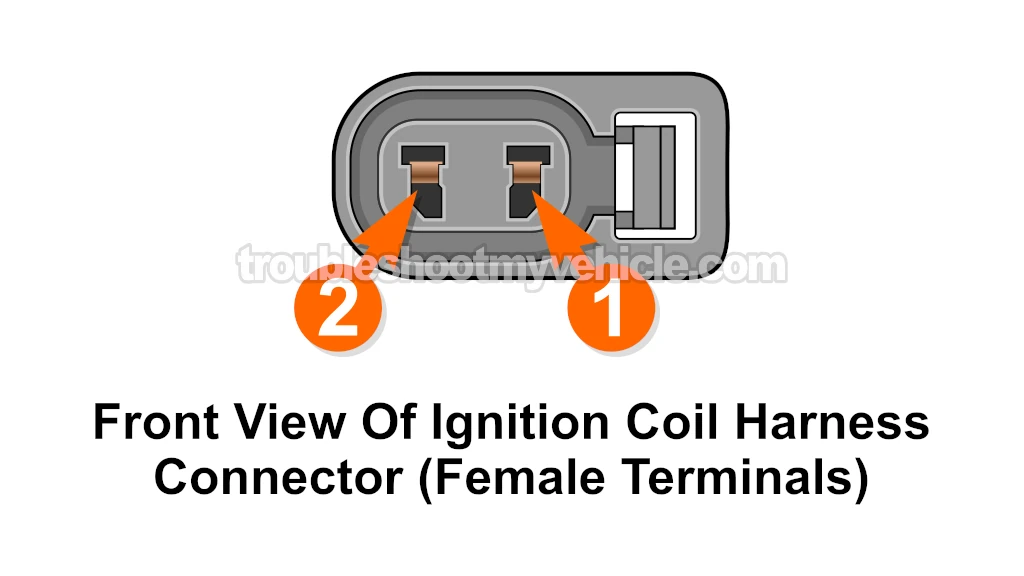
TEST 3: Making Sure The Ignition Coil Is Getting Its Activation Signal

Besides 10 to 12 Volts, the ignition coil receives an activation signal. This activation signal comes from the igniter (ignition control module).
It's not uncommon for the igniter to fail, and when it does, it stops sending an activation signal to the COP ignition coil.
The cool thing is that you and I can easily check if the ignition coil is receiving this activation signal with a 12 Volt automotive test light.
These are the test steps:
- 1
Disconnect the ignition coil from its connector.
- 2
Connect the crocodile clip of the 12V test light to the battery positive (+) terminal.
- 3
Gently probe the terminal of the connector labeled with the number 2.
Depending on the ignition coil you're testing, terminal 2 will correspond to the following wires:- Coil #1: Blue with black stripe (BLU/BLK) or blue (BLU).
- Coil #2: Grey (GRY).
- Coil #3: White (WHT).
- Coil #4: Green (GRN).
- Coil #5: Light Green with black stripe (LT GRN/BLK).
- Coil #6: Pink (PNK).
- 4
Have your helper crank up the engine as you observe the 12V test light.
- 5
The 12V test light should flash ON and OFF the whole time the engine is cranking and running.
Let's take a look at what your test results mean:
CASE 1: The test light flashed ON and OFF. This is the correct and expected test result and confirms the ignition coil is receiving an activation signal.
You can conclude that the ignition coil is bad and needs to be replaced if you have confirmed:
- The ignition coil is not sparking (TEST 1).
- The ignition coil is getting power (TEST 2).
- The ignition coil is receiving its activation signal (this test section).
CASE 2: The test light DID NOT flash ON and OFF. This let's you know that the ignition coil is not getting an activation signal from the igniter.
Without an activation signal, the ignition coil is not gonna spark, therefore, you can conclude that the ignition coil itself is not bad.
The most likely cause of this missing activation signal is a malfunctioning igniter (ignition control module). Your next step is to test the igniter.
Identifying The Cylinders

The illustration above will help you ID what cylinder the ignition coil you're testing belongs to. The list below will help you identify the color of the wire that delivers the coil's activation signal to it:
- Ign. Coil -Cylinder #1: Blue with black stripe (BLU/BLK) or blue (BLU).
- Ign. Coil -Cylinder #2: Grey (GRY).
- Ign. Coil -Cylinder #3: White (WHT).
- Ign. Coil -Cylinder #4: Green (GRN).
- Ign. Coil -Cylinder #5: Light Green with black stripe (LT GRN/BLK).
- Ign. Coil -Cylinder #6: Pink (PNK).
More 3.0L Toyota Camry Tutorials
You can find a complete list of 3.0L Toyota Camry tutorials and wiring diagrams in this index:
Here's a sample of the tutorials you'll find there:
- How To Test Engine Compression (1992-2006 3.0L V6 Toyota Camry).
- How To Test For A Blown Head Gasket (1992-2006 3.0L V6 Toyota Camry).
- How To Test The TPS (1997-2001 3.0L V6 Toyota Camry).
- How To Test The MAF Sensor (1997-2001 3.0L V6 Toyota Camry).

If this info saved the day, buy me a beer!

