")
Testing the crankshaft position (CKP) sensor on your 1996-2000 3.0L V6 (OHV) Ford Taurus or Mercury Sable is pretty easy and the best part of all is that you don't need any expensive diagnostic equipment to do so.
In this tutorial, I'm going to show you how to test it using only a multimeter we'll be checking two things the sensors internal resistance to see if it has suffered an an internal open-circuit or short-circuit issue and will be checking it's signal output with the engine cranking.
The results of your test will let you know if the CKP sensor is toast and causing the engine to not start due to a lack of spark.
Contents of this tutorial:
APPLIES TO: This tutorial applies to the following vehicles:
- 3.0L V6 (OHV) Ford Taurus: 1996, 1997, 1998, 1999.
- 3.0L V6 (OHV) Mercury Sable: 1996, 1997, 1998, 1999.
CKP SENSOR CIRCUIT WIRING DIAGRAM:
IGNITION COIL PACK TESTS:
2000-2006 CKP SENSOR TESTS:
ENGINE NO-START DIAGNOSTICS:
Important Tips And Suggestions
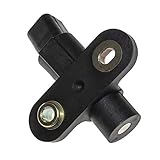
TIP 1: The CKP sensor is located right behind the crankshaft pulley, since the sensor's reluctor wheel is behind (and part of) the crank pulley.
TIP 2: This is an on-car test of the CKP sensor, and one of the checks we're going to do requires measuring its output signal with the engine cranking. To get the most accurate test result, it's super important that your Ford Taurus or Mercury Sable's battery be fully charged. So if the battery is low, be sure to charge it up completely before beginning the CKP sensor output test in TEST 2.
TIP 3: If you do need to remove the CKP sensor from its place behind the crankshaft pulley, you'll need to raise the vehicle to access it. Be sure to use jack stands, and wear safety glasses to keep dirt and debris from falling into your eyes. Never trust the jack alone to keep the vehicle up in the air.
TIP 4: If you're diagnosing an intermittent no-start issue —where the engine runs but stalls, or refuses to start every now and then— keep in mind that as long as the engine starts, the CKP sensor is doing its job. The tests in this tutorial won't help with that type of problem. You'll need to test the CKP sensor during the moment the engine isn't starting to find out if it's good or bad.
Symptoms Of A Bad CKP Sensor
The crankshaft position sensor on your 3.0L V6 Ford Taurus or Mercury Sable is the component the PCM relies on to activate the ignition coil pack and to trigger the fuel injectors so the engine can start and keep it running.
When this sensor fails, you'll usually run into one or more of the following symptoms:
- The engine cranks but does not start.
- The engine stalls out of the blue while driving and restarts after it's cooled down.
- Extended engine cranking especially when the engine is hot.
- The engine misfires or runs rough.
- Check engine light is illuminated with CKP sensor related codes.
How Does The Crank Sensor Work
")
The CKP sensor on your 3.0L V6 Ford Taurus or Mercury Sable is a two-wire reluctor-type position sensor. Ford calls it a magnetic transducer type.
For our testing purposes, what this is telling us —in plain English— is that the sensor creates its own A/C voltage signal without needing an external power source. In a nutshell, this is how it works:
- As your turn the key and crank the engine, the trigger wheel mounted on behind the front crankshaft pulley starts to rotate.
- The trigger wheel has a total of 35 teeth spaced 10 degrees apart, with one empty space for a missing tooth.
- As this trigger wheel's teeth pass under the crank sensor, they induce the crank sensor to create an A/C voltage. This A/C voltage signal is sent directly to the powertrain control module (PCM).
- When the PCM receives the CKP sensor signal, it knows the engine is turning over, and it now starts activating the coil pack (to fire) spark and the injectors (to begin spraying fuel into their cylinders).
- The primary indicator of the crankshaft speed and piston position is the missing teeth on the trigger wheel.
The key thing to remember from this basic operating theory section is that the powertrain control module (PCM) needs the CKP sensor signal to activate the ignition coil pack and the fuel injectors. And if your vehicle is equipped with a tachometer, it uses the CKP sensor to activate it too.
So the bottom line is this: if the CKP sensor fails on your Ford Taurus or Mercury Sable, it's not going to start due to a lack of spark and fuel.
INTERMITTENT ENGINE NO-START: Now, before you head into the tests, it's important to note that the CKP sensor can fail intermittently. In other words, it works fine most of the time, but every now and then it stops working and the engine won't start. If you're diagnosing an intermittent no-start problem, it's important that you perform your tests while the engine isn't starting. Otherwise, if even just one spark plug wire sparks or the engine starts, the CKP sensor is functioning at that specific moment in time.
Where To Buy The CKP Sensor And Save
When you're ready to replace the crankshaft position (CKP) sensor on your 1996–1999 3.0L OHV Ford Taurus or Mercury Sable, these are the ones I recommend. They're from trusted automotive brands I've used throughout my entire repair career, and I don't hesitate to recommend them:

Disclosure: As an Amazon Associate, I earn from qualifying purchases. If my tutorials help you, using these links is an easy way to support the site at no extra cost to you. Thank you!
NOTE: Not sure if the CKP sensor fits your particular Taurus or Sable? Don't worry, once you get to the site they'll make sure it fits by asking you the specifics of your particular Ford vehicle. If it doesn't fit, they'll find you the right CKP sensor.
TEST 1: Checking The CKP Sensor's Resistance
")
To begin our CKP sensor diagnostic, we're going to check its internal resistance to see if it has suffered an internal short-circuit or open-circuit problem.
Now, since the CKP sensor is located behind the crankshaft pulley, checking its internal resistance at that specific location isn't possible —we'd have to remove it to test it. Instead of removing the sensor, we're going to disconnect the Powertrain Control Module's 104-pin connector and check its resistance from there.
Before you start the test, I want to point out that this is a super easy check to do, but there are a few precautions you need to take. Mainly, you've got to use the correct testing probes when inserting them into the PCM connector to measure the CKP sensor's resistance and its circuit. So before you begin, be sure to take a look at this guide: How To Safely Probe The PCM Connector -Without Damaging It (1991-2007 3.0L V6 Ford Taurus, Mercury Sable).
If the CKP sensor itself is OK —and the wiring between it and the PCM connector is intact —you should see a resistance between 300 and 800 Ohms on your multimeter.
NOTE: If you don't have a multimeter or you're wanting to upgrade to one you've got, this is the one that I use and recommend: Tekpower TP8268 AC/DC Auto/Manual Range Digital Multimeter (Amazon affiliate link).
All right, let's get started:
- 1
Disconnect the battery's negative cable.
NOTE: This step is important. Don't move on to the next step without first disconnecting the negative battery cable from the battery. - 2
Disconnect the PCM from its 104-pin connector.
- 3
Locate PCM pins 21 and 22. You can use the PCM connector pinout above to identify the correct terminals.
- 4
Set your multimeter to Ohms mode.
- 5
Measure the resistance across pins 21 and 22.
- 6
Your multimeter should read between 300 and 800 Ohms.
Let's figure out what your test result means:
CASE 1: The multimeter reports the specified resistance values. This is the correct and expected test result, and it tells you that the CKP sensor itself and its wiring are OK —no short-circuit or open-circuit issues.
Our final test is to check, with the multimeter, that the CKP sensor is producing an actual AC voltage signal. For this test, go to: TEST 2: Checking The CKP Sensor's AC Voltage Output.
CASE 2: Your multimeter does NOT report the specified resistance value. This result lets you know there's an issue with either the CKP sensor itself or the wiring between the CKP sensor and the PCM connector.
Your next step is to visually inspect the CKP sensor connector. One of the most common problems with this connector is the insulation peeling off, causing the two wires to short together right where they enter the connector.
If, after inspecting the 2-wire CKP connector, everything looks OK —the connector's intact and the wires aren't shorted— your next step is to remove the CKP sensor from its place and check its resistance directly at the sensor's male terminals.
If the sensor's resistance is still not within the specified 300 to 800 Ohms, the CKP sensor is toast and needs to be replaced. If that's the case, these are the ones I would recommend:
- Walker Products 235-1130 Engine Crankshaft Position Sensor (Amazon affiliate link).
- Motorcraft - DY918 CKP Sensor (Amazon affiliate link).
In my experience, the most common reasons the resistance falls outside the specified range are: a damaged connector, wires shorted together because the insulation peeled off, or the sensor itself has failed.
TEST 2: Checking The CKP Sensor's AC Voltage Output
Now that we've confirmed the CKP sensor itself and its wiring are OK —meaning no electrical open-circuit or short-circuit issues— we're going to check the CKP sensor in action.
Specifically, we're going to crank the engine and use our multimeter to see if the CKP sensor is producing an AC voltage between 0.4 and 1 Volts AC.
This is going to be a fluctuating AC signal. You're not going to see a constant voltage value —it'll move up and down as the engine is cranking.
Another important thing to keep in mind is that the CKP sensor's voltage output depends on how fast the engine is turning over while the starter motor is cranking it. This is why it's super important to perform this test with a fully charged battery. If the battery is weak or low, be sure to charge it completely before running this test.
Alright, let's get the ball rolling:
- 1
Reconnect the battery's negative (-) cable.
- 2
Connect your multimeter test leads to female terminals 21 and 22 of the 104-pin PCM connector.
NOTE: It doesn't matter which multimeter test lead goes where, since polarity does not matter. The important thing to keep in mind is to use the appropriate probes to avoid damaging the female terminals of the PCM connector. - 3
Set your multimeter to Volts AC mode.
- 4
Have your helper crank the engine while you watch the multimeter.
- 5
Your multimeter should show an AC voltage that fluctuates between 0.4 and 1 Volts AC.
NOTE: You'll only see this AC voltage fluctuating between 0.4 and 1 Volts AC while the engine is cranking. When the engine isn't cranking, you should see 0 Volts AC.
Let's see what your test result is telling us:
CASE 1: The multimeter indicated the specified AC voltage as the engine was cranking. This is the correct and expected test result, and it tells you the CKP sensor is doing its job.
You can rule out the CKP sensor as the cause of the engine no-start issue —especially now that we've confirmed its internal resistance is within the specified 300 to 800 Ohms, and in this test section, we've confirmed the sensor is producing an AC voltage signal that's actually reaching the PCM.
CASE 2: The sensor is NOT generating the specified AC voltage while cranking the engine. This test result lets you know the CKP sensor is toast and needs to be replaced. Replacing the CKP sensor will get the engine started and running again.
When it comes time to replacing the CKP sensor on your Ford Taurus or Mercury Sable, I want to recommend the following sensors from known automotive brands I've used throughout my entire automotive repair career:
- Walker Products 235-1130 Engine Crankshaft Position Sensor (Amazon affiliate link).
- Motorcraft - DY918 CKP Sensor (Amazon affiliate link).
More 3.0L V6 Ford Taurus And Mercury Sable Tutorials
You can find a complete list of diagnostics tutorials and wiring diagrams for the 3.0L V6 Ford Taurus and Mercury Sable in this index:
Here's a small sample of the tutorials you'll find:
- How To Test The MAF Sensor (1996-1999 3.0L V6 Ford Taurus, Mercury Sable).
- How To Test The TPS With A Multimeter (1996-2007 3.0L V6 Ford Taurus, Mercury Sable).
- How To Test For A Blown Head Gasket (1990-2007 3.0L V6 Ford Taurus, Mercury Sable).
- How To Do And Interpret An Engine Compression Test (1990-2007 3.0L V6 Ford Taurus, Mercury Sable).

If this info saved the day, buy me a beer!
