TEST 4: Checking The Ignition Coil Tower For Spark

The previous two spark tests have confirmed the following:
- In TEST 1, none of the spark plug wires are sparking.
- In TEST 3, you confirmed that the ignition coil's high-tension wire isn't delivering spark to the center of the distributor cap.
For our next ignition system diagnostic test, we're going to place the spark tester directly on the ignition coil's tower to check it for spark.
We can expect one of two results:
- The tower sparks: This tells us the ignition coil itself is OK and is producing spark, but the ignition coil's high-tension wire is toast and not transmitting the spark to the distributor cap.
- The tower doesn't spark: In this case, we need to keep testing —the next step is to make sure the ignition coil is getting power, which we'll do in TEST 5.
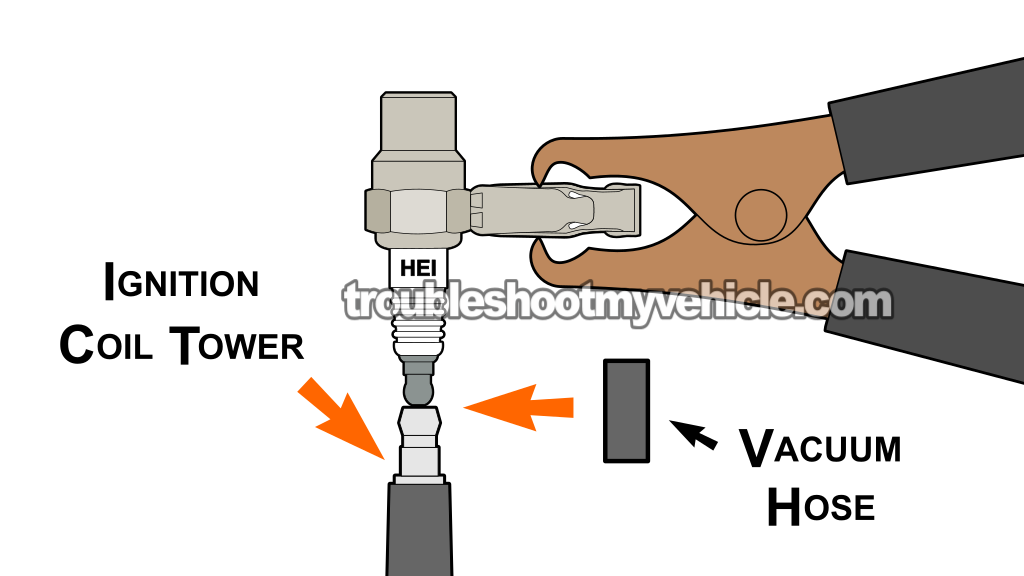
This is a simple test to perform, but you'll need a small piece of vacuum hose to attach the spark tester to the metal terminal on the ignition coil's tower. The vacuum hose helps keep the spark tester in place and ensures solid metal-to-metal contact while cranking the engine.
Alright, let's get going:
- 1
Disconnect the high tension wire from the ignition coil tower.
- 2
Attach the spark tester to the ignition coil tower using a small piece of vacuum hose (see the illustration above).
NOTE: The vacuum hose must be short enough so that both the HEI spark tester and the ignition coil tower can make metal to metal contact. - 3
Connect the spark tester to the battery negative (-) terminal using a battery jump start cable.
- 4
Have your helper crank the engine while you observe the spark tester from a safe distance.
- 5
You'll get one of two results:
1.) The spark tester will spark.
2.) The spark tester will NOT spark.
Let's interpret your spark test result:
CASE 1: The ignition coil tower sparks. This spark test result tells us several important things:
- The ignition coil itself is good, and both the ignition control module (ICM) and the Profile Ignition Pickup (PIP) sensor are OK and doing their job.
- The high-tension wire that connects the ignition coil to the center of the distributor cap —which transmits the ignition coil's spark to the cap— is bad.
To fix the no-spark, no-start problem on your Ford Taurus or Mercury Sable, replace all of the spark plug wires with a new set.
NOTE: It's standard procedure in this situation to also replace the distributor cap, rotor, and spark plugs as part of a full tune-up.
CASE 2: The ignition coil tower does not spark. This test result tells us that the ignition coil's high-tension wire itself is not the cause of the engine's no-start problem.
For our next ignition system diagnostic test, we need to make sure the ignition coil is getting power (10 to 12 Volts). For this test, go to: TEST 5: Making Sure The Ignition Coil Is Getting Power.
TEST 5: Making Sure The Ignition Coil Is Getting Power

Now that you've confirmed the ignition coil itself isn't sparking in TEST 4, our next step is to make sure the red with light green stripe (RED/LT GRN) wire of its connector is delivering battery voltage when the key is in either the RUN or START position.
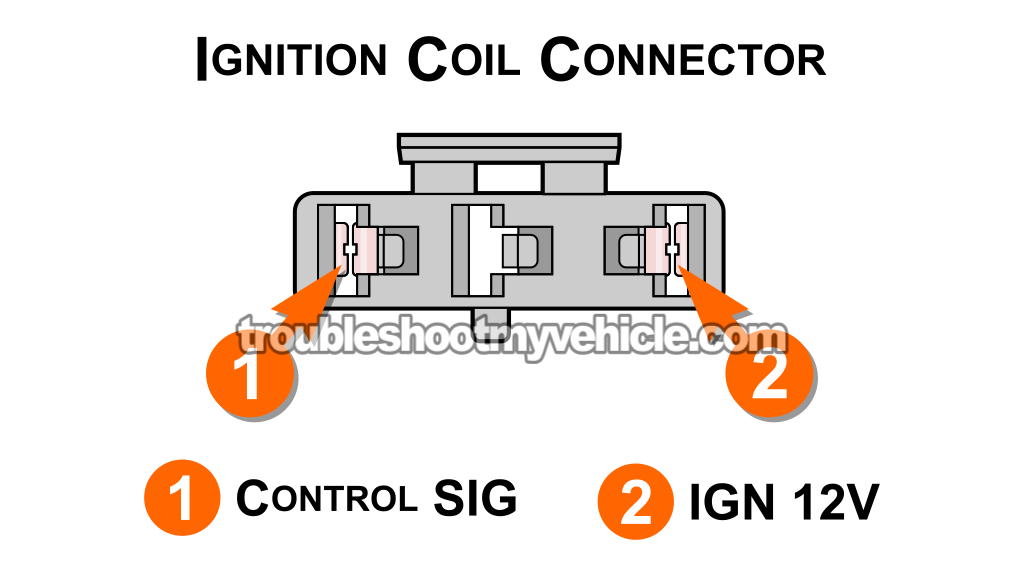
The RED/LT GRN wire connects to female terminal 2 of the ignition coil's electrical connector (see the connector pinout illustration above to identify the terminal).
For this specific test, we'll check for battery voltage at terminal 2 with the key in the RUN position and the engine OFF. If power is present at terminal 2, we'll move on to TEST 6, which checks for the ignition coil's activation signal.
Alright, here we go:
- 1
Disconnect the ignition coil connector from the ignition coil.
- 2
Place your multimeter Volts DC mode.
- 3
Connect the black multimeter test lead to the battery negative (-) post.
- 4
Turn the key to the ON position but don't start the engine.
- 5
With the red multimeter test lead, probe female terminal 2 of the connector.
NOTE: Double-check that terminal 2 corresponds to the RED/LT GRN wire. - 6
Your multimeter should read 10 to 12 Volts DC.
Let's interpret your test result:
CASE 1: The ignition coil is getting power. This is the correct and expected test result.
Now that we've confirmed the RED/LT GRN wire is delivering battery voltage to the ignition coil, our next diagnostic step is to see if the ignition control module is activating the ignition coil to spark. For this test, head over to: TEST 6: Making Sure The Ignition Coil Is Getting An Activation Signal.
CASE 2: The ignition coil IS NOT getting battery power. Without this voltage, the ignition coil can't produce the spark the engine needs to start.
Your next step is to find out why voltage is missing from the RED/LT GRN wire and restore battery power to it. Once the ignition coil receives power, it'll function properly and the engine should start. The following wiring diagrams will help you with this issue:
TEST 6: Making Sure The Ignition Coil Is Getting An Activation Signal

If you're about to start this section, then you've already confirmed all of the following:
- TEST 1 —All six spark plug wires are not sparking.
- TEST 3 —The ignition coil's high-tension wire isn't delivering spark to the distributor cap.
- TEST 4 —The ignition coil's tower does not spark.
- TEST 5 —The red with light green stripe wire (RED/LT GRN) is supplying power to the ignition coil.
With all of these basic checks done, our next step is to see if the ignition control module is actually activating the ignition coil to spark.
This activation signal is delivered to the ignition coil through the following wire (of the ignition coil's connector):
- 1990: Dark green with yellow stripe (DK GRN/YEL) wire.
- 1991-1995: Tan with yellow stripe (TAN/YEL) wire.
You and I can easily check for the presence of this activation signal using a 12-Volt incandescent automotive test light. If you don't have one and need to buy it, this is the one I use and recommend —and you can get it here: Lisle 28400 Heavy Duty 12 Volt Test Light (Amazon affiliate link).
Let's get this pot of water boiling:
- 1
Disconnect the ignition coil from its electrical connector.
- 2
Connect the test light's crocodile clip to the battery positive (+) terminal.
- 3
With the metal point of the 12 Volt test light, back-probe terminal 1 of the connector.
Confirm that either a TAN/YEL (1991-1995) or a DK GRN/YEL (1990) wire connects to terminal 1 of the connector. - 4
Have your helper crank the engine while you observe the 12 Volt test light.
- 5
You'll see one of two things:
1.) The 12 Volt test light flashes ON and OFF.
2.) The 12 Volt test light DOES NOT flash ON and OFF.
NOTE: Don't worry about what the test light does before cranking the engine. What matters is whether the test light flashes ON and OFF while the engine's being cranked.
Let's find out what it all means:
CASE 1: The test light flashed ON and OFF. This lets us know that the ignition control module is actively trying to get the ignition coil to fire spark.
We can now conclude that the ignition coil itself is fried and needs to be replaced only if the following is true:
- All six spark plug wires do not spark (TEST 1).
- The ignition coil's high-tension wire isn't sparking (TEST 3).
- No spark from the ignition coil tower (TEST 4).
- The ignition coil's getting 10 to 12 Volts (TEST 5).
- The ICM is activating the ignition coil (this test section.
CASE 2: The 12V test light did not flash ON and OFF while cranking the engine. Without an activation signal from the ignition control module, the ignition coil isn't going to spark. We can now rule out the ignition coil itself as the cause of the engine no-start problem.
This missing ignition coil activation signal is usually caused by one of two things:
- The ignition control module (ICM) itself is bad.
- The profile ignition pickup (PIP) sensor in the distributor is toast.
The cool thing is, we can easily check if either of these two components is bad. Your next diagnostic step is to check the ICM. I've written a tutorial that'll walk you through this step by step, and you can find it here: How To Test The Ignition Control Module (1990-1995 3.0L V6 Ford Taurus, Mercury Sable).
More 3.0L V6 Ford Taurus Diagnostic Tutorials
You can find a complete list of diagnostics tutorials for the 3.0L V6 Taurus and Mercury Sable in this index:
Here's a small sample of the tutorials you'll find in the index:
- How To Test The MAF Sensor (1991-1995 3.0L V6 Ford Taurus, Mercury Sable).
- How To Test The Fuel Pump (1990-1999 3.0L V6 Ford Taurus, Mercury Sable).
- How To Test The TPS With A Multimeter (1991-1995 3.0L V6 Ford Taurus, Mercury Sable).
- How To Test For A Blown Head Gasket (1990-2007 3.0L V6 Ford Taurus, Mercury Sable).

If this info saved the day, buy me a beer!

